POWERTEC BS900
POWERTEC BS900 9-Inch Benchtop Bandsaw Instruction Manual
Модел: БС900
1. Увод
This manual provides essential instructions for the safe operation, maintenance, and setup of your POWERTEC BS900 9-Inch Benchtop Bandsaw. Please read this manual thoroughly before operating the tool to ensure proper usage and to prevent injury or damage.
The POWERTEC BS900 is designed for precision cutting, shaping irregular forms, and ripping lumber in woodworking applications.
2. Безбедносне информације
Увек дајте приоритет безбедности при раду са електричним алатима. Непоштовање безбедносних упутстава може довести до озбиљних повреда.
- Носите одговарајућу личну заштитну опрему (ЛЗО), укључујући заштитне наочаре, заштиту за уши и рукавице.
- Уверите се да је радни простор чист, добро осветљен и без препрека.
- Keep hands clear of the blade at all times. Use push sticks or blocks when necessary.
- Искључите напајање пре него што извршите било какво одржавање, подешавање или замену сечива.
- Do not operate the bandsaw if any parts are damaged or missing.
- Avoid using a miter gauge and rip fence simultaneously, as this can cause kickback.
УПОЗОРЕЊЕ: Рак и репродуктивна штета - ввв.П65Варнингс.ца.гов
УПОЗОРЕЊЕ: Бушење, тестерисање, брушење или машинска обрада производа од дрвета могу вас изложити дрвној прашини, супстанци за коју је држава Калифорнија позната да изазива рак. Избегавајте удисање дрвене прашине или користите маску за прашину или друге заштитне мере за личну заштиту. За више информација идите на ввв.П65Варнингс.ца.гов/воод
3. Компоненте производа
The POWERTEC BS900 Benchtop Bandsaw includes the following main components:
- Bandsaw Unit (110 Volt, 9-inch)
- Митре Гауге
- 1/4-inch x 62-inch Bandsaw Blade
- Aluminum Die Cast Table (11-3/4-inch x 11-3/4-inch)
- 2-inch Dust Port

Слика 3.1: Готовоview of the POWERTEC BS900 9-Inch Benchtop Bandsaw with its main components visible.
4. Подешавање
4.1 Почетна монтажа
The bandsaw comes mostly assembled. Attach the table and handle as per the included quick start guide. Ensure all fasteners are secure before proceeding.
4.2 Blade Installation and Tension Adjustment
Proper blade installation and tension are crucial for safe and accurate cutting.
- Искључите напајање: Always unplug the bandsaw before any adjustments or maintenance.
- Отворени корице: Отворите горњи и доњи поклопац точкова.
- Ослободите напетост: Turn the blade tension knob counter-clockwise to release tension.
- Remove Table and Lower Guide: Remove the aluminum table and lower the blade guide completely using the adjusting knob.
- Прегледајте сечиво: Before installing a new blade, carefully check it for any defects or damage. Use a new blade if any signs of damage are present.
- Инсталирајте блејд: Carefully place the blade around the upper and lower wheels. Ensure the blade teeth point downwards towards the table.
- Примени напетост: Turn the blade tension knob clockwise to apply tension. The bandsaw automatically adjusts blade tension, but fine-tuning may be performed.
- Lock Tension: Lock the replacement blade in place by turning the blade tension lever back.
Видео 4.2.1: This video demonstrates the process of replacing the bandsaw blade, including inspecting the blade for defects and correctly installing it with teeth pointing downwards. It also shows how to lock the blade tension lever.
Видео 4.2.2: This video illustrates how to adjust the blade tension. It shows turning the tension knob clockwise to add tension and demonstrates checking for proper tension by pressing the blade, allowing for approximately 3/8 inch (1 cm) of movement.
4.3 Подешавање праћења сечива
Correct blade tracking ensures the blade runs centered on the wheels, preventing wear and improving cut quality.
- Укључено: Plug in the bandsaw.
- Manual Rotation: Manually rotate the drive wheel clockwise and observe the blade movement.
- Adjust Tracking: If the blade tilts to one side, adjust the tracking control knob until the blade is centered on the wheels.
Видео 4.3.1: This video demonstrates how to adjust the blade tracking on the POWERTEC BS900 bandsaw. It shows manually rotating the drive wheel to observe blade movement and then adjusting the tracking control knob to center the blade on the wheels.
4.4 Подешавање вођице сечива
The blade guides prevent the blade from twisting during cuts. They must be properly spaced from the blade.
- Проверите клиренс: After tracking and tension are adjusted, ensure the blade has no contact with the upper or lower blade guides.
- Set Spacing: The blade guides should sit approximately 0.016 inches away from the blade. A folded dollar bill (folded twice) can be used as a gauge to achieve this spacing.
- Secure Guides: Tighten the guide pins or bearings to secure the spacing.
Видео 4.4.1: This video demonstrates how to adjust the blade guides. It shows checking for blade contact with the guides and using a folded dollar bill to set the correct 0.016-inch spacing between the blade and the guide pins/bearings.
5. Упутство за употребу
5.1 Основни рад
Ensure all setup steps are completed before operating the bandsaw.
- Укључивање/искључивање: Use the red/yellow power switch located on the side of the unit to turn the bandsaw on or off.
- Постављање радног комада: Place the workpiece firmly on the aluminum table.
- Брзина протока: Feed the workpiece into the blade at a consistent, moderate rate. Do not force the material.

Слика 5.1.1: Close-up of the power switch on the POWERTEC BS900 bandsaw, showing the red and yellow buttons for operation.

Слика 5.1.2: A user operating the POWERTEC BS900 bandsaw to cut a piece of wood, demonstrating proper hand placement and material feeding.
5.2 Технике сечења
The BS900 bandsaw supports various cutting operations:
- Straight Sawing (Rip Fence): Use the rip fence for straight cuts.
- Angled Cutting (Miter Gauge): The miter gauge allows for precise angled cuts.
- Contour Cutting: Guide the workpiece free-handed for cutting irregular shapes.
- Beveled Cutting: Tilt the saw table to the desired degree for beveled cuts.
Видео 5.2.1: This video demonstrates various cutting techniques using the POWERTEC BS900 bandsaw, including straight sawing with a rip fence, angled cuts with a miter gauge, contour cutting for irregular shapes, and beveled cutting by tilting the table.
CAUTION: Do not use a miter gauge and rip fence at the same time. This can cause the blade to bind, potentially injuring the operator or damaging the workpiece.
6. Одржавање
6.1 Чишћење
Regular cleaning extends the life of your bandsaw and ensures optimal performance.
- Сакупљање прашине: Connect a shop vacuum to the 2-inch dust port to keep the workspace clear of dust and debris during operation.
- Post-Operation Cleaning: After each use, unplug the machine and use a brush or compressed air to remove sawdust from the blade, guides, and internal components.

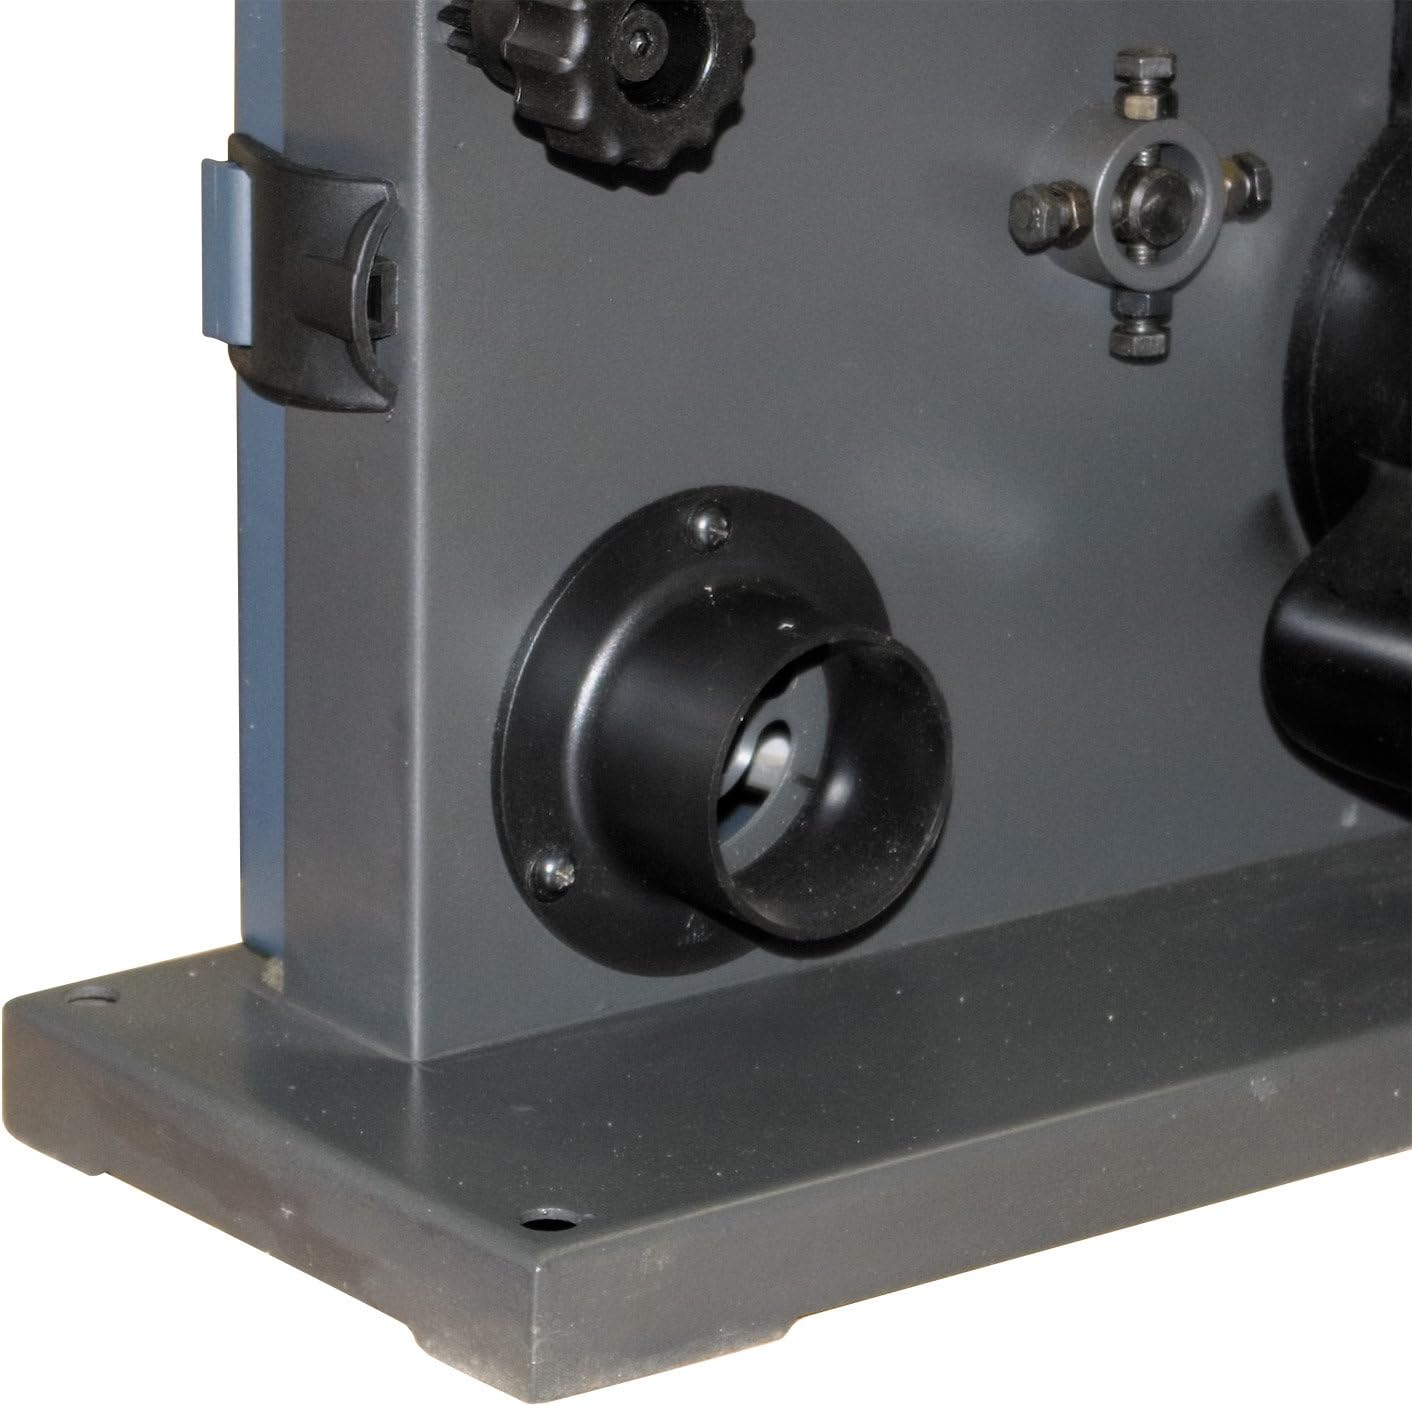
Слика 6.1.1: Close-up of the 2-inch dust port on the POWERTEC BS900 bandsaw, designed for connecting to a shop vacuum for efficient dust collection.
6.2 Замена оштрице
Refer to Section 4.2 for detailed instructions on blade replacement. Always use the correct blade size (62-inch length, 1/8 to 3/8-inch width) for your POWERTEC BS900 bandsaw.
КСНУМКС. Решавање проблема
Овај одељак се бави уобичајеним проблемима на које можете наићи са својом трачном тестером.
| Проблем | Могући узрок | Решење |
|---|---|---|
| Blade not tracking correctly | Incorrect blade tracking adjustment | Refer to Section 4.3 for blade tracking adjustment. |
| Blade binding or poor cut quality | Incorrect blade tension, dull blade, or improper blade guide spacing | Check blade tension (Section 4.2), replace dull blade, and adjust blade guides (Section 4.4). |
| Прекомерне вибрације или бука | Loose components, worn blade, or improper setup | Ensure all components are tightened. Inspect and replace the blade if worn. Re-check blade tension and tracking. |
| Мотор се не покреће | No power, faulty switch, or motor issue | Check power connection. Ensure the power switch is fully engaged. If issues persist, contact customer support. |
8. Спецификације
| Феатуре | Спецификација |
|---|---|
| Модел | БС900 |
| Ampераге | 2.5 Amps |
| РПМ | 1725 РПМ |
| Бладе Сизе | 62-Inch x 1/8-Inch to 3/8-Inch |
| Капацитет грла | 9-Inch Max. |
| Max. Depth of Cut (90°) | 3-5/8-инча |
| Max. Depth of Cut (45°) | 2-инчни |
| Табле Сизе | 11-3/4-Inch x 11-3/4-Inch (Aluminum Die Cast) |
| Дуст Порт | 2-инчни |
| Тежина артикла | 42.1 фунти |
| Волtage | 110 Волтс |
9. Гаранција и подршка
The POWERTEC BS900 9-Inch Benchtop Bandsaw comes with a 1-year warranty. For warranty claims, technical support, or replacement parts, please contact POWERTEC customer service.

Слика 9.1: POWERTEC offers a 1-year warranty and guarantees satisfaction for their products.
Visit the official POWERTEC webсајт или погледајте документацију о куповини за контакт информације.
Ask a question about this manual
Ask about setup, troubleshooting, compatibility, parts, safety, or missing instructions. Manuals+ will review the question and use this page’s manual context to help answer it.