
1. Увод
This manual provides detailed instructions for the installation, setup, operation, and maintenance of the Intermatic FM1D20A-24 Electronic 24-Hour/7-Day Timer Module. Please read this manual thoroughly before attempting to install or operate the device to ensure proper function and safety.
2. Безбедносне информације
УПОЗОРЕЊЕ: Risk of electric shock. Installation and servicing of this device should be performed by qualified personnel only. Disconnect power at the circuit breaker or fuse before installing or servicing. Follow all national and local electrical codes.
- Уверите се да напајање одговара јачини звука уређајаtagЕлектрична напетост (24V).
- Do not exceed the maximum current rating of 16A.
- Држите уређај даље од влаге и екстремних температура.
- Не покушавајте сами да отворите или поправите уређај. Обратите се квалификованом сервисеру.
3. Садржај пакета
Проверите да ли су све компоненте присутне приликом распакивања:
- 1 x Intermatic FM1D20A-24 Electronic 24-Hour/7-Day Timer Module
4. Производ је готовview
The Intermatic FM1D20A-24 is an electronic timer module designed for precise 24-hour and 7-day scheduling. It features a digital display and intuitive controls for programming up to 20 ON/OFF operations.
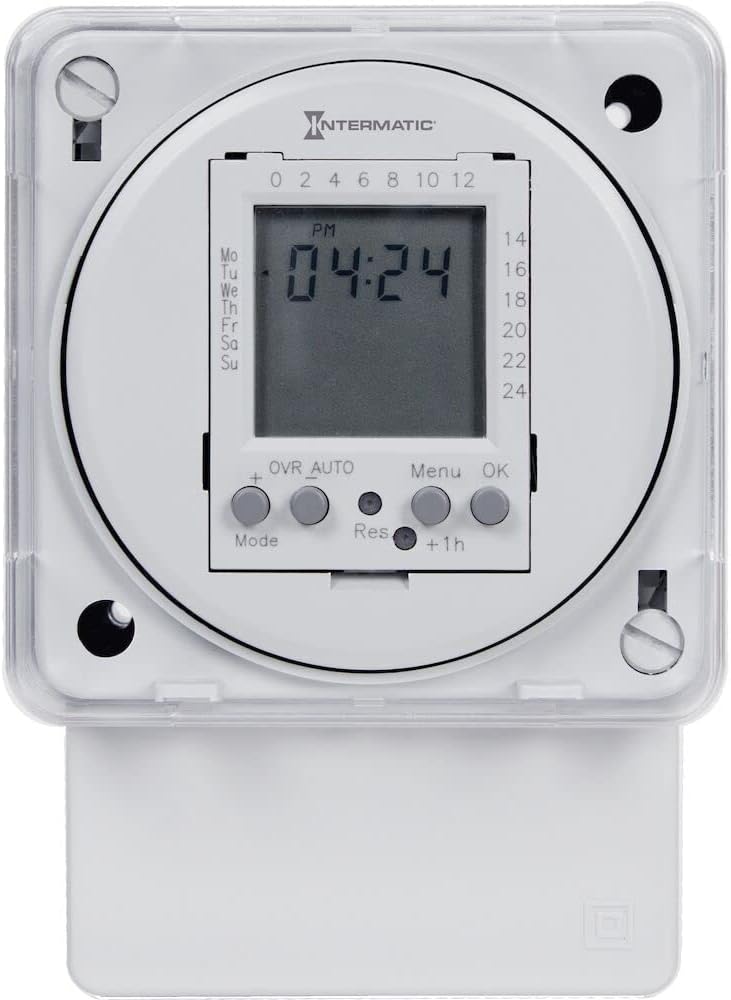
Слика 1: Фронт view of the Intermatic FM1D20A-24 Timer Module, showing the digital display and control buttons.

Слика 2: Цлосе-уп view of the timer module's display, indicating current time and day, along with the 'Mode', '+', 'OVR AUTO', 'Res', 'Menu', 'OK', and '+1h' buttons.

Слика 3: Сиде view of the timer module, illustrating its compact design and potential mounting points for surface or DIN rail installation.
5. Инсталација
The FM1D20A-24 timer module supports both surface and DIN rail mounting.
5.1 Монтажа
- Површински носач: Secure the module to a flat surface using appropriate screws through the designated mounting holes.
- Монтажа на DIN шину: Attach the module to a standard DIN rail by snapping it into place.
5.2 Ожичење
ВАЖНО: All wiring must comply with local and national electrical codes. Ensure power is disconnected before wiring.
- Connect the 24V power supply to the designated input terminals.
- Connect the load (device to be controlled) to the output terminals. The timer module features an SPDT (Single Pole Double Throw) switch style.
- Проверите да ли су све везе безбедне пре него што вратите напајање.
6. Подешавање
6.1 Почетно укључивање
Upon initial power-up, the display may be blank or show default settings. The internal clock will need to be set.
6.2 Подешавање тренутног времена и дана
- Press the 'Mode' button to enter the time setting mode.
- Use the '+' button to adjust the hour, minute, and day.
- Press 'OK' to confirm each setting and move to the next.
- Once the time and day are set, press 'OK' to exit the setting mode.
6.3 Programming ON/OFF Events
The timer supports up to 20 ON/OFF operations.
- Press the 'Menu' button to access the programming menu.
- Navigate through the program slots (P1 ON, P1 OFF, P2 ON, P2 OFF, etc.) using the '+' button.
- For each program slot, press 'OK' to select it.
- Use the '+' button to set the desired time and day(s) for the ON or OFF event.
- Press 'OK' to confirm each setting.
- Repeat for all desired ON/OFF events.
- Press 'Menu' to exit the programming mode.
7. Упутство за употребу
7.1 Manual Override (OVR AUTO)
The 'OVR AUTO' button allows for temporary manual control of the output, overriding the programmed schedule. Pressing it will toggle the output state (ON/OFF) and return to automatic operation at the next scheduled event.
7.2 Time Adjustment (+1h)
The '+1h' button can be used for quick adjustment of the current time, typically for daylight saving time changes. Pressing it will advance the current time by one hour.
7.3 Reset Function (Res)
The 'Res' (Reset) button is typically a recessed button that requires a pointed object (like a pen tip) to press. This button will reset the timer to its factory default settings, erasing all programmed events and resetting the clock. Use with caution.
8. Одржавање
The Intermatic FM1D20A-24 timer module requires minimal maintenance.
- Чишћење: Обришите спољашњост уређаја меком, сувом крпом. Не користите абразивна средства за чишћење или раствараче.
- батерија: This device does not require user-replaceable batteries for operation or memory retention.
- инспекција: Периодично проверавајте спојеве ожичења да ли постоје чврстоћа и знаци хабања или оштећења.
КСНУМКС. Решавање проблема
9.1 Display is Blank
- Check if the power supply (24V) is connected and active.
- Уверите се да су све везе ожичења безбедне.
9.2 Programmed Events Not Executing
- Проверите да ли су тренутно време и дан правилно подешени.
- Check that the programmed ON/OFF times and days are accurate.
- Ensure the timer is not in manual override mode (check 'OVR AUTO' status).
- Confirm the load is properly connected and functional.
9.3 Уређај не реагује
- Attempt a soft reset by pressing the 'Res' button with a pointed object. Note that this will erase all settings.
- If the issue persists, disconnect power for a few minutes and then restore it.
10. Спецификације
| Број модела | FM1D20A-24 |
| Бранд | Интерматиц |
| Тип | Electronic 24-Hour/7-Day Timer Module |
| Волtage | 24В |
| Фреквенција | 50/60Хз |
| Цуррент Ратинг | 16А |
| Max. Number of Operations | 20 (УКЉУЧЕНО/ИСКЉУЧЕНО) |
| Тип монтаже | Surface, DIN Rail |
| Свитцх Стиле | СПДТ |
| Материјал | Пластика |
| Димензије производа | 2.06"Д к 83"Ш к 4"В |
| Тежина артикла | 0.01 унци |
| Цертификати | UL (Canada and US), CE |
11. Гаранција и подршка
For warranty information, please refer to the manufacturer's description or contact Intermatic customer support directly. Technical assistance and further support can be obtained through the official Intermatic webсајт или овлашћени сервисни центри.
Произвођач: Интерматиц Инцорпоратед
Webсајт: ввв.интерматиц.цом