
1. Увод и крајview
The OSD Audio ATM-7 is a sophisticated 7-zone automatic speaker selector designed to distribute amplified audio signals to various zones within a home or commercial space. It allows users to select between two distinct music sources for each designated zone, providing flexible audio management. This passive device is engineered for seamless integration into existing audio systems, offering remote control capabilities for enhanced convenience.
For optimal performance and to prevent potential damage to your amplifier, it is highly recommended to use impedance matching in-wall volume controls in conjunction with the ATM-7, as this unit does not include built-in impedance protection.

Figure 1.1: OSD Audio ATM-7 Speaker Selector and its accompanying remote control, showcasing the front panel and rear connections.
2. Кључне карактеристике
- 7-Zone Audio Distribution: Distributes amplified audio signals to up to seven independent zones.
- Dual Source Selection: Allows selection between two distinct music sources (A or B) in each zone when operating in 2-input mode.
- даљински управљач: Includes an IR remote control for convenient operation from a distance of up to 10 meters.
- Front Panel Controls & LEDs: Features status LEDs for Power, Multi-zone, Master/Slave, Zone In/Out Select, In/Out Mode, and Zone Out/In Selector.
- Функционалност мастер-роба: A Master-Slave switch on the rear panel enables parallel connection of two ATM-7 units for expanded zone control.
- Функција меморије: The remote control includes a backup memory function to retain settings.
- Passive Design: A passive device, requiring external impedance matching for ampзаштита лифиера.
3. Садржај пакета
Please verify that all items are present and in good condition upon unpacking.
- OSD Audio ATM-7 Speaker Selector Unit
- ИР даљински управљач
- Адаптер за напајање (DC 12V 1.5A)
- External IR Receiver (for remote placement)
- Кориснички приручник (овај документ)
4. Безбедносне информације
Да бисте осигурали безбедан рад и спречили оштећења, молимо вас да се придржавате следећих мера предострожности:
- Извор напајања: Користите само приложени адаптер за напајање. Уверите се да је јачина звукаtagе одговара вашем локалном извору напајања.
- вентилација: Не блокирајте вентилационе отворе. Обезбедите адекватан проток ваздуха око уређаја како бисте спречили прегревање.
- Влага: Do not expose the unit to water, moisture, or excessive humidity. Avoid placing liquids near the device.
- Пласман: Поставите уређај на стабилну, равну површину. Избегавајте постављање у близини извора топлоте или на директној сунчевој светлости.
- Сервисирање: Не покушавајте сами да сервисирате уређај. Сва сервисирања препустите квалификованом особљу.
- Подударање импедансе: As a passive device, the ATM-7 does not provide impedance protection. Always use impedance matching volume controls or ensure your amplifier can handle the combined speaker load to prevent damage to your ampлифиер.
5. Подешавање и инсталација
Follow these steps to connect your OSD Audio ATM-7 speaker selector:
- Power Off All Equipment: Пре него што направите било какву везу, уверите се да је amplifier and all audio sources are powered off and unplugged from the wall outlet.
- Повежите се AmpЛифиер Излаз: Connect the speaker output terminals from your amplifier to the "ZONE IN/OUT" terminals on the rear of the ATM-7. The ATM-7 supports two input modes: 2-input (for dual source selection) or 7-input (for individual zone control). Refer to the rear panel diagram for correct wiring.
- Повежите звучнике: Connect your speakers to the corresponding "ZONE OUT" terminals on the rear of the ATM-7. Ensure correct polarity (+ to + and - to -) for all connections.
- Install Impedance Matching Volume Controls (Recommended): For optimal performance and amplifier protection, install impedance matching in-wall volume controls between the ATM-7 and your speakers. This is crucial to maintain a safe impedance load for your amplifier, especially when multiple zones are active.
- Повежите ИР пријемник: If the ATM-7 unit will be placed out of direct line of sight for the remote control, connect the external IR receiver to the "EXT IR Receiver" port on the rear panel. Position the IR receiver in a location where it can receive signals from the remote.
- Прикључите напајање: Plug the provided DC 12V 1.5A power adapter into the "DC 12V 1.5A" input on the rear of the ATM-7, then plug the adapter into a wall outlet.

Figure 5.1: Rear panel connections of the ATM-7, including speaker terminals, IR receiver port, and power input.

Слика 5.2: Детаљно view of the speaker wire terminals on the rear of the ATM-7, showing positive and negative connections for a zone.
6. Упутство за употребу
The ATM-7 can be operated using the front panel controls or the included IR remote control.
6.1 Контроле на предњој плочи

Figure 6.1: Front panel of the ATM-7, displaying power button, status LEDs, and zone selectors.
- Дугме за укључивање: Press to turn the unit On or Off. The "ON" LED indicates power status.
- Multi Zone Enable: Activates or deactivates multi-zone operation.
- Дугме за утишавање: Mutes all active audio outputs.
- Master/Slave Control Select (M/S): Toggles between Master and Slave mode when chaining two ATM-7 units.
- Zone In/Out Select: Toggles individual zones between input and output modes.
- IN/OUT Mode (2 IN / 7 IN): Selects between 2-input mode (allowing selection of Source A or B for each zone) or 7-input mode (where each zone acts as an independent input/output).
- ZONE OUT/IN SELECTOR (ZONE1-ZONE7): Buttons to individually activate or deactivate each of the seven zones. Corresponding LEDs indicate active zones.
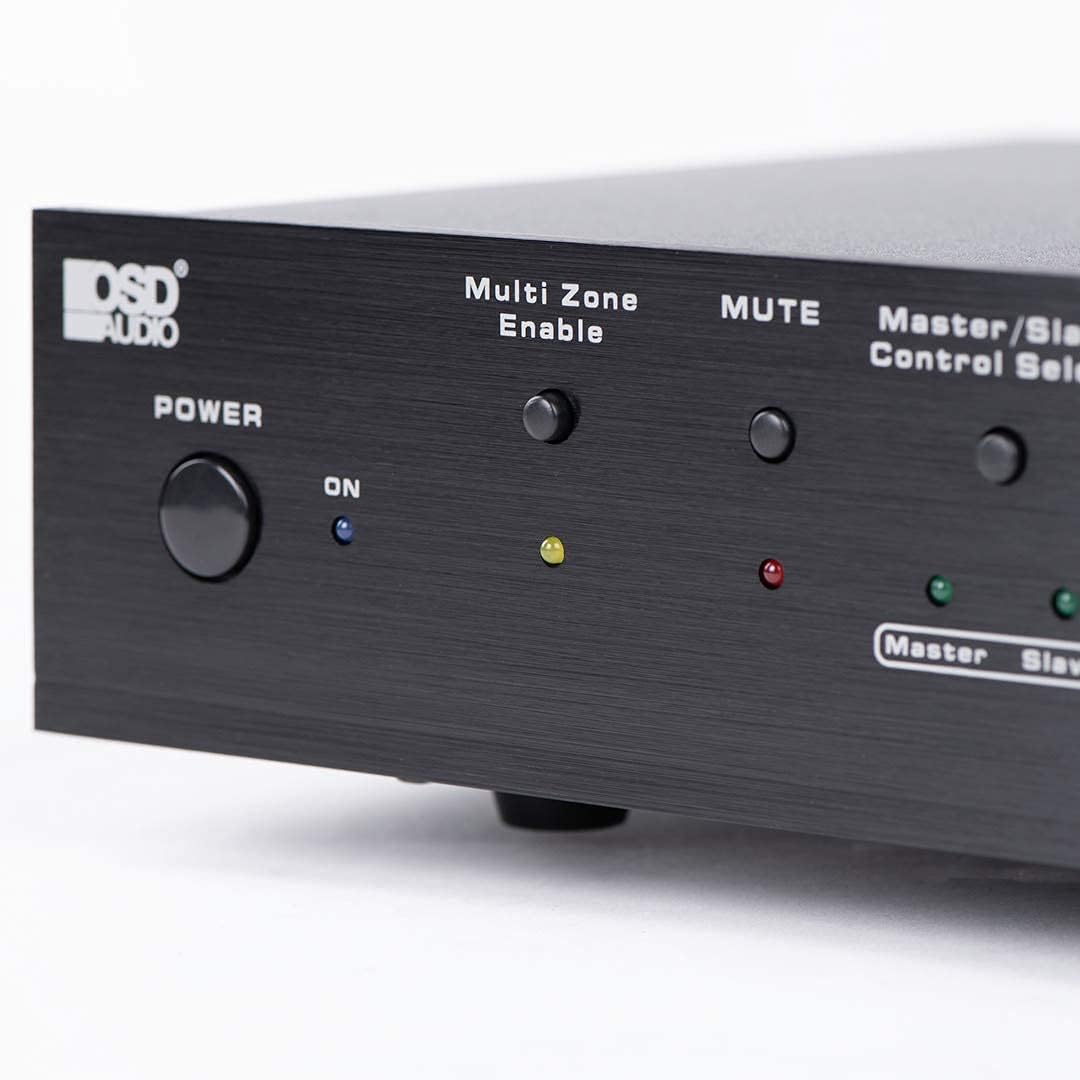
Figure 6.2: Detail of the Power and Multi Zone Enable buttons on the ATM-7 front panel.

Figure 6.3: Detail of the IN/OUT Mode (2 IN / 7 IN) and individual Zone Selector buttons on the ATM-7 front panel.
6.2 ИР даљински управљач
The included IR remote control provides full functionality for the ATM-7. Point the remote towards the unit's IR sensor or the external IR receiver.
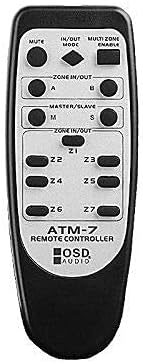
Figure 6.4: The ATM-7 remote control, featuring buttons for mute, input/output mode, master/slave, and individual zone selection.
- МУТЕ: Искључује сав аудио излаз.
- IN/OUT MODE: Toggles between 2-input and 7-input modes.
- MULTI ZONE ENABLE: Activates or deactivates multi-zone operation.
- ZONE IN/OUT (A/B): In 2-input mode, selects between Source A and Source B for the active zones.
- MASTER/SLAVE (M/S): Selects Master or Slave mode for multi-unit configurations.
- Z1-Z7 Buttons: Individually activate or deactivate each of the seven zones.
The remote control has a backup memory function, retaining the last settings even after power cycling the unit. This allows for integration with smart plugs or switched outlets.
7. Одржавање
The OSD Audio ATM-7 requires minimal maintenance. Follow these guidelines to ensure longevity:
- Чишћење: Use a soft, dry cloth to clean the exterior of the unit. Do not use liquid cleaners or abrasive chemicals.
- вентилација: Периодично проверавајте да ли су вентилациони отвори чисти од прашине и остатака.
- Везе: Ensure all speaker wire connections remain secure and free from corrosion.
КСНУМКС. Решавање проблема
| Проблем | Могући узрок | Решење |
|---|---|---|
| No audio output from speakers. |
|
|
| Даљински управљач не ради. |
|
|
| Изобличење звука или ниска јачина звука. |
|
|
9. Спецификације
| Феатуре | Спецификација |
|---|---|
| Број модела | ATM-7 |
| Димензије производа | 21.5 к 12 к 5.5 инча |
| Тежина артикла | 7 фунти |
| Боја | Црно |
| Тип конектора | Speaker Wire (Banana Plugs compatible) |
| Цабле Типе | Спеакер Вире |
| Произвођач | ОСД Аудио |
| Повер Инпут | ДЦ 12В 1.5А |
| Remote Operating Distance | До 10 метара |
10. Информације о гаранцији
Warranty information for the OSD Audio ATM-7 Speaker Selector is typically provided with the product at the time of purchase or can be found on the official OSD Audio website. Please retain your proof of purchase for warranty claims. For detailed terms and conditions, please visit the OSD Audio official webсајту или контактирајте њихову корисничку подршку.
11. Корисничка подршка
For technical assistance, troubleshooting, or general inquiries regarding your OSD Audio ATM-7, please contact OSD Audio customer support. You can find contact information, FAQs, and additional resources on the official OSD Audio webсајт: