Увод
Хвала вам на куповиниasing the Edifier Tick Tock Retro Multifunctional Alarm Clock. This device combines a retro design with modern functionality, offering an alarm clock, FM radio, and media playback from SD cards, USB drives, and auxiliary input. This manual provides detailed instructions for setup, operation, and maintenance to ensure optimal performance and longevity of your device.
Карактеристике производа
- SD card reader and USB input port for media playback.
- LCD display screen for time, date, alarm status, and input mode (SD/USB/FM/AUX).
- Alarm clock function with customizable audio sources: SD card, USB drive, FM radio, or Auxiliary input.
- Auxiliary 3.5mm input jack for connecting external audio devices.
- FM radio function with 24 preset channels for easy access to your favorite stations.
- Two 360° omni-directional full-range speakers for rich, multi-directional sound.
Контроле и портови
Портови на задњој плочи
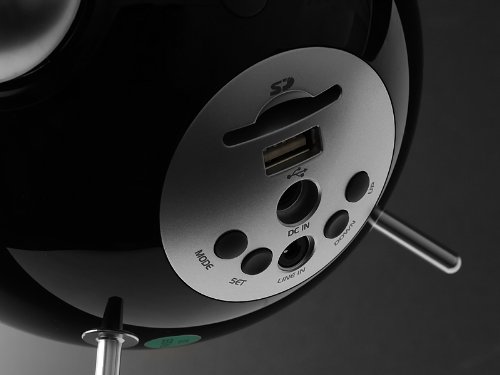
This image displays the rear panel of the Edifier Tick Tock alarm clock. Visible ports and buttons include:
- Слот за СД картицу: Insert an SD card for music playback.
- УСБ порт: Connect a USB flash drive for music playback.
- ДЦ ИН: Улаз за напајање за приложени АЦ адаптер.
- ЛИНЕ ИН (АУКС): 3.5 мм аудио улаз за екстерне уређаје.
- Дугме МОДЕ: Cycles through input modes (SD, USB, FM, AUX).
- СЕТ дугме: Used for entering settings menus (e.g., time, alarm).
- Тастери ГОРЕ/ДОЛЕ: Navigate menus, adjust volume, or change settings.
Контроле горње плоче

This image shows the top panel controls of the Edifier Tick Tock alarm clock. These include:
- Дугме за репродукцију/паузу: Starts or pauses media playback.
- Дугмад за претходну/следећу нумеру: Skips to the previous or next track during media playback. Also used for tuning FM radio.
- Дугмад за појачавање / смањење јачине звука: Подешава јачину звука излаза.
- SNOOZE/LIGHT Button: Activates snooze during an alarm or adjusts display brightness.
Сетуп
- Распакивање: Carefully remove the alarm clock and all accessories from the packaging. Ensure all components are present: the alarm clock unit, AC power adapter, and this user manual.
- Прикључак за напајање: Connect the AC power adapter to the "DC IN" port on the rear of the alarm clock. Plug the adapter into a standard wall outlet. The display should illuminate.
- Почетно укључивање: The unit should power on automatically. If not, press the power button (if available, otherwise it's always on when plugged in).
- Antenna (FM Radio): Extend the FM antenna located at the back of the unit for optimal radio reception.
Упутство за употребу
Подешавање времена и датума
- Притисните и држите СЕТ дугме док приказ времена не почне да трепери.
- Користите UP и ДОВН дугмад за подешавање сата. Притисните СЕТ да потврдите и пређете на минуте.
- Подесите минуте користећи UP и ДОВН. Притисните СЕТ потврдити.
- Continue this process to set the year, month, and day. Press СЕТ да бисте изашли из режима подешавања времена/датума.
Постављање аларма
- Притисните тастер СЕТ button once (do not hold) to enter alarm setting mode. The alarm time will flash.
- Користите UP и ДОВН дугмад за подешавање сата аларма. Притисните СЕТ да потврдите и пређете на минуте.
- Подесите минуте користећи UP и ДОВН. Притисните СЕТ потврдити.
- Next, select the alarm source (FM, SD, USB, AUX). Use UP и ДОВН to cycle through options. Press СЕТ потврдити.
- If FM is selected, use UP и ДОВН to select a preset FM station (P01-P24).
- If SD or USB is selected, ensure a card/drive with audio is inserted. The alarm will play the first track.
- If AUX is selected, ensure an external device is connected and playing audio.
- Притисните СЕТ again to activate the alarm. An alarm icon will appear on the display.
- To deactivate the alarm, press СЕТ док икона аларма не нестане.
- Када се огласи аларм, притисните СНООЗЕ / СВЕТЛО button to activate snooze (typically 9 minutes). To turn off the alarm completely, press any other button.
Операција ФМ радија
- Притисните тастер МОДЕ button repeatedly until "FM" appears on the display.
- Auto Scan and Preset: Притисните и држите ПЛАИ/ПАУСЕ button. The radio will automatically scan for available stations and save them to presets (P01-P24).
- Ручно подешавање: Користите ПРЕТХОДНА/СЛЕДЕЋА ПЕСМА дугмад за фино подешавање фреквенције.
- Избор пресета: У FM режиму, кратко притисните ПРЕТХОДНА/СЛЕДЕЋА ПЕСМА buttons to cycle through saved preset stations.
- Подесите јачину звука помоћу UP и ДОВН buttons on the rear panel.
SD Card / USB Playback
- Insert an SD card into the SD card slot or a USB flash drive into the USB port on the rear panel.
- Притисните тастер МОДЕ button repeatedly until "SD" or "USB" appears on the display. The device will automatically start playing audio files.
- Користите ПЛАИ/ПАУСЕ дугме за паузирање или наставак репродукције.
- Користите ПРЕТХОДНА/СЛЕДЕЋА ПЕСМА buttons on the top panel to skip tracks.
- Подесите јачину звука помоћу UP и ДОВН buttons on the rear panel.
Auxiliary Input (LINE IN)
- Connect an external audio device (e.g., smartphone, MP3 player) to the "LINE IN" (3.5mm) port on the rear panel using an audio cable (not included).
- Притисните тастер МОДЕ button repeatedly until "AUX" appears on the display.
- Покрените репродукцију на повезаном екстерном уређају.
- Подесите јачину звука помоћу UP и ДОВН buttons on the rear panel, and also control volume from your external device.
Дисплаи Бригхтнесс
Кратко притисните СНООЗЕ / СВЕТЛО button on the top panel to cycle through different display brightness levels.
Одржавање
- Чишћење: Use a soft, dry cloth to clean the surface of the alarm clock. Do not use abrasive cleaners, waxes, or solvents.
- Пласман: Place the unit on a stable, flat surface. Avoid direct sunlight, high temperatures, humidity, or dusty environments.
- Снага: Искључите адаптер за напајање из зидне утичнице ако уређај неће бити коришћен дуже време.
Решавање проблема
| Проблем | Могући узрок / решење |
|---|---|
| Нема напајања / Екран је искључен |
|
| Нема звука из звучника |
|
| Лош ФМ радио пријем |
|
| Alarm does not sound or plays static |
|
| Екран је превише светао ноћу |
|
Спецификације
| Бранд | Едифиер |
| Број модела | MF240Reto |
| Дисплаи Типе | ЛЦД |
| Технологија повезивања | АУКС, УСБ |
| Посебне карактеристике | Alarm, Radio, SD Card Reader, USB Playback |
| Извор напајања | Цордед Елецтриц |
| Материјал | Пластика |
| Тежина артикла | 0.74 фунти (приближно 0.34 кг) |
| Произвођач | Едифајер САД |
Гаранција и подршка
This Edifier product comes with a 2-годишња гаранција произвођача. For warranty claims, technical support, or further assistance, please contact Edifier USA customer service. Please retain your proof of purchase for warranty validation.
For the most up-to-date support information, please visit the official Edifier webсајту.