
1. Увод
Хвала вам на куповиниasing the Hello Kitty KT2064 AM/FM Projection Alarm Clock Radio. This device combines a digital alarm clock with an AM/FM radio and a unique projection feature, allowing you to display the time on your ceiling or wall. Please read this manual carefully to ensure proper operation and to fully utilize all features of your new alarm clock radio.

Слика 1.1: Предња страна view of the Hello Kitty KT2064 Projection Alarm Clock Radio, showing the digital display and the Hello Kitty design.
2. Карактеристике
- Карактеристике пројекције: Projects the time onto your ceiling or wall with adjustable focus and up to 120-degree pivot angle.
- Dual Alarm Options: Wake up to either a buzzer alarm or your favorite radio station.
- АМ/ФМ радио: Integrated radio tuner for listening to broadcast stations.
- Одгода функција: Allows for an additional 9 minutes of sleep before the alarm sounds again.
- Sleep to Radio: Set a timer (up to 2 hours) for the radio to play before automatically turning off.
- Резервна батерија: Одржава подешавања времена и аларма током нестанка струјеtages (requires 3 CR2025 button cell batteries, not included).
- ЛЕД дисплеј времена: Clear red LED display for current time.
3. Садржај пакета
Молимо вас да проверите пакет за следеће ставке:
- Hello Kitty KT2064 Projection Alarm Clock Radio Unit
- АЦ адаптер
- Кориснички приручник (овај документ)
Note: 3 CR2025 button cell batteries for backup are not included and must be purchased separately.
4. Подешавање
4.1 Прикључак за напајање
- Unpack the alarm clock radio and its accessories.
- Connect the AC power adapter to the DC input jack located on the back of the unit.
- Plug the other end of the AC power adapter into a standard wall outlet. The unit will power on, and the LED display will light up.
4.2 Installing Backup Batteries
Installing backup batteries ensures that your time and alarm settings are retained during a power outage.
- Пронађите одељак за батерију на дну или задњој страни уређаја.
- Отворите поклопац одељка за батерије.
- Insert 3 CR2025 button cell batteries, observing the correct polarity (+ and - markings).
- Добро затворите поклопац одељка за батерије.

Слика 4.2: Позади view of the alarm clock radio, showing control buttons and potential location for battery compartment.
5. Упутство за употребу
5.1 Подешавање времена
- Притисните и држите ВРЕМЕНСКИ СКЛОП button (or similar button, refer to unit markings) for approximately 3 seconds until the hour digits begin to flash.
- Користите ХОУР or + / - buttons to adjust the hour. Pay attention to the AM/PM indicator.
- Притисните тастер ВРЕМЕНСКИ СКЛОП поново притисните дугме. Цифре за минуте ће трептати.
- Користите МИНУТЕ or + / - дугмад за подешавање минута.
- Притисните тастер ВРЕМЕНСКИ СКЛОП притисните дугме још једном да бисте потврдили и изашли из режима подешавања времена.
5.2 Подешавање аларма (Аларм 1 и Аларм 2)
This unit supports two independent alarms.
- Притисните и држите AL1 СЕТ дугме (за аларм 1) или AL2 СЕТ button (for Alarm 2) for approximately 3 seconds until the hour digits of the alarm time begin to flash.
- Користите ХОУР or + / - дугмад за подешавање сата аларма.
- Притисните одговарајуће АЛ СЕТ поново притисните дугме. Цифре за минуте ће трептати.
- Користите МИНУТЕ or + / - дугмад за подешавање минута аларма.
- Притисните тастер АЛ СЕТ button again to select the alarm source: БУЗЗЕР or РАДИО. Користите + / - buttons to toggle.
- Притисните тастер АЛ СЕТ притисните дугме још једном да бисте потврдили и изашли из режима подешавања аларма.
- Да бисте активирали/деактивирали аларм, притисните дугме AL1 ON/OFF or AL2 ON/OFF button (or similar) repeatedly until the alarm indicator appears/disappears on the display.
5.3 Using the Radio
- Притисните тастер РАДИО ОН/ОФФ дугме за укључивање радија.
- Притисните тастер АМ/ФМ дугме за пребацивање између АМ и ФМ опсега.
- Користите ТУНЕ+ и ТУНЕ- дугмад за ручно подешавање жељене станице.
- For automatic scanning, press and hold ТУНЕ+ or ТУНЕ- for a few seconds until the radio finds the next clear station.
- Подесите јачину звука помоћу ВОЛУМЕ + и ЗАПРЕМИНА - дугмад.
- Да бисте искључили радио, притисните РАДИО ОН/ОФФ дугме поново.
5.4 Функција пројекције
- Locate the projector lens on top of the unit.
- Притисните тастер ПРОЈЕКТОР УКЉУЧЕН/ИСКЉУЧЕН button to activate the time projection.
- Adjust the angle of the projector head (up to 120 degrees) to direct the time display onto your ceiling or wall.
- Ротирајте ФОЦУС ring around the projector lens to achieve a clear image.
- To turn off the projection, press the ПРОЈЕКТОР УКЉУЧЕН/ИСКЉУЧЕН дугме поново.

Image 5.4: The alarm clock radio actively projecting the time and Hello Kitty logo onto a surface.
5.5 Функција одлагања
Када се огласи аларм, притисните велико СНООЗЕ button (usually located on top of the unit). The alarm will pause for approximately 9 minutes and then sound again.
5.6 Sleep to Radio Function
This feature allows you to fall asleep to the radio, which will automatically turn off after a set period.
- Turn on the radio and tune to your desired station.
- Притисните тастер СЛЕЕП button repeatedly to cycle through the available sleep timer durations (e.g., 120, 90, 60, 30, 15 minutes, or OFF). The selected duration will appear on the display.
- The radio will play for the chosen duration and then automatically turn off.
6. Одржавање
- Чишћење: Обришите уређај меком, сувом крпом. Не користите абразивна средства за чишћење или раствараче.
- Изложеност води: Држите уређај даље од воде или прекомерне влаге.
- температура: Avoid exposing the unit to extreme temperatures or direct sunlight.
- Замена батерије: Replace backup batteries annually or when the low battery indicator appears to ensure continuous functionality during power outagес.
КСНУМКС. Решавање проблема
| Проблем | Могући узрок | Решење |
|---|---|---|
| Јединица се не укључује. | Адаптер за напајање није повезан или је утичница неисправна. | Ensure the power adapter is securely plugged into the unit and a working wall outlet. Test the outlet with another device. |
| Time/alarm settings are lost after power outage. | Резервне батерије су празне или нису инсталиране. | Install new CR2025 button cell batteries or replace existing ones. |
| Пројекција је мутна. | Focus is not adjusted correctly. | Ротирајте ФОЦУС ring around the projector lens until the image is clear. |
| Радио пријем је лош. | Антена није продужена или постоји сметња. | Extend the FM wire antenna fully. For AM, try repositioning the unit. Avoid placing near electronic devices that may cause interference. |
| Аларм се не оглашава. | Аларм није активиран или је погрешно подешен. | Ensure the alarm is set and activated (alarm indicator visible). Check alarm volume if set to radio. |
8. Спецификације
| Бранд | Хелло Китти |
| Број модела | KT2064P |
| Дисплаи Типе | Дигитал ЛЕД |
| Извор напајања | АЦ адаптер |
| Резервна батерија | 3 x CR2025 Button Cell (not included) |
| Радио фреквенција | AM/FM (FM up to 108 MHz) |
| Димензије производа (Д к Ш к В) | 14.5 x 11.9 x 17.3 цм (приближно 5.7 x 4.7 x 6.8 инча) |
| Тежина производа | 885 г (приближно 1.95 фунти) |
| Угао пројекције | До 120 степени |
| Трајање одлагања | КСНУМКС минута |
| Слееп Тимер | До 2 сати |
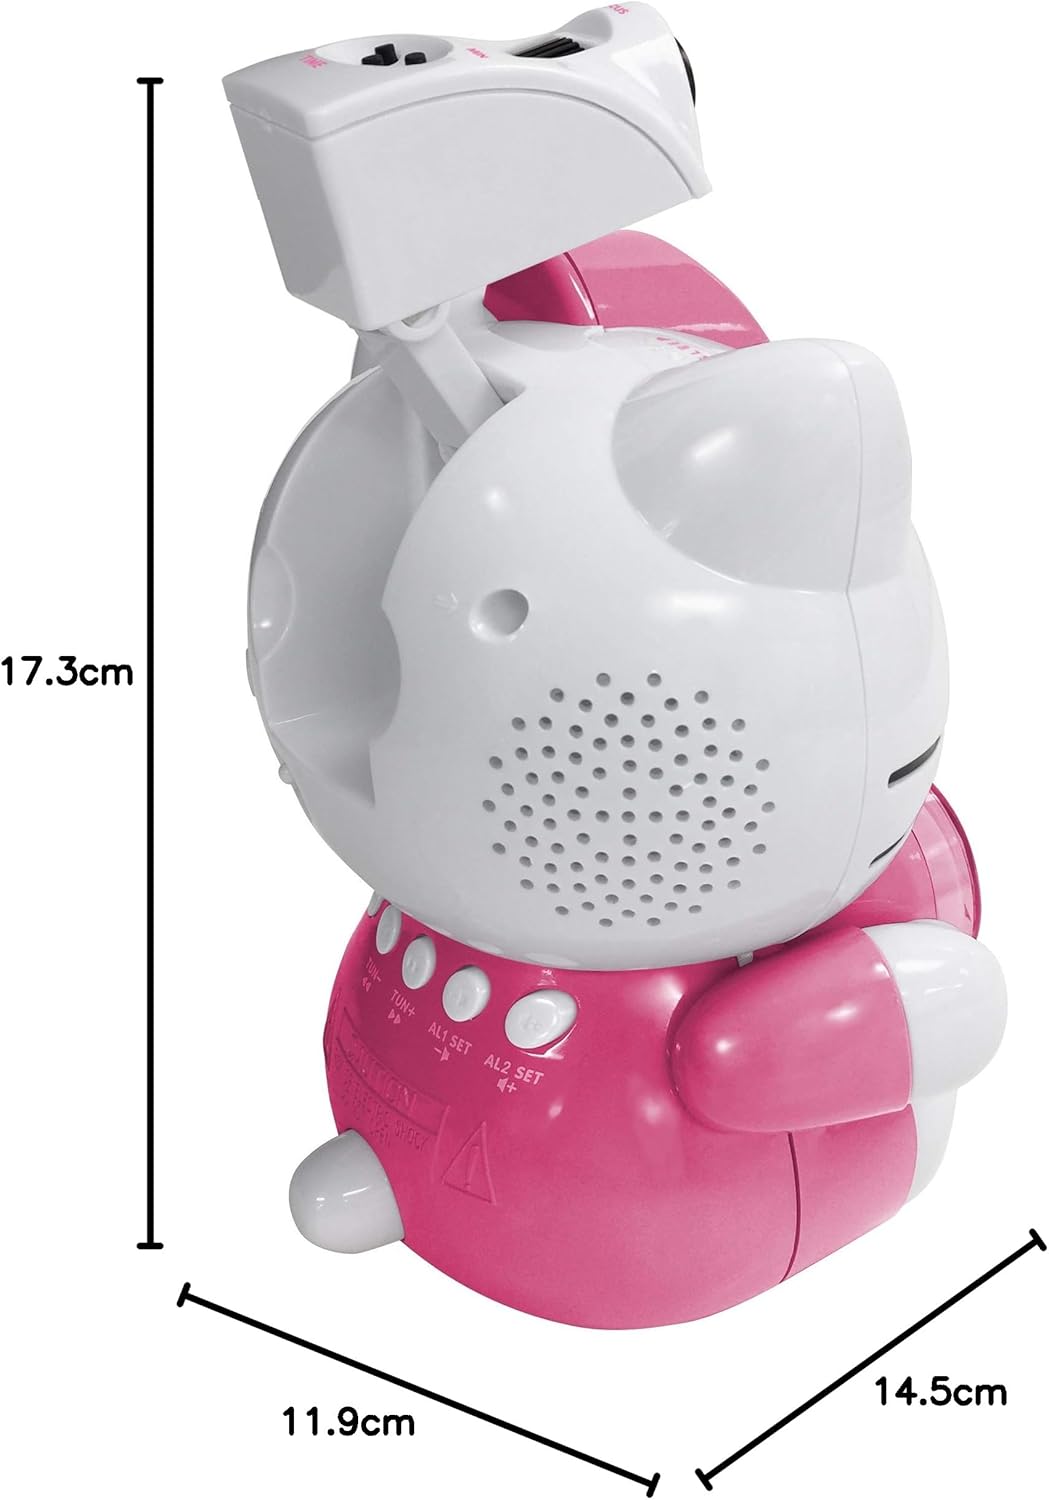
Image 8.1: Dimensions of the Hello Kitty KT2064 Projection Alarm Clock Radio.
9. Гаранција и подршка
This product comes with a standard manufacturer's warranty. For specific warranty details, please refer to the documentation provided at the time of purchase or contact your retailer. If you encounter any issues not covered in the troubleshooting section, please contact customer support for assistance.
For support inquiries, please visit the official Hello Kitty product support webсајт или контактирајте свог локалног дистрибутера.