
1. Увод
This manual provides detailed instructions for the installation, operation, and maintenance of the Supermicro MBD-X10SLH-F-O uATX Server Motherboard. Please read this manual thoroughly before beginning installation to ensure proper setup and to maximize the performance and longevity of your system. This motherboard is designed for server applications, supporting Intel LGA1150 processors and DDR3 memory.
2. Производ је готовview
The Supermicro MBD-X10SLH-F-O is a high-performance uATX server motherboard featuring the Intel C226 chipset. It is engineered for reliability and efficiency in server environments.
Кључне карактеристике:
- ЦПУ Соцкет: LGA1150, supporting Intel Xeon E3-1200 v3/v4 series, 4th/5th Gen Core i3, Pentium, Celeron processors.
- Меморија: 4x 204-pin DDR3-1600 SODIMM slots, supporting up to 32GB ECC/non-ECC Unbuffered memory.
- Слотови за проширење: 1x PCI-Express 3.0 x16, 1x PCI-Express 2.0 x8, 1x PCI-Express 2.0 x4.
- Складиштење: 6x SATA3 (6Gbps) ports.
- Повезивање: Dual Gigabit Ethernet LAN ports (2x RJ45) and 1x Dedicated IPMI LAN port (RJ45).
- УСБ портови: 4x USB 3.0 ports, 6x USB 2.0 ports.
- Видео излаз: 1x VGA port.
- Фактор форме: uATX (9.6" x 9.6").
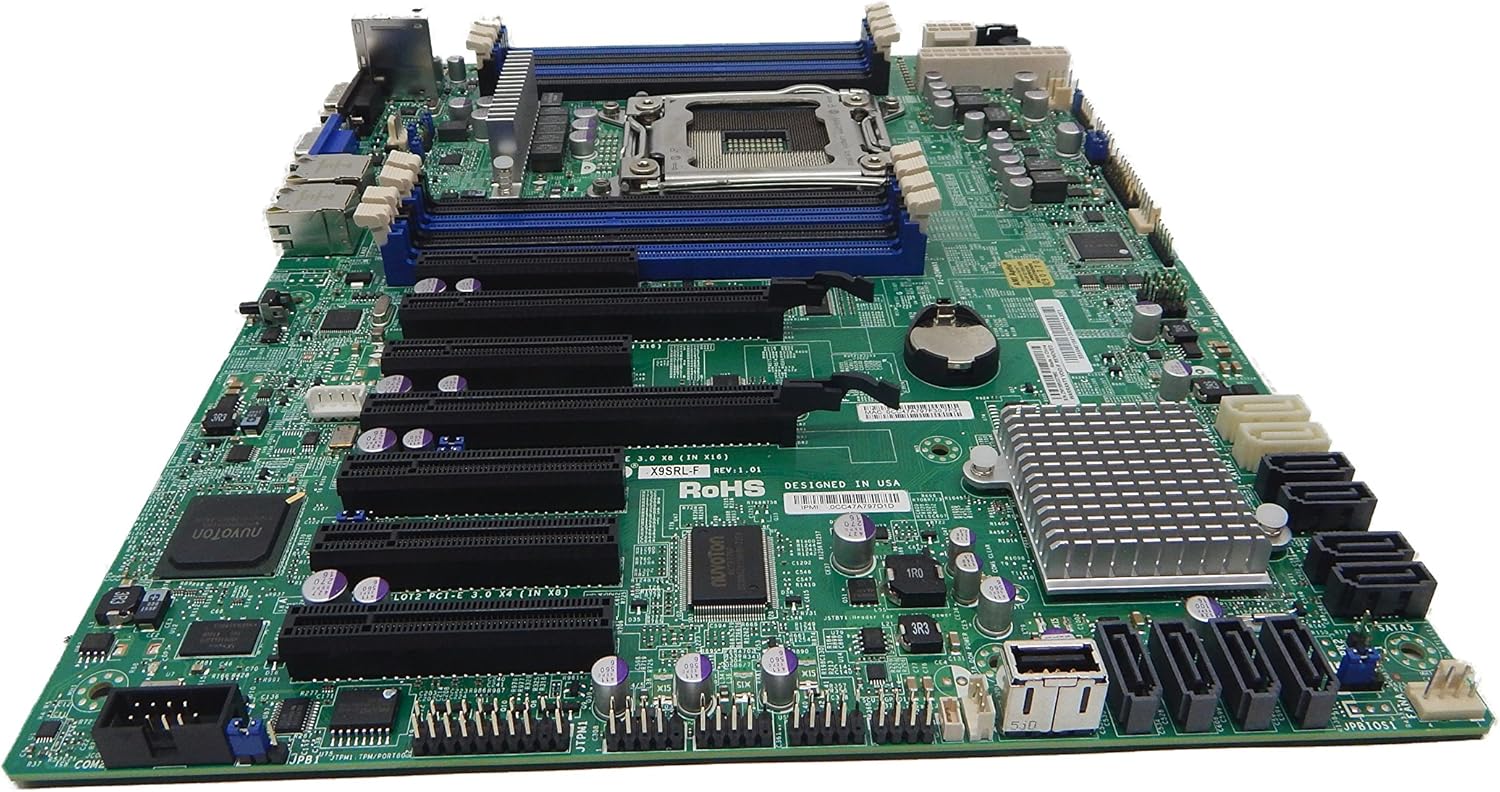
Слика 2.1: Одозго надоле view of the Supermicro MBD-X10SLH-F-O motherboard, showing the CPU socket, RAM slots, and various expansion slots.

Слика 2.2: Англед view of the motherboard, highlighting the LGA1150 CPU socket and the four DDR3 SODIMM memory slots.

Слика 2.3: Позади view of the Supermicro MBD-X10SLH-F-O motherboard, displaying the I/O panel with USB, VGA, LAN, and IPMI ports.

Слика 2.4: Цлосе-уп view of the motherboard, showing the six SATA3 ports and other onboard connectors.
3. Спецификације
| Феатуре | Спецификација |
|---|---|
| Бранд | Супермицро |
| Назив модела | MBD-X10SLH-F-O |
| ЦПУ Соцкет | ЛГА 1150 |
| Тип чипсета | Интел Ц226 |
| Компатибилни процесори | Intel Core i3-4xxx, i5-4xxx, i7-4xxx, i3-5xxx, i5-5xxx, i7-5xxx, Intel Xeon E3-1200 v3/v4 series |
| Технологија РАМ меморије | ДДР3 |
| Брзина меморије | 1600 МХз |
| Максимална подржана РАМ меморија | 32 ГБ |
| Број УСБ 2.0 портова | 6 |
| Број УСБ 3.0 портова | 4 |
| САТА портови | 6x SATA3 (6Gbps) |
| Слотови за проширење | 1x PCIe 3.0 x16, 1x PCIe 2.0 x8, 1x PCIe 2.0 x4 |
| Форм Фацтор | uATX |
| Димензије (ДкШкВ) | 14 к 11 к 3.5 инча |
| Тежина артикла | 3.52 унци |
4. Подешавање
Before beginning installation, ensure your system is powered off and disconnected from the power source. Always handle the motherboard by its edges to avoid static discharge.
4.1. Инсталација процесора
- Пажљиво подигните полугу процесорског утичнице.
- Align the CPU with the socket, ensuring the gold triangle on the CPU matches the triangle on the socket.
- Пажљиво поставите процесор у подножје без насиља.
- Lower the socket lever and secure it.
- Нанесите термалну пасту и инсталирајте хладњак процесора према упутствима произвођача.
4.2. Инсталација меморије
- Отворите копче на оба краја DIMM слота.
- Align the memory module's notch with the key in the DIMM slot.
- Чврсто притисните оба краја меморијског модула док се клипови не уклопе на своје место.
4.3. Инсталација картице за проширење
- Remove the corresponding slot cover from your chassis.
- Align the expansion card with the desired PCIe slot.
- Чврсто притисните док картица потпуно не легне.
- Secure the card with a screw or retention clip.
4.4. Повезивање уређаја за складиштење
- Повежите један крај SATA кабла за пренос података са SATA портом на матичној плочи.
- Повежите други крај SATA кабла за пренос података са уређајем за складиштење података (HDD/SSD).
- Повежите SATA кабл за напајање са напајања на уређај за складиштење података.
4.5. Прикључци за напајање
- Повежите 24-пински ATX главни конектор за напајање са вашег напајања на матичну плочу.
- Повежите 8-пински (или 4-пински) ATX 12V конектор за напајање процесора на матичну плочу.
4.6. Прикључци на предњој плочи
Connect the front panel headers (Power LED, HDD LED, Power Switch, Reset Switch, USB, Audio) to the corresponding pins on the motherboard. Refer to the motherboard's silkscreen labels for correct pin orientation.
5. Упутство за употребу
5.1. Почетно покретање система
- After all components are installed and connected, connect the power cord to your power supply and turn on the power switch.
- Press the power button on your chassis.
- The system should power on, and you should see a display on your monitor.
5.2. Приступ BIOS-у/UEFI-ју
To enter the BIOS/UEFI setup utility, press the designated key (commonly ДЕЛ or F2) during the initial boot sequence. The exact key may vary; observe the on-screen prompts.
5.3. IPMI Remote Management
This motherboard features a dedicated IPMI LAN port for remote management. To access the IPMI interface, connect the IPMI LAN port to your network. Obtain the IP address assigned to the IPMI interface (either from BIOS or a network scan) and access it via a web browser from another computer on the same network. Java may be required for remote console functionality.
6. Одржавање
Редовно одржавање помаже у обезбеђивању стабилности и дуговечности ваше матичне плоче и система.
- Уклањање прашине: Периодично чистите прашину са матичне плоче и компоненти помоћу компримованог ваздуха. Уверите се да је систем искључен из струје пре чишћења.
- Управљање кабловима: Уверите се да су сви каблови уредно постављени и осигурани како би се спречило ометање протока ваздуха и случајно искључивање.
- Ажурирања BIOS-а/фирмвера: Проверите Супермицро website for the latest BIOS and IPMI firmware updates. Follow the provided instructions carefully. Note that IPMI BIOS upgrades may require a separate license. Always update BIOS before IPMI firmware.
- Провере компоненти: Occasionally inspect all connections (power, data, expansion cards) to ensure they are securely seated.
КСНУМКС. Решавање проблема
Овај одељак се бави уобичајеним проблемима на које можете наићи.
7.1. System Fails to Boot
- Проверите прикључке за напајање: Ensure the 24-pin ATX and 8-pin CPU power connectors are securely attached.
- Поново поставите компоненте: Remove and re-install the CPU, memory modules, and any expansion cards to ensure they are properly seated.
- Обриши ЦМОС: Refer to your motherboard's detailed manual for instructions on how to clear the CMOS, which can resolve boot issues caused by incorrect BIOS settings.
- Минимална конфигурација: Try booting with only essential components (CPU, one RAM stick, power supply, and display) to isolate the problem.
7.2. Fan Speed Issues
Some low RPM, high-efficiency fans may not be accurately detected by the motherboard's fan controller, leading to erratic fan speed behavior (e.g., fans spinning up to max RPM). This is often due to the controller expecting server-grade fans with higher RPM ranges.
- БИОС подешавања: Check BIOS settings for fan control options. Adjust fan curves or modes if available.
- 3-Pin vs. 4-Pin Fans: If using 4-pin PWM fans that exhibit this behavior, consider using 3-pin adapters if available with your fans. This can sometimes provide a more stable, albeit less precise, fan control.
- IPMI Fan Control: While IPMI offers fan control, it may have limitations for low RPM fans.
7.3. SATA Port Obstruction
When installing a full-size graphics processing unit (GPU), some SATA ports may become physically blocked or difficult to access.
- Планирајте унапред: Connect SATA cables to the necessary ports before installing large expansion cards.
- Angled SATA Cables: Use SATA cables with angled connectors if straight connectors are obstructed.
- Alternative Ports: Utilize any unblocked SATA ports first.
8. Информације о гаранцији и подршци
For detailed warranty information, including terms, conditions, and duration, please refer to the official Supermicro website or the warranty card included with your product. For technical support, driver downloads, and additional documentation, visit the Supermicro support portal.
Supermicro Official Webсајт: ввв.супермицро.цом