
1. Увод
This manual provides detailed instructions for installing, configuring, and maintaining your GIGABYTE GA-B150M-D3H Micro ATX motherboard. The GA-B150M-D3H is designed to support 6th Generation Intel Core Processors and features Dual Channel DDR4 memory, PCIe Gen3 x4 M.2 connector, SATA Express, and 8-channel HD audio with Audio Noise Guard.
Please read this manual thoroughly before beginning installation to ensure proper setup and operation.
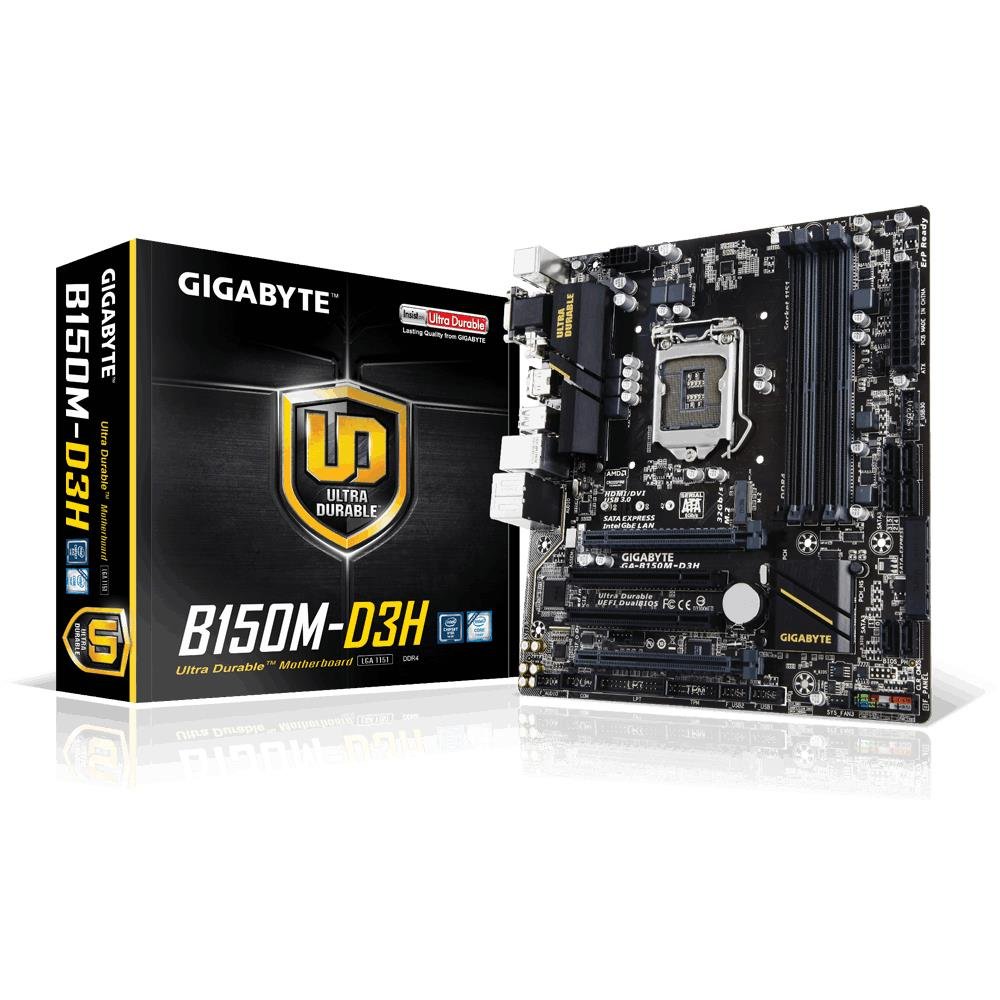
Image 1.1: GIGABYTE GA-B150M-D3H Micro ATX Motherboard. This image displays the overall layout of the motherboard, highlighting its compact Micro ATX form factor and various component slots.
2. Безбедносне информације
Observe the following safety precautions to prevent damage to the motherboard and injury to yourself:
- Увек искључите кабл за напајање из зидне утичнице пре него што додирнете било које компоненте.
- Носите антистатичку наруквицу или често додирујте уземљени метални предмет да бисте испразнили статички електрицитет.
- Држите матичну плочу за ивице како бисте избегли додиривање осетљивих компоненти.
- Држите матичну плочу даље од влаге и екстремних температура.
- Обезбедите одговарајућу вентилацију унутар кућишта рачунара како бисте спречили прегревање.
3. Садржај пакета
Проверите да ли су сви предмети присутни у паковању ваше матичне рачунаре:
- GIGABYTE GA-B150M-D3H Motherboard
- Упутство за употребу
- И / О штит
- САТА каблови
- ЦД/ДВД са драјверима
Note: Contents may vary slightly depending on region or revision.
4. Распоред матичне плоче
Familiarize yourself with the various components and connectors on the GA-B150M-D3H motherboard.
Image 4.1: GIGABYTE GA-B150M-D3H Motherboard Layout. This image provides a visual reference for the location of key components such as the CPU socket, DIMM slots, PCIe slots, SATA ports, and M.2 connector.
Кључне компоненте:
- LGA 1151 процесорски сокет: For 6th Generation Intel Core Processors.
- DDR4 DIMM Slots (4): Supports Dual Channel DDR4 memory up to 2133 MHz.
- ПЦИе слотови: Includes PCIe Gen3 x16 for graphics cards and PCIe x1 slots for expansion.
- M.2 Connector: Supports PCIe NVMe & SATA SSDs with up to 32Gb/s data transfer.
- SATA Express Connector: For up to 16Gb/s data transfer.
- SATA 6Gb/s портови: For connecting traditional SATA storage devices.
- 24-Pin ATX Power Connector: Главни улаз за напајање.
- 8-Pin ATX 12V Power Connector: CPU power input.
- Заглавља на предњем панелу: For power button, reset button, LED indicators, and USB ports.
- Аудио конектори: 8-channel HD Audio with high quality capacitors and Audio Noise Guard.
5. Подешавање и инсталација
Пратите ове кораке за правилну инсталацију матичне плоче и компоненти.
5.1. Инсталирање процесора
- Locate the LGA 1151 CPU socket.
- Отворите полугу процесорског утичнице и подигните плочу за оптерећење.
- Пажљиво поравнајте процесор са подножјем, водећи рачуна да се златни троугао на процесору поклапа са троуглом на подножју. Немојте силом уметати процесор у подножје.
- Спустите плочу за терет и осигурајте је полугом.
5.2. Инсталирање хладњака процесора
Refer to your CPU cooler's instruction manual for specific installation steps. Ensure thermal paste is applied correctly between the CPU and cooler base.
5.3. Инсталирање меморије (RAM)
- Отворите копче на оба краја DDR4 DIMM слотова.
- Поравнајте меморијски модул са слотом, водећи рачуна да се зарез на модулу поклапа са кључем у слоту.
- Чврсто притисните оба краја меморијског модула док се клипови не уклопе на своје место.
- For dual-channel performance, install memory modules in matching colored slots (e.g., DIMM1 and DIMM2).
5.4. Инсталирање картица за проширење
- Remove the metal bracket from the desired PCIe slot on your computer case.
- Align the expansion card with the PCIe slot and press down firmly until it is seated correctly.
- Причврстите картицу за кућиште рачунара помоћу завртња.
5.5. Повезивање уређаја за складиштење
- SATA уређаји: Connect one end of the SATA data cable to a SATA 6Gb/s port on the motherboard and the other end to your hard drive or SSD. Connect the SATA power cable from your power supply to the device.
- М.2 ССД: Insert the M.2 SSD into the M.2 slot at an angle, then gently push it down and secure it with the provided screw.
- SATA Express: If using a SATA Express device, connect it to the designated SATA Express connector.
5.6. Повезивање конектора на предњој плочи
Connect the cables from your computer case's front panel (power button, reset button, HDD LED, power LED, front USB, front audio) to the corresponding headers on the motherboard. Refer to the motherboard layout diagram for exact locations and pin assignments.
5.7. Повезивање напајања
- Connect the 24-pin ATX main power connector from your power supply to the 24-pin power socket on the motherboard.
- Connect the 8-pin ATX 12V CPU power connector to the 8-pin socket near the CPU.
- Уверите се да су сви прикључци за напајање безбедни.
6. Упутство за употребу
6.1. Прво покретање
After assembling all components, connect your monitor, keyboard, and mouse. Power on the system. The system should display the GIGABYTE splash screen and then enter the BIOS/UEFI setup or attempt to boot from a connected storage device.
6.2. Подешавање BIOS-а/UEFI-ја
Да бисте ушли у подешавање BIOS/UEFI, притисните тастер ДЕЛ key repeatedly during the boot process when the GIGABYTE logo appears. Here you can configure system settings, boot order, and monitor hardware status. The GA-B150M-D3H features GIGABYTE UEFI Dual BIOS for enhanced reliability.
6.3. Инсталација драјвера
After installing your operating system, install the necessary drivers for the motherboard components. These can be found on the included driver CD/DVD or downloaded from the official GIGABYTE website. Key drivers include chipset, audio (Realtek ALC892 codec), LAN, and any integrated graphics drivers.
6.4. Инсталација оперативног система
Insert your operating system installation media (USB drive or DVD) and configure the boot order in the BIOS/UEFI to boot from it. Follow the on-screen instructions to install your preferred operating system (e.g., Windows 8.1, Windows 10).
7. Одржавање
7.1. Чишћење
Редовно чистите унутрашњост кућишта рачунара како бисте спречили накупљање прашине, што може довести до прегревања. Користите компримовани ваздух да бисте уклонили прашину са вентилатора, хладњака и компоненти матичне плоче. Уверите се да је систем искључен из струје пре чишћења.
7.2. Ажурирања BIOS-а
GIGABYTE периодично објављује ажурирања BIOS-а како би побољшао стабилност, компатибилност и перформансе система. Посетите званичну GIGABYTE веб страницу website for your motherboard model (GA-B150M-D3H) to check for the latest BIOS version and follow the provided instructions for updating. Exercise caution during BIOS updates, as an interruption can render the motherboard inoperable.
КСНУМКС. Решавање проблема
Овај одељак се бави уобичајеним проблемима на које можете наићи.
8.1. No Power / System Does Not Turn On
- Check if the power supply is connected correctly to the motherboard (24-pin and 8-pin connectors).
- Уверите се да је прекидач за напајање у положају УКЉУЧЕНО.
- Verify that the front panel power button cable is correctly connected to the motherboard header.
- Тестирајте напајање помоћу другог система или тестера напајања.
8.2. Нема излаза на екран
- Ensure the monitor is connected to the correct graphics output (either integrated graphics on the motherboard or a dedicated graphics card).
- Поново инсталирајте графичку картицу и меморијске модуле.
- Покушајте да покренете систем са само једним инсталираним меморијским модулом.
- Проверите да ли је монитор укључен и подешен на исправан улазни извор.
8.3. Нестабилност система / Падови система
- Проверите температуре процесора и графичке картице како бисте били сигурни да су у границама безбедног рада.
- Verify that all drivers are installed and up to date.
- Покрените алате за дијагностику меморије да бисте проверили да ли постоји неисправна РАМ меморија.
- Ensure the power supply provides sufficient and stable power to all components.
9. Спецификације
Detailed technical specifications for the GIGABYTE GA-B150M-D3H motherboard:
| Феатуре | Спецификација |
|---|---|
| Назив модела | ГА-Б150М-Д3Х |
| Форм Фацтор | Мицро АТКС (24.4 цм к 22.5 цм) |
| ЦПУ Соцкет | ЛГА 1151 |
| Компатибилни процесори | 6th Generation Intel Core Processors |
| Чипсет | Intel B150 Express чипсет |
| Технологија меморије | ДДР4 |
| меморијска слота | 4 x DDR4 DIMM sockets (Dual Channel) |
| Максимални капацитет меморије | 16 ГБ |
| Брзина меморије | 2133 МХз |
| ПЦИе Слотс | 1 x PCI Express x16, 1 x Total PCIe Ports |
| Интерфејси за складиштење | PCIe Gen3 x4 M.2, SATA Express, SATA 6Gb/s |
| Аудио Цодец | Realtek ALC892 codec, 8-channel HD Audio |
| УСБ портови | Total 8 USB Ports (including USB 2.0) |
| Главни прикључак за напајање | 24-пински ATX |
| ЦПУ конектор за напајање | 8-Pin ATX 12V |
| Јединствене карактеристике | GIGABYTE UEFI Dual BIOS, Audio Noise Guard with LED Trace Path Lighting, App Center (Easy Tune, Cloud Station) |
10. Гаранција и подршка
For warranty information, please refer to the warranty card included in your product package or visit the official GIGABYTE webсајт. Услови гаранције могу се разликовати у зависности од региона.
For technical support, driver downloads, BIOS updates, and further product information, please visit the GIGABYTE official support webсајт:
https://www.gigabyte.com/Support
When contacting support, please have your motherboard model (GA-B150M-D3H) and serial number ready.