
Увод
This manual provides detailed instructions for the installation, operation, and maintenance of your Venstar T1900 Residential Slimline Platinum Thermostat. Please read this manual thoroughly before attempting to install or operate the thermostat to ensure proper function and to avoid potential damage.
Важне информације о безбедности
- Always turn off power to the heating/cooling system at the main circuit breaker or fuse box before installing or servicing the thermostat.
- This thermostat operates on 24 Volts AC. Do not connect to line voltagе (120В или 240В).
- Инсталацију треба да обави квалификовани техничар ако нисте упознати са електричним ожичењем.
- Do not short circuit the terminals on the gas valve or at the system control to test the thermostat. This will damage the thermostat and void the warranty.
- Ensure all wiring connections are secure and insulated to prevent short circuits.
Садржај пакета
Проверите да ли ваш пакет садржи следеће ставке:
- Venstar T1900 Thermostat Unit
- Опрема за монтажу (шрафови и зидни типлови)
- Кориснички приручник (овај документ)
Производ је завршенview
The Venstar T1900 is a 7-day programmable digital thermostat designed for residential use. It offers precise temperature control and energy-saving scheduling capabilities. This thermostat is compatible with heat/cool, heat pump, and dual-fuel systems, controlling up to three heat stagес и два кул сtagес.
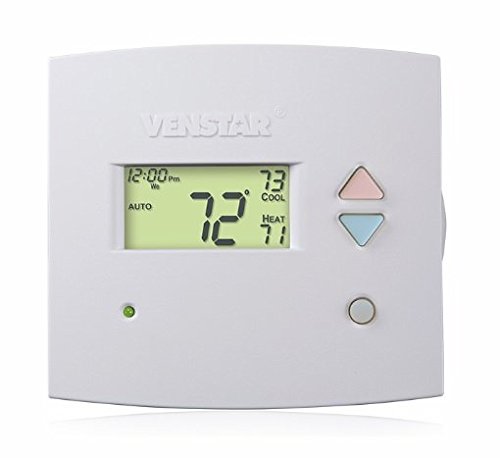
Слика 1: Фронт view of the Venstar T1900 Thermostat. This image displays the thermostat's LCD screen and control buttons, indicating its slimline design.
Кључне карактеристике:
- Програмабилност у року од 7 дана: Allows for customized heating and cooling schedules for each day of the week.
- Компатибилност система: Works with heat/cool, dual-fuel, and heat pump systems.
- Мулти-Сtagе Контрола: Manages up to three heat stagес и два кул сtagес.
- Могућност даљинског управљања: Controllable by phone using an optional add-on (sold separately).
- Automatic or Manual Operation: Provides flexibility for scheduled or on-demand temperature adjustments.
Упутство за инсталацију
Потребни алати:
- Одвијач (Пхиллипс и/или равна глава)
- Drill with appropriate drill bit (if installing new wall anchors)
- Жице стриптизета
- Оловка
- Ниво (опционо)
1. Искључите напајање
Locate the circuit breaker or fuse box that controls your heating and cooling system. Turn off the power completely before proceeding with any wiring.
2. Remove Old Thermostat (if applicable)
- Пажљиво уклоните поклопац старог термостата.
- Take a picture of the existing wiring connections for reference.
- Label each wire with the terminal designation it was connected to (e.g., R, G, Y, W).
- Disconnect the wires and remove the old thermostat's mounting plate from the wall.
3. Mount the New Thermostat Base
- Separate the front cover of the T1900 thermostat from its base plate.
- Position the base plate on the wall where you want to install the thermostat. Ensure it is level.
- Оловком означите рупе за причвршћивање.
- Ако је потребно, избушите пробне рупе и уметните анкере у зид.
- Secure the thermostat base plate to the wall using the provided screws.
4. Ожичење
Connect the wires from your HVAC system to the corresponding terminals on the T1900 thermostat base. Refer to the wiring diagram provided with your specific HVAC system for precise connections. Ensure wires are stripped approximately 3/8 inch and securely fastened under the terminal screws.
Common Terminal Designations:
- R/Rc/Rh: Напајање од 24V (грејање/хлађење)
- C: Common (24V return)
- G: Фан
- Г/Г1: Компресор С.tagе 1 (хлађење)
- И2: Компресор С.tagе 2 (хлађење)
- С/С1: Грејање С.tagе 1 (грејање)
- В2: Грејање С.tagе 2 (грејање)
- О / Б: Обрнути вентил (топлотне пумпе)
Note: The T1900 supports various system types. Consult the detailed wiring diagrams in the full installation manual for specific configurations (e.g., heat pump with auxiliary heat, conventional multi-stage systems).
5. Attach Thermostat to Base
Once wiring is complete and verified, carefully align the thermostat front cover with the mounted base plate and snap it into place.
6. Вратите напајање
Return to your circuit breaker or fuse box and restore power to your heating and cooling system.
Почетно подешавање
Upon initial power-up, the thermostat may prompt you to configure basic settings. Follow the on-screen instructions to set the current date, time, and system type (e.g., Conventional, Heat Pump).
System Type Configuration:
It is crucial to correctly configure the thermostat for your specific HVAC system. Incorrect settings can lead to improper operation or damage. Access the installer settings menu (refer to the full installation guide for specific button sequences) to select:
- Тип система: Heat/Cool, Heat Pump, Dual Fuel
- Број топлоте Сtages
- Број Цоол Сtages
- Reversing Valve Operation: O (Cooling) or B (Heating)
Упутство за употребу
Разумевање екрана:
The LCD screen displays the current temperature, set temperature, system mode, fan mode, time, and programming status. Refer to the icons and indicators on the screen for current operational status.
Setting System Mode:
Притисните тастер МОДЕ дугме за прелазак кроз доступне системске режиме:
- ТОПЛОТА: The system will operate to maintain the heating setpoint.
- ХЛАДАН: The system will operate to maintain the cooling setpoint.
- АУТО: The thermostat automatically switches between heating and cooling as needed to maintain the set temperature range.
- ВАН: Систем грејања и хлађења је искључен.
Setting Fan Mode:
Притисните тастер Фан дугме за прелазак кроз режиме вентилатора:
- АУТО: Вентилатор ради само када систем грејања или хлађења активно ради.
- НА: Вентилатор ради континуирано, без обзира на захтеве за грејање или хлађење.
Подешавање температуре:
Користите UP и ДОВН arrow buttons to adjust the desired temperature setpoint. In programmable modes, this will temporarily override the schedule until the next scheduled change.
Programming Schedules (7-Day):
The T1900 allows for 7-day programming, enabling different schedules for each day of the week. This feature helps save energy by adjusting temperatures when you are away or asleep.
- Притисните тастер ПРОГРАМ дугме за улазак у режим програмирања.
- Користите ДАН button to select the day or group of days you wish to program (e.g., Mon-Fri, Sat-Sun, or individual days).
- Користите ВРЕМЕ button to cycle through the four available periods: Wake, Leave, Return, Sleep.
- Користите UP и ДОВН arrow buttons to set the desired temperature for each period.
- Користите ХОЛД button to exit programming mode or save changes.
Refer to the detailed programming section in the full user guide for advanced options and specific button sequences.
Remote Control (Optional Add-on):
The Venstar T1900 thermostat can be controlled remotely via a phone using an optional add-on module (sold separately). This module connects to the thermostat and allows for remote access and control through a dedicated application. Installation and setup instructions for the remote control module are provided with the module itself.
Одржавање
Чишћење термостата:
To maintain the appearance and functionality of your thermostat, periodically wipe the exterior with a soft, damp крпа. Не користите абразивна средства за чишћење, раствараче или хемијске спрејеве, јер могу оштетити пластичне и електронске компоненте.
Замена батерије:
The Venstar T1900 thermostat does not require batteries for operation as it is powered by the 24V AC system.
Решавање проблема
If you experience issues with your Venstar T1900 thermostat, consult the following common problems and solutions:
| Проблем | Могући узрок | Решење |
|---|---|---|
| Дисплеј термостата је празан | Нема струје на термостату. | Check the circuit breaker for your HVAC system. Ensure all wiring connections are secure. |
| Heating/Cooling system does not respond | Изабран погрешан режим система; проблем са ожичењем; закључавање система. | Verify the system mode (HEAT/COOL/AUTO). Check wiring connections. Wait 5 minutes for system lockout to reset. |
| Очитавање температуре делује нетачно | Thermostat location; sensor obstruction. | Ensure the thermostat is not exposed to direct sunlight, drafts, or heat sources. Clean any dust from the thermostat vents. |
| Programming schedule is not working | Program not saved; temporary override active; incorrect time/day setting. | Ensure programs are saved. Check if a temporary override is active and cancel it. Verify current time and day settings. |
| Вентилатор ради континуирано у аутоматском режиму | Fan mode set to ON; wiring issue. | Press the FAN button to ensure it is set to AUTO. Check fan wiring. |
If these solutions do not resolve the issue, please contact customer support or a qualified HVAC technician.
Спецификације
| Феатуре | Спецификација |
|---|---|
| Бранд | Венстар |
| Назив модела | Венстар Т1900 |
| Тип контролера | Притисните дугме |
| Посебна карактеристика | Програмабилно |
| Боја | Бела |
| Специфичне употребе за производ | Heat Pump, Heater |
| Тип контроле температуре | Programmable, Smart/Remote (with add-on) |
| Волtage | 24 В АЦ |
| Дисплаи Типе | ЛЦД или ЛЕД |
| Контролни метод | Remote (with add-on) |
| Позадинско осветљење | Да |
| Димензије производа | 5.3 к 2 к 2 инча |
| Тежина артикла | 0.01 унци |
| Батерије су потребне? | бр |
Информације о гаранцији
Venstar products are manufactured to high-quality standards. This product is covered by a limited warranty against defects in materials and workmanship. The specific terms and duration of the warranty may vary. Please refer to the warranty card included with your product or visit the official Venstar webсајт за детаљне информације о гаранцији и поступке регистрације.
Корисничка подршка
For technical assistance, troubleshooting, or warranty inquiries, please contact Venstar customer support. You can typically find contact information, including phone numbers and email addresses, on the official Venstar webсајт (www.venstar.com) or on the product packaging.
When contacting support, please have your thermostat model number (T1900) and any relevant purchase information ready.