
1. Увод
Thank you for choosing the OSD Audio PRE-1 High Definition Preamplifier. This unit is designed to enhance your audio experience by providing versatile source selection and precise audio control. The PRE-1 acts as a central hub for various audio components, including turntables, CD/DVD players, and tape decks, delivering a clean and powerful signal to your main ampлифиер.
This manual provides detailed instructions for the proper setup, operation, and maintenance of your PRE-1 preamplifier. Please read this manual thoroughly before operating the unit to ensure optimal performance and longevity.
2. Важне информације о безбедности
- Извор напајања: Прикључите уређај само на тип извора напајања назначен на налепници са ознаком.
- вентилација: Ensure adequate ventilation. Do not block any ventilation openings. Install in accordance with the manufacturer’s instructions.
- Вода и влага: Не користите овај уређај у близини воде или га излажите капању или прскању.
- топлота: Не постављајте у близини извора топлоте као што су радијатори, грејни регистри, пећи или други уређаји (укључујући ampлифиерс) који производе топлоту.
- Чишћење: Чистите само сувом крпом.
- Сервисирање: Не покушавајте сами да сервисирате овај производ. Све сервисирање препустите квалификованом сервисном особљу.
- уземљење: Ова јединица мора бити правилно уземљена.
3. Садржај пакета
Молимо вас да проверите да ли су следеће ставке укључене у ваш пакет:
- OSD Audio PRE-1 High Definition Preampлифиер
- Повер Цабле
- Кориснички приручник (овај документ)
4. Производ је готовview
4.1. Предњи панел
The front panel provides access to all primary controls and a microphone input for convenient use.

This image displays the front panel of the OSD Audio PRE-1 Preamplifier, including its physical dimensions for installation planning.

Детаљно view of the left side of the PRE-1's front panel, highlighting the Microphone Level, Bass, Midrange, and Treble adjustment knobs.

Детаљно view of the right side of the PRE-1's front panel, showing the Loudness, Balance, and Volume controls, along with input selection and function buttons.
- Дугме за напајање: Укључује или искључује јединицу.
- Улаз микрофона: 1/4-inch jack for connecting a microphone.
- Ниво микрофона: Подешава јачину звука микрофонског улаза.
- Контрола баса: Подешава нискофреквентни излаз.
- Mid Control: Adjusts the mid-range frequency output.
- Контрола високих тонова: Подешава високофреквентни излаз.
- Гласност: Engages or disengages a loudness contour for enhanced bass and treble at low volumes.
- Стање: Подешава баланс левог/десног канала.
- Волумен: Главна контрола јачине звука за све излазе.
- Изаберите улаз: Rotary knob to choose between Phono, AUX1, AUX2, and CD/DVD inputs.
- Tape Button: Activates the Tape Monitor loop.
- Моно дугме: Combines stereo signals into a monaural output.
- Низак филтер: Engages a low-frequency cut-off filter.
- Искључи звук: Silences all audio output.
4.2. Задња плоча
The rear panel houses all the necessary input and output connections for your audio system.
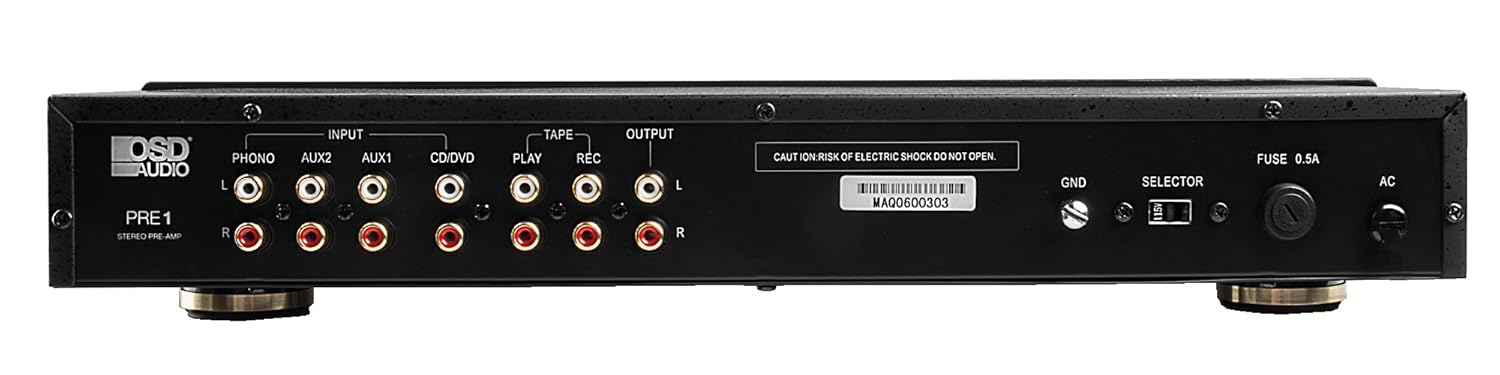
The rear panel of the PRE-1 Preamplifier, showing all input and output connections for various audio devices.
- Phono Input (L/R): RCA inputs for connecting a turntable. Includes a ground terminal.
- AUX1 Input (L/R): RCA inputs for general auxiliary devices.
- AUX2 Input (L/R): RCA inputs for a second auxiliary device.
- CD/DVD Input (L/R): RCA inputs for CD or DVD players.
- Tape Play (L/R): RCA inputs for the playback output of a tape deck or other recording device.
- Tape Rec (L/R): RCA outputs for connecting to the recording input of a tape deck or other recording device.
- Output (L/R): RCA outputs to connect to your main power ampлифиер.
- Ground Terminal (GND): Connects to the ground wire of your turntable to reduce hum.
- Изборни прекидач: For internal configuration (typically left in default position unless specified).
- Осигурач: Replace only with the specified fuse type and rating.
- Улаз наизменичне струје: Connects to the supplied power cable.
5. Подешавање и везе
Follow these steps to properly set up your OSD Audio PRE-1 Preampдизалица:
- Пласман: Place the PRE-1 on a stable, flat surface, ensuring adequate ventilation around the unit. Avoid placing it near heat sources or in direct sunlight.
- Искључивање: Ensure all audio components, including the PRE-1 and your main amplifier, are turned off before making any connections.
- Повежите изворе:
- Грамофонска плоча: Connect the RCA cables from your turntable to the Phono Input (L/R) on the PRE-1. Connect the turntable's ground wire to the ГНД terminal on the PRE-1.
- ЦД/ДВД плејер: Connect the RCA cables from your CD/DVD player to the CD/DVD Input (L/R).
- Other Devices (e.g., Streamer, Tuner): Connect RCA cables from these devices to the AUX1 Input (L/R) or AUX2 Input (L/R).
- Tape Deck: Connect the playback outputs of your tape deck to the Tape Play (L/R) inputs. Connect the recording inputs of your tape deck to the Tape Rec (L/R) излази.
- Повежите се са Ampдизалица: Повежите Output (L/R) RCA jacks on the PRE-1 to the input jacks of your main power ampлифиер.
- Прикључак за напајање: Повежите испоручени кабл за напајање на Улаз наизменичне струје on the rear panel of the PRE-1, then plug it into a suitable wall outlet.
- Почетно укључивање: Turn on your main power amplifier first, then turn on the PRE-1. When powering off, turn off the PRE-1 first, then your main ampлифиер.
6. Упутство за употребу
Once your PRE-1 is connected, follow these steps for basic operation:
- Изаберите унос: Користите Инпут Селецт rotary knob on the front panel to choose the desired audio source (Phono, AUX1, AUX2, CD/DVD).
- Подесите јачину звука: Почните са Волуме knob at its minimum setting. Begin playing your selected audio source and slowly increase the volume to a comfortable listening level.
- Контроле тона: Користите Бас, Мид, и Високи тонови knobs to adjust the tonal characteristics of your audio. Turn clockwise to increase, counter-clockwise to decrease.
- Контрола равнотеже: Подесите Баланс knob to fine-tune the left and right channel output for optimal stereo imaging.
- Гласност: Притисните тастер Гласноћа button to activate a contour that boosts bass and treble frequencies, which can be beneficial at lower listening volumes. Press again to deactivate.
- Низак филтер: Притисните тастер Лов Филтер button to engage a filter that reduces very low frequencies. This can help eliminate rumble from turntables or other unwanted low-frequency noise. Press again to deactivate.
- Моно: Притисните тастер Моно button to combine the left and right stereo channels into a single monaural signal. This is useful for playing mono recordings. Press again for stereo.
- Искључи звук: Притисните тастер Муте button to instantly silence the audio output. Press again to restore sound.
- Употреба микрофона: Plug a microphone into the Миц Инпут. Adjust the microphone's volume using the Ниво микрофона дугме.
- Tape Monitoring/Recording: If you have a tape deck connected, select the appropriate input for playback. To record, ensure your tape deck is set to record and the PRE-1 is passing the desired source through the Tape Rec outputs.
7. Одржавање
Proper care and maintenance will ensure the longevity and optimal performance of your PRE-1 Preampлифиер.
- Чишћење: Use a soft, dry cloth to clean the exterior of the unit. Do not use liquid cleaners, aerosols, or harsh chemicals, as they may damage the finish or internal components.
- вентилација: Periodically check that the ventilation openings are free from dust and obstructions.
- Везе: Occasionally check all cable connections to ensure they are secure. Loose connections can lead to signal loss or interference.
- Складиштење: If storing the unit for an extended period, disconnect it from the power outlet and store it in a cool, dry place, away from direct sunlight and extreme temperatures.
КСНУМКС. Решавање проблема
If you experience issues with your OSD Audio PRE-1, refer to the following common problems and solutions:
| Проблем | Могући узрок | Решење |
|---|---|---|
| Нема струје | Power cable not connected; Power outlet not active; Blown fuse | Ensure power cable is securely connected. Test the outlet with another device. Check and replace the fuse if necessary (refer to specifications for fuse type). |
| Нема излаза звука | Incorrect input selected; Volume too low; Mute engaged; Loose audio cables; Main amplifier off or incorrect input selected | Select the correct input source. Increase the volume. Disengage Mute. Check all RCA cable connections. Ensure your main amplifier is on and set to the correct input. |
| Изобличен звук | Volume too high (clipping); Incorrect tone control settings; Faulty cables | Reduce the volume. Adjust Bass, Mid, and Treble controls to neutral or desired settings. Try replacing audio cables. |
| Зујање или зујање | Ground loop; Loose ground wire (Phono); Interference from other electronics | Ensure turntable ground wire is connected to the PRE-1's GND terminal. Try moving the PRE-1 or other audio components away from power cables or other electronic devices. Use a ground loop isolator if necessary. |
| Микрофон не ради | Mic not connected; Mic Level too low; Faulty microphone | Ensure microphone is securely plugged into the Mic Input. Increase the Mic Level. Test with another microphone if available. |
9. Спецификације
Below are the technical specifications for the OSD Audio PRE-1 Preampдизалица:
| Феатуре | Спецификација |
|---|---|
| Модел | ПРЕ-1 |
| Бранд | ОСД Аудио |
| Број канала | 2 |
| Тип монтаже | Сурфаце Моунт |
| УПЦ | 819603012446 |
| ASIN | B01MPYJLPX |
| Произвођач | ОСД Аудио |
10. Гаранција и подршка
OSD Audio products are designed for reliability and performance. For specific warranty details and terms, please refer to the warranty card included with your product or visit the official OSD Audio website. If you require technical assistance or have questions not covered in this manual, please contact OSD Audio customer support.
OSD Audio Customer Support: Please visit the OSD Audio webсајт за контакт информације и ресурсе за подршку.