
1. Увод
This manual provides essential instructions for the safe and efficient operation, installation, and maintenance of your Steinbach SPS 50-1T self-priming filter pump. Please read this manual thoroughly before operating the pump to ensure proper function and longevity of the product. This filter pump is designed for use with swimming pools up to approximately 22,000 liters water content.
2. Безбедносна упутства
Важно: Always disconnect the pump from the power supply before performing any installation, maintenance, or cleaning tasks.
- Ensure the power supply matches the pump's specifications (230V/250W).
- The pump must be installed on a stable, level surface, protected from direct weather exposure.
- Не користите пумпу ако је кабл за напајање или утикач оштећен.
- Држите децу и неовлашћена лица даље од пумпе током рада.
- Never run the pump dry. Ensure the pump is filled with water before starting.
- Максимална температура воде за рад је 35°C.
- All electrical connections should be performed by a qualified electrician and comply with local regulations.
3. Производ је готовview и компоненте
The Steinbach SPS 50-1T is a self-priming filter pump equipped with a pre-filter and an integrated timer. Familiarize yourself with the main components:

Слика 1: Свеукупно view of the Steinbach SPS 50-1T filter pump, showing the motor, pump housing, pre-filter, and control panel.
- Мотор: The electrical unit that drives the pump impeller.
- Кућиште пумпе: Contains the impeller and directs water flow.
- Предфилтер: A transparent chamber with a removable basket designed to capture larger debris before it reaches the pump impeller, protecting the pump from damage.
- Улазни/излазни прикључци: Points for connecting hoses (Ø 32/38 mm).
- Контролна табла: Features ON/OFF and TIMER buttons, along with indicator lights for setting operation duration.

Слика 2: Детаљно view of the pre-filter assembly, showing the transparent lid and the hose connection point for the inlet.
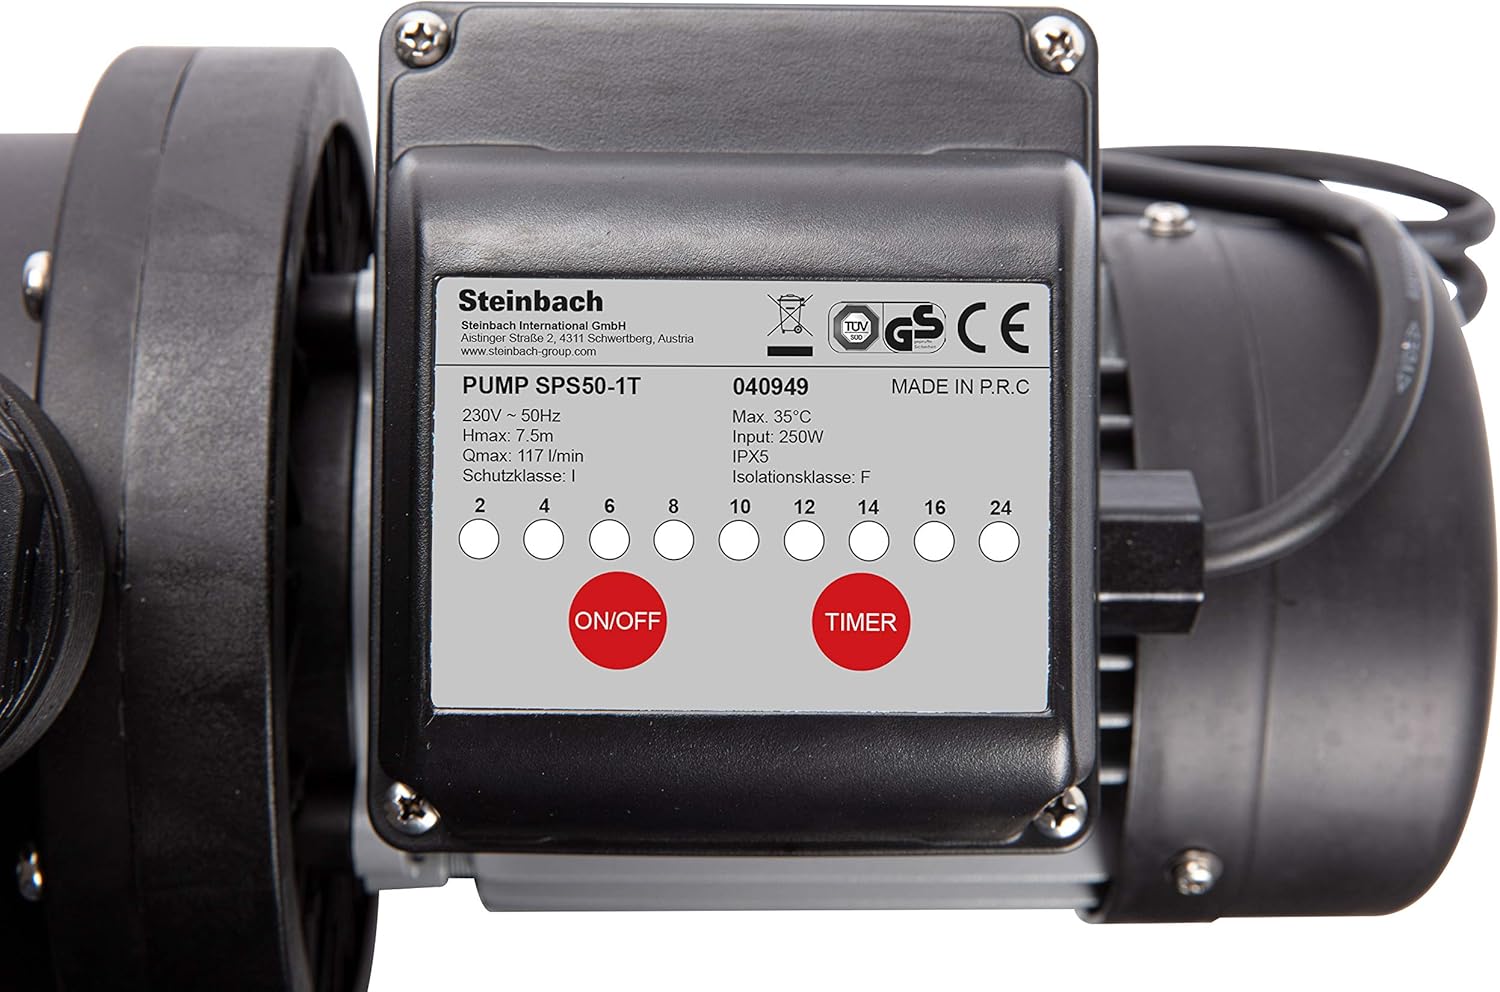
Слика 3: The pump's control panel, featuring the ON/OFF button, TIMER button, and indicator lights for setting operational hours.
4. Подешавање и инсталација
- Пласман: Position the pump on a firm, level surface, ideally below the water level of the pool for easier priming. Ensure it is protected from rain and direct sunlight.
- Прикључци црева: Connect the pool's skimmer line to the pump's inlet (pre-filter side) and the return line to the pump's outlet. Use hoses with a diameter of Ø 32/38 mm. Secure all connections with hose clampс за спречавање цурења.

Слика 4: View of the threaded inlet and outlet ports on the pump, ready for hose adapters.
- Пуњење пумпе: Before starting, ensure the pre-filter is filled with water. If the pump is above water level, it may require manual priming by filling the pre-filter chamber until water flows into the pump housing.
- Електрични прикључак: Plug the pump into a grounded electrical outlet (230V). Ensure the outlet is protected by a Residual Current Device (RCD) for safety.
5. Упутство за употребу
Once installed and primed, the pump is ready for operation.
5.1 Ручни рад
- Притисните тастер ОН/ОФФ button on the control panel to start the pump.
- Притисните тастер ОН/ОФФ button again to stop the pump.
5.2 Функција тајмера
The integrated timer allows for automated operation cycles.
- Ensure the pump is connected to power.
- Притисните тастер ТИМЕР button repeatedly to select the desired operating duration (e.g., 2, 4, 6, 8, 10, 12, 14, 16, 24 hours). The corresponding indicator light will illuminate.
- The pump will start and run for the selected duration, then automatically shut off.
- The timer cycle will repeat daily at the same time it was initially set. To reset the timer, unplug the pump for a few seconds and then plug it back in.
6. Одржавање
Редовно одржавање обезбеђује оптималне перформансе и продужава век трајања ваше пумпе.
6.1 Cleaning the Pre-filter Basket
- Искључите пумпу из напајања.
- Close any valves to prevent water flow from the pool.
- Unscrew the transparent lid of the pre-filter.
- Remove the pre-filter basket and clean it thoroughly under running water.
- Inspect the O-ring seal on the lid for damage and ensure it is clean.
- Replace the basket, secure the lid, and open the valves.
- Поново напуните пумпу ако је потребно пре поновног покретања.

Слика 5: The pre-filter chamber with its transparent lid removed, showing the internal basket for debris collection.
6.2 Зимовање
- At the end of the swimming season, disconnect the pump from power and drain all water from the pump and hoses to prevent freezing damage.
- Темељно очистите пумпу и чувајте је на сувом месту заштићеном од мраза.
КСНУМКС. Решавање проблема
| Проблем | Могући узрок | Решење |
|---|---|---|
| Пумпа се не покреће | No power; tripped circuit breaker; motor overload. | Check power connection; reset circuit breaker; allow motor to cool. |
| Пумпа ради, али нема протока воде | Pump not primed; air leak in suction line; clogged pre-filter basket; closed valves. | Prime the pump; check all connections for leaks; clean pre-filter; open all valves. |
| Смањен проток воде | Partially clogged pre-filter; restricted suction or return lines; low water level in pool. | Clean pre-filter; check and clear hoses; ensure adequate pool water level. |
| Прекомерна бука | Air in pump; cavitation; motor bearing wear. | Ensure pump is fully primed and no air leaks; check for obstructions in suction line; contact service if motor noise persists. |
8. Техничке спецификације
| Феатуре | Спецификација |
|---|---|
| Модел | SPS 50-1T (040949) |
| Повер Суппли | 230В / 50Хз |
| Потрошња енергије | 250 Ваттс |
| Pump Power (Flow Rate) | 7,020 liters/hour (Q= 117 l/min) |
| Макс. висина пумпе (напор) | 7.5 метара |
| Тип пумпе | Self-priming with Pre-Filter |
| Прикључак црева | Ø 32/38 мм |
| Максимална температура воде | Ночьу 35°Ц |
| Maximum Pool Size | 22,000 литара |
| Ниво буке | Прибл. 70 дБ |
| Интегрисане карактеристике | Тајмер |
| Димензије производа | 1 к 1 к 1 цм |
| Тежина артикла | 6 килограма |
| Материјал | Metal (motor housing), Plastic (pump housing, pre-filter) |
9. Гаранција и подршка
For warranty information, technical support, or spare parts, please refer to the documentation provided with your purchase or contact Steinbach customer service. Keep your proof of purchase for warranty claims.
You can find more information and contact details on the official Steinbach webсајт: ввв.стеинбацх.ат