1. Увод
This manual provides detailed instructions for the installation, operation, and maintenance of your ASRock AB350M-HDV MicroATX Motherboard. The ASRock AB350M-HDV is designed to support AMD Socket AM4 A-Series APUs (Bristol Ridge) and Ryzen Series CPUs (Summit Ridge), featuring a Digi Power design and 7 Power Phase design for stable performance. It supports DDR4 memory and offers various connectivity options including SATA3, USB 3.0, and an Ultra M.2 slot.
2. Производ је готовview
The ASRock AB350M-HDV motherboard is a MicroATX form factor board, ideal for compact PC builds. It features essential components for a modern computing system.

Слика 2.1: Под углом view of the ASRock AB350M-HDV Motherboard, showcasing its compact MicroATX design and various components.
Кључне карактеристике:
- Supports AMD Socket AM4 A-Series APUs (Bristol Ridge) and Ryzen Series CPUs (Summit Ridge).
- DDR4 memory support up to 3200+ (OC) for Ryzen CPUs and 2400 for A-series APUs.
- 1 PCIe 3.0 x16 slot and 1 PCIe 2.0 x1 slot for expansion cards.
- 4 SATA3 ports and 1 Ultra M.2 (PCIe Gen3 x4 & SATA3) slot for storage.
- 6 USB 3.0 ports (2 front, 4 rear) and 2 USB 2.0 ports for peripheral connectivity.
- Integrated Gigabit Ethernet for network connectivity.
- Video outputs: VGA, DVI, HDMI.

Слика 2.2: Одозго надоле view of the ASRock AB350M-HDV Motherboard, highlighting the CPU socket, RAM slots, M.2 slot, and PCIe slots.
3. Подешавање и инсталација
Follow these steps carefully to install your ASRock AB350M-HDV motherboard and its components.
3.1 Инсталација ЦПУ-а
- Пронађите АМ4 процесорски сокет на матичној плочи.
- Подигните полугу за оптерећење са стране утичнице.
- Поравнајте троугласту ознаку на процесору са одговарајућом ознаком на подножју. Пажљиво поставите процесор у подножје без насиља.
- Спустите полугу за оптерећење да бисте осигурали процесор на месту.
- Инсталирајте хладњак процесора према упутствима произвођача.
3.2 RAM (Memory) Installation
- Locate the DDR4 DIMM slots. This motherboard has 4 slots.
- Отворите копче на оба краја DIMM слота.
- Поравнајте зарез на РАМ модулу са кључем у ДИММ слоту.
- Insert the RAM module firmly into the slot until the clips snap into place. Ensure both clips are closed.
3.3 Инсталација уређаја за складиштење података (SATA и M.2)
SATA дискови:
- Connect one end of a SATA data cable to a SATA3 port on the motherboard.
- Повежите други крај SATA кабла за пренос података са чврстим диском или SSD-ом.
- Повежите SATA кабл за напајање са јединице за напајање (PSU) на уређај за складиштење података.
М.2 ССД:
- Locate the Ultra M.2 slot on the motherboard.
- Remove the M.2 screw and standoff from the slot.
- Уметните M.2 SSD у слот под углом од 30 степени.
- Push the M.2 SSD down and secure it with the screw and standoff.
3.4 Прикључци за напајање
- Connect the 24-pin ATX power connector from your PSU to the 24-pin power socket on the motherboard.
- Connect the 8-pin (or 4-pin) ATX 12V power connector from your PSU to the corresponding socket near the CPU.
3.5 Прикључци предње плоче
Connect the cables from your PC case (Power Button, Reset Button, HDD LED, Power LED, USB, Audio) to the corresponding headers on the motherboard. Refer to the motherboard layout diagram in your physical manual for exact header locations.
3.6 Инсталација графичке картице
- Locate the PCIe 3.0 x16 slot.
- Уклоните одговарајући поклопац слота за проширење са кућишта рачунара.
- Align the graphics card with the PCIe slot and press it down firmly until it clicks into place.
- Причврстите графичку картицу за кућиште помоћу завртња.
- Connect any required PCIe power cables from your PSU to the graphics card.
4. Упутство за употребу
4.1 Прво покретање и подешавање BIOS-а/UEFI-ја
- Након састављања свих компоненти, повежите монитор, тастатуру и миш.
- Укључите свој систем.
- Током покретања, више пута притисните ДЕЛ or F2 тастер за улазак у услужни програм за подешавање BIOS/UEFI-ја.
- In the BIOS, you can configure boot order, system time, and other advanced settings. Save changes and exit to boot into your operating system installation media.
4.2 Инсталација драјвера
After installing your operating system, install the necessary drivers for the motherboard components. These typically include chipset drivers, audio drivers, LAN drivers, and any specific utility drivers. Drivers can be found on the ASRock official webсајт за ваш специфични модел матичне матичне главе.
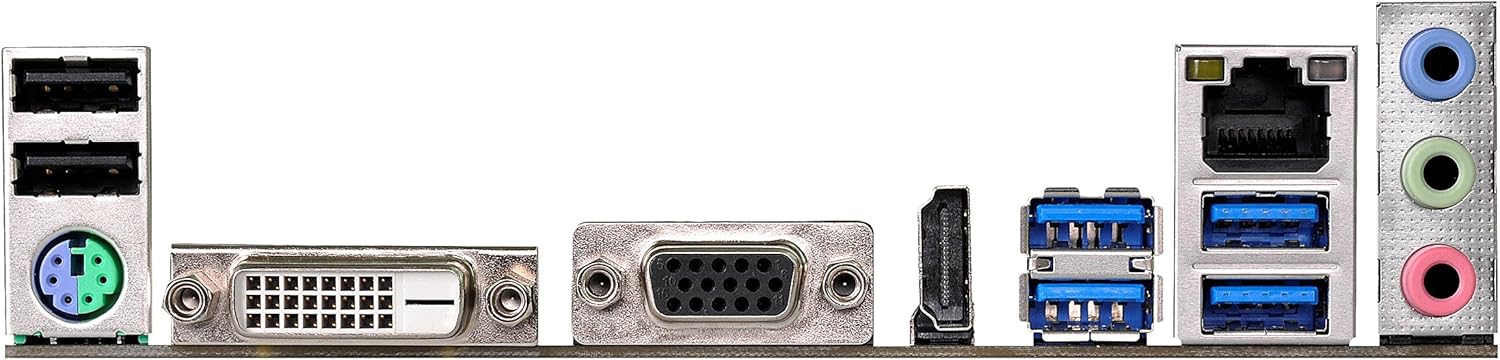
Figure 4.1: Rear I/O panel of the ASRock AB350M-HDV Motherboard, showing USB ports, video outputs (VGA, DVI, HDMI), LAN port, and audio jacks.
5. Одржавање
Правилно одржавање осигурава дуготрајност и оптималне перформансе ваше матичне плоче.
5.1 Чишћење
- Редовно чистите прашину са матичне плоче и компоненти помоћу компримованог ваздуха.
- Уверите се да је систем искључен и искључен из струје пре чишћења.
- Избегавајте употребу течних средстава за чишћење директно на компонентама.
5.2 Ажурирања BIOS-а/UEFI-ја
Периодично проверавајте ASRock website for BIOS/UEFI updates. Updates can improve compatibility, stability, and performance. Follow the instructions provided by ASRock carefully when performing a BIOS update to avoid system damage.
КСНУМКС. Решавање проблема
Овај одељак пружа решења за уобичајене проблеме на које можете наићи.
6.1 Нема напајања / Нема POST-а (самотестирање при укључивању)
- Проверите прикључке за напајање: Ensure the 24-pin and 8-pin (or 4-pin) CPU power connectors are securely seated.
- Verify PSU: Test your power supply unit (PSU) to ensure it is functional and providing adequate power.
- Поново поставите компоненте: Remove and re-install the CPU, RAM, and graphics card to ensure they are properly seated.
- Обриши ЦМОС: Refer to your physical manual for instructions on how to clear the CMOS (Complementary Metal-Oxide-Semiconductor) settings, which can resolve boot issues.
6.2 Нема излаза за приказ
- Веза монитора: Ensure your monitor is correctly connected to the graphics card or motherboard (if using an APU with integrated graphics).
- графичка картица: If using a dedicated graphics card, ensure it is properly installed and has sufficient power. Test with another graphics card if possible.
- APU Compatibility: If using an AMD A-Series APU, ensure your monitor is connected to the motherboard's video outputs (VGA, DVI, HDMI). Ryzen CPUs without integrated graphics require a dedicated graphics card.
6.3 Operating System Not Booting
- Редослед покретања: Check the BIOS/UEFI settings to ensure the correct boot device (e.g., SSD/HDD with OS) is prioritized.
- Уређај за складиштење: Verify that your storage device is detected in the BIOS.
- OS Installation: If the OS is newly installed, ensure the installation process completed successfully.
7. Спецификације
| Бранд | АСРоцк |
| Назив модела | AB350M-HDV |
| ЦПУ Соцкет | Соцкет АМ4 |
| Тип чипсета | АМД Промонтори Б350 |
| Компатибилни процесори | AMD A-Series APUs (Bristol Ridge), Ryzen Series CPUs (Summit Ridge) |
| Технологија РАМ меморије | ДДР4 |
| Брзина меморије | 2133 MHz (Base), up to 3200+ (OC) for Ryzen CPU |
| Доступни меморијски слотови | 4 |
| Интерфејс графичке картице | PCI Express (1x PCIe 3.0 x16, 1x PCIe 2.0 x1) |
| Укупно SATA портова | 4 (SATA3) |
| М.2 Слот | 1 (Ultra M.2, PCIe Gen3 x4 & SATA3) |
| Укупно УСБ портова | 8 (6x USB 3.0, 2x USB 2.0) |
| Видео излази | ВГА, ДВИ, ХДМИ |
| Тип главног конектора за напајање | 24-пински ATX |
| Форм Фацтор | МицроАТКС |
| Тежина артикла | 1.3 фунти |
8. Информације о гаранцији
The ASRock AB350M-HDV Motherboard comes with a 1 година гаранције. For specific terms and conditions, please refer to the warranty card included with your product or visit the official ASRock webсајту.
9. Подршка
За додатну помоћ, техничку подршку или преузимање драјвера, посетите званичну ASRock веб-сајт. webсајт:
You can also find contact information for customer service and support resources on their webсајту.