
1. Производ је готовview
This manual provides detailed instructions for the installation, operation, and maintenance of your TORCHSTAR 6 Inch Slim LED Recessed Lighting with Junction Box. This ultra-thin LED downlight is designed for efficient and versatile illumination in various indoor settings.
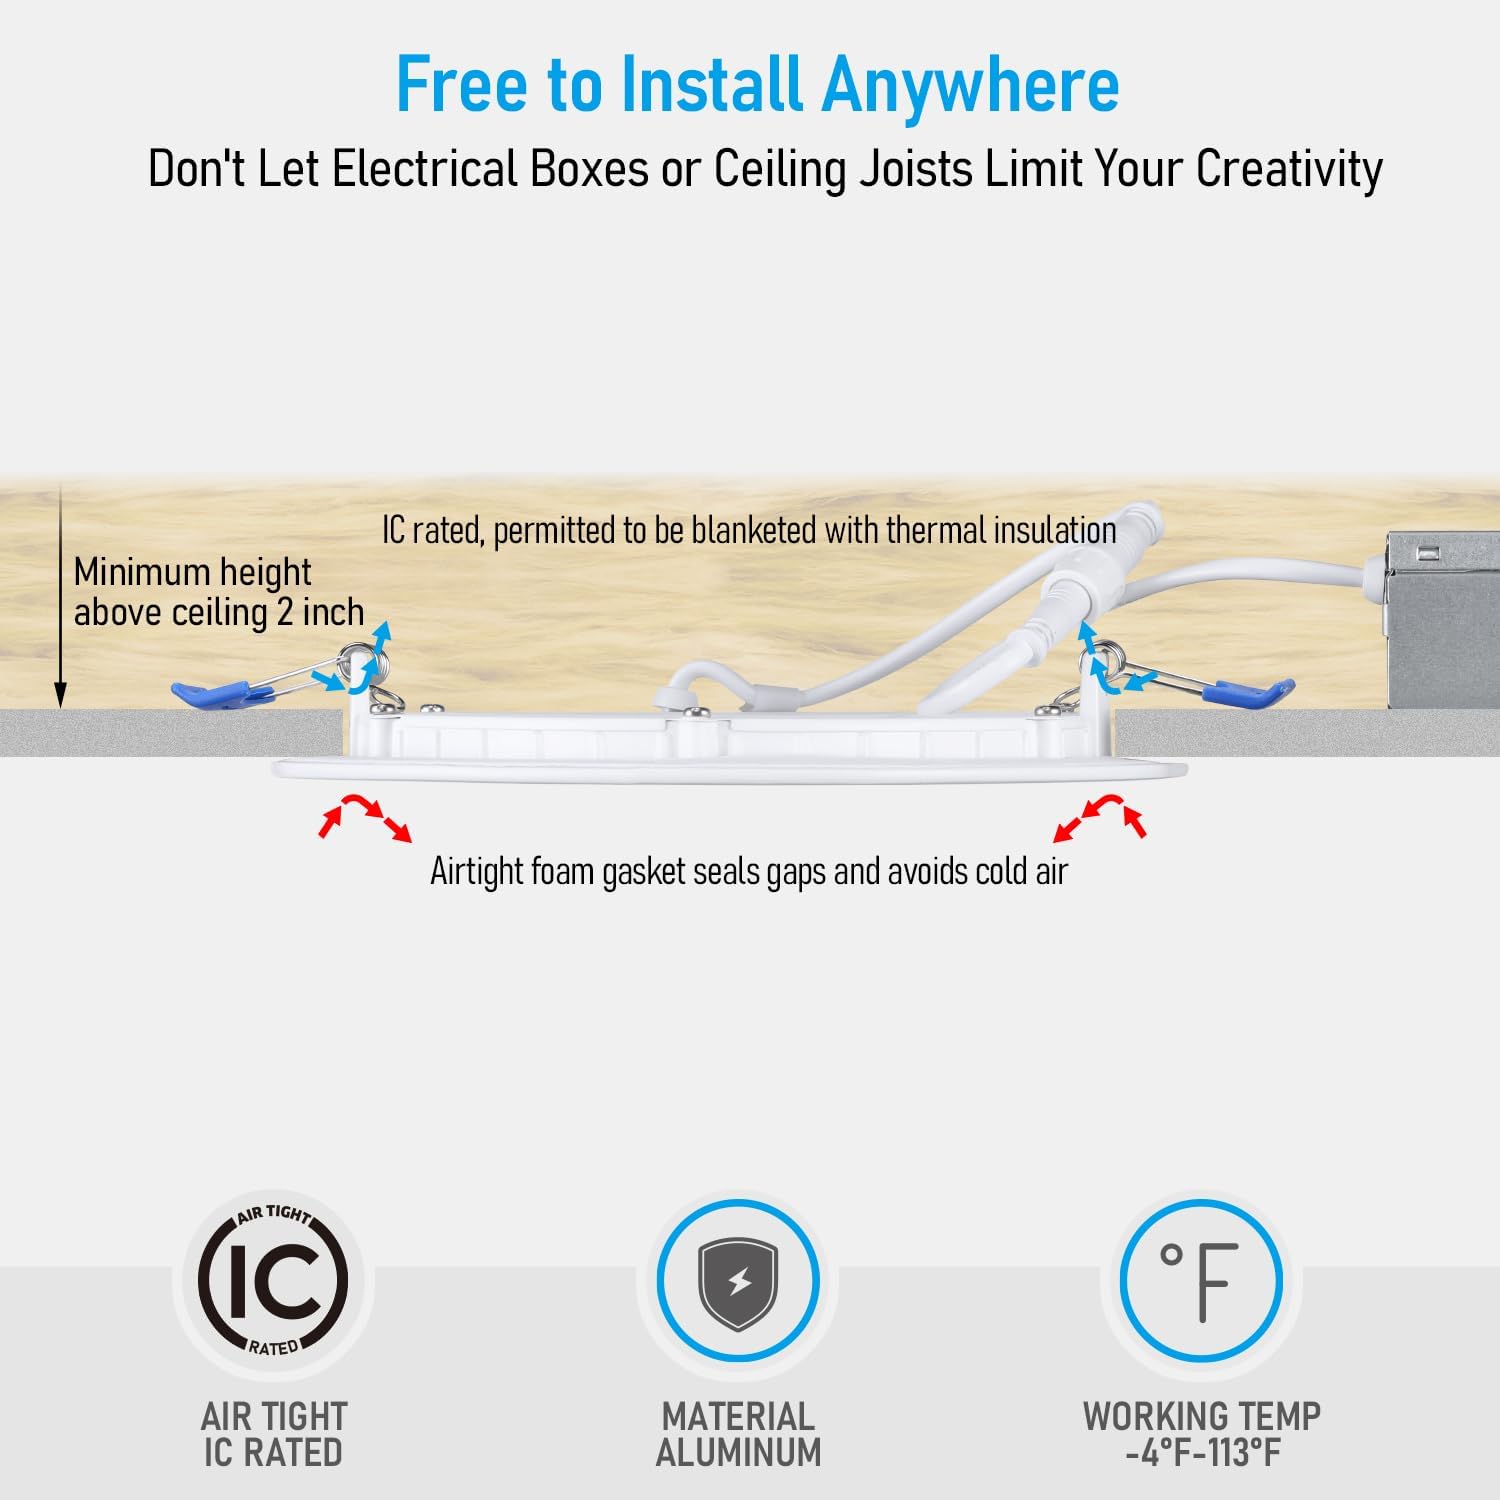
Image Description: A cross-section view of the recessed light showing its ultra-thin profile (minimum height above ceiling 2 inches) and features like IC rating, airtight foam gasket, aluminum material, and working temperature range (-4°F to 113°F).
Кључне карактеристике укључују:
- Efficient Lighting: Uses 12W to provide 1100lm brightness, 100-130V.
- Ултра танак дизајн: Requires only 2 inches of clearance, suitable for ceilings with limited space.
- Поуздани квалитет: ETL certified, corrosion and rust-resistant aluminum material, IC rated for contact with insulation.
- CRI90 & Dimmable: Dimmable from 5% to 100% with high CRI90 for accurate color rendering.
- Лако се инсталира: Includes a junction box for direct ceiling installation without a separate housing can.
2. Важне информације о безбедности
WARNING: RISK OF ELECTRIC SHOCK. Disconnect power at the circuit breaker or fuse box before installation or servicing. Improper installation can lead to electric shock or fire.
- Пажљиво прочитајте сва упутства пре почетка инсталације.
- All electrical connections must be in accordance with local and National Electrical Code (NEC) standards. If you are unfamiliar with proper electrical wiring connections, consult a qualified electrician.
- Уверите се да је залиха волtage is compatible with the fixture (100-130V).
- Не модификујте уређај или његове компоненте.
- Do not install in areas exposed to direct water spray or submersion. This product is rated for damp само локације.
- Носите заштитне наочаре и рукавице током инсталације.
- Држите децу даље од радног подручја.
3. Садржај пакета
Пре почетка инсталације проверите да ли су све компоненте присутне:
- 6 x TORCHSTAR 6 Inch Slim LED Recessed Lights
- 6 x razvodne kutije
- Wire connectors (quantity may vary)
- Mounting screws (quantity may vary)
Note: Additional items such as cable connectors (required by code for metal boxes) and a 6 3/8 inch hole saw are not included and may be necessary for installation.
4. Спецификације производа
| Спецификација | Детаљ |
|---|---|
| Бранд | ТОРЦХСТАР |
| Број модела | JXLDL6D-6P12W40 |
| Величина | 6 инча |
| Температура боје | 4000К Цоол Вхите |
| Осветљеност | 1100 лумена |
| Ватtage | 12 Ваттс |
| Волtage | 100-130 волти |
| Диммабле | Да (5%-100%) |
| ЦРИ | 90+ |
| Материјал | Алуминијум |
| Животни век | 50,000 сата |
| Цертификати | ЕТЛ, Енерги Стар, ФЦЦ |
| ИЦ Ратед | Yes (suitable for contact with insulation) |
| Оцена локације | Damp Локација |
| Потребно одобрење | 2 инча |
| Димензије артикла (Д к Ш к В) | 7.01 cm D x 7.01 cm Š x 0.46 cm V |
| Cut-out Hole Size | 6.10 inches (155mm) - Note: Some users recommend 6 3/8 inches for easier fit. |

Image Description: A detailed diagram illustrating the product dimensions, including the light panel's diameter (7.01 inches), thickness (0.46 inches), and the junction box's dimensions (4.77 x 2.72 x 1.38 inches). The recommended cut-out hole size is indicated as 6.10 inches (155mm).
5. Упутства за инсталацију
Before you begin, ensure power is turned off at the circuit breaker. This product is designed for easy installation, but if you are unsure, consult a qualified electrician.
Корак 1: Припремите плафон
Determine the desired location for your recessed light. Use a hole saw to cut a circular opening in the ceiling. The recommended cut-out hole size is 6.10 inches (155mm). Some users have found a 6 3/8 inch hole saw provides a slightly easier fit.

Image Description: A person wearing yellow gloves is using a utility knife to cut a circular hole in a white ceiling, guided by a template labeled "TEMPLATE".
Step 2: Wire the Junction Box
Open the junction box. Connect the household electrical wires to the corresponding wires inside the junction box (black to black, white to white, ground to ground) using the provided wire connectors. Ensure all connections are secure. Close the junction box cover.
Important: Ensure proper cable connectors are used where wires enter the metal junction box, as required by electrical codes. These are typically not included.

Image Description: A person wearing yellow gloves is connecting electrical wires inside a gray junction box. Orange wire connectors are visible.
Step 3: Connect the LED Panel to the Driver
Locate the cable extending from the LED light panel and the corresponding connector from the junction box. Plug the LED panel cable into the connector from the junction box. Ensure a firm connection.

Image Description: A person wearing yellow gloves is connecting the white cable from the LED light panel to the cable extending from the junction box.
Step 4: Insert the Light into the Ceiling
Gently push the junction box up into the ceiling opening. Then, fold the spring clips on the sides of the LED light panel upwards and insert the light into the hole. The spring clips will secure the light flush against the ceiling.

Опис слике: Крупни план view of a white, round LED recessed light installed flush with a white ceiling, emitting light downwards.
Видео за инсталацију
Video Description: An official product video from Torchstar demonstrating the installation process of the ultra-thin LED recessed lighting. The video shows the steps from preparing the ceiling to securing the light in place.
6. Упутство за употребу
Once installed, restore power to the circuit. The TORCHSTAR 6 Inch Slim LED Recessed Light will illuminate. This fixture is dimmable, allowing you to adjust the light output from 5% to 100% using a compatible LED dimmer switch (sold separately).
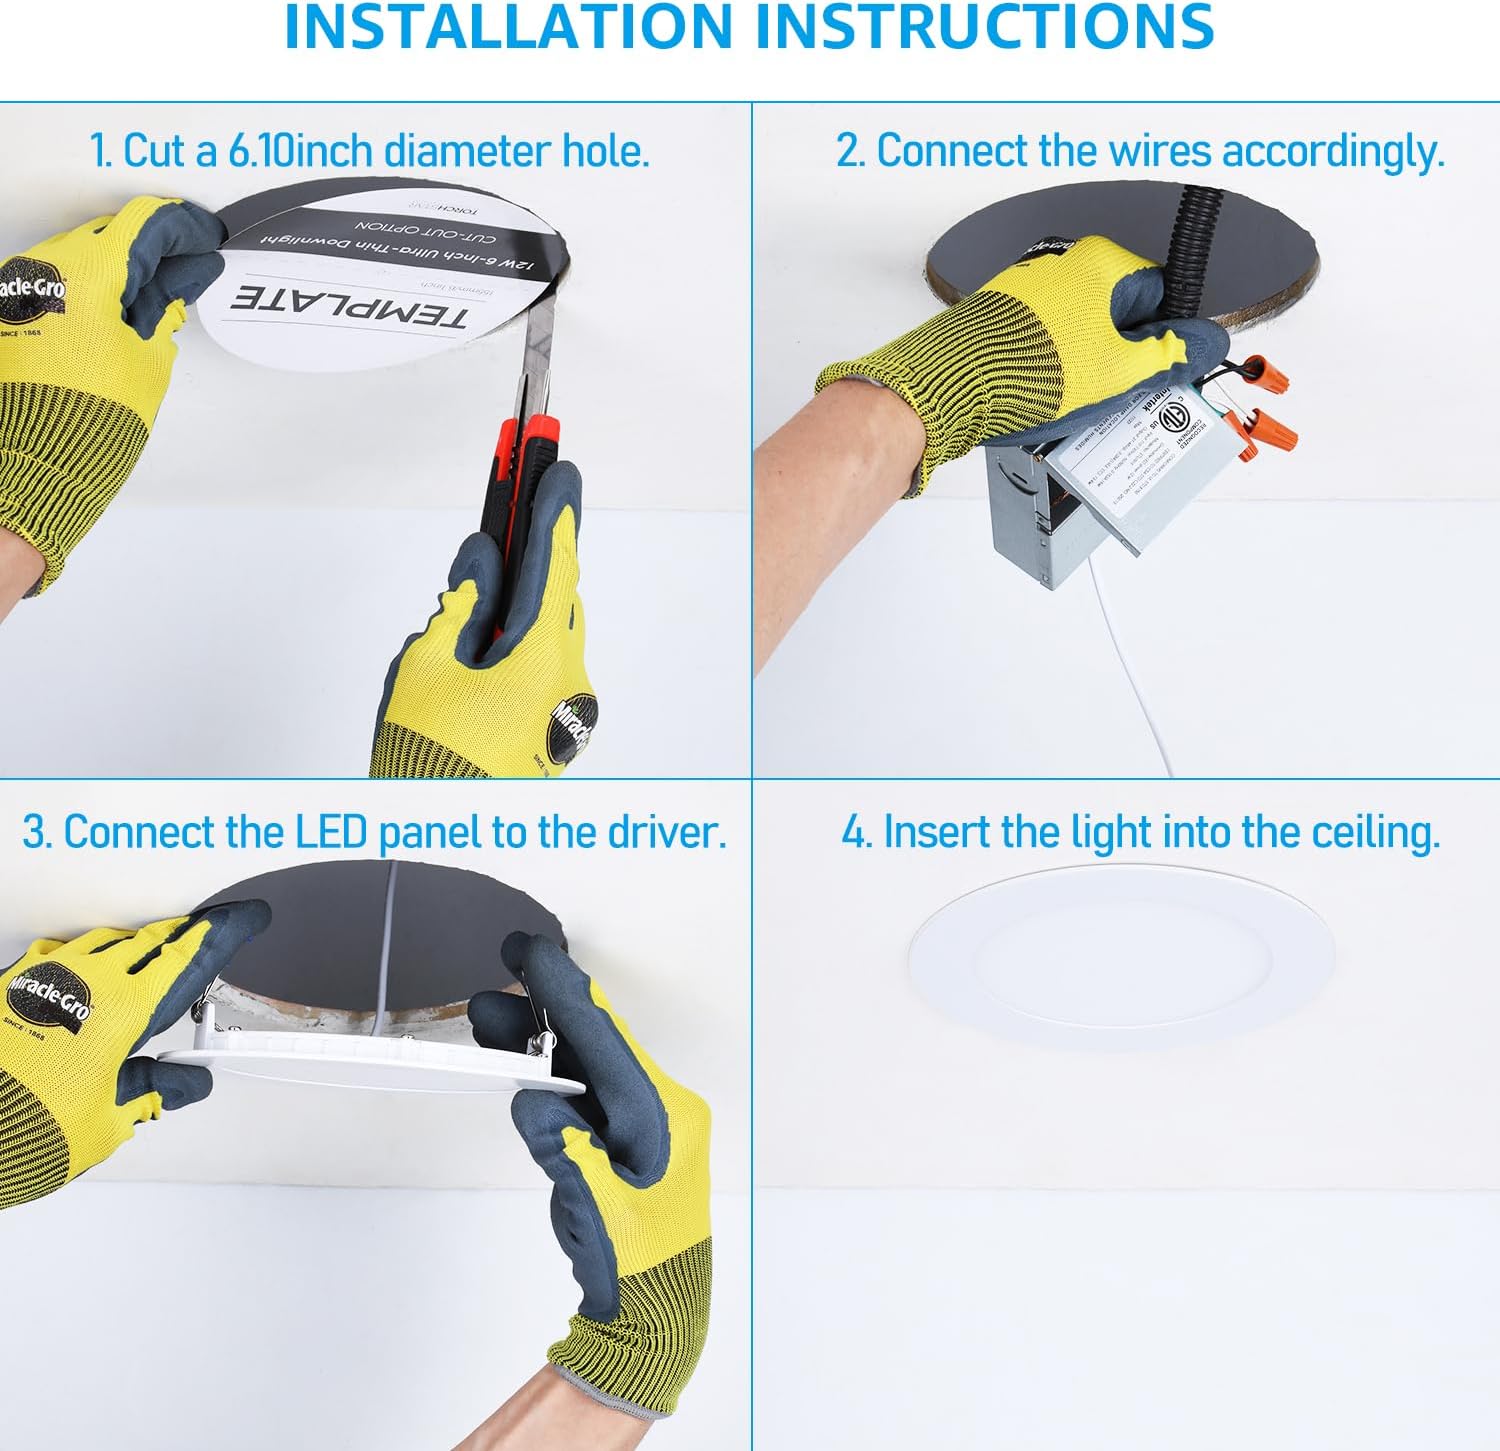
Image Description: A modern living room with multiple recessed lights installed in the ceiling. Icons indicate CRI90, a dimming range of 5%-100%, and suitability for damp локацијама.
Функционалност затамњивања
For optimal dimming performance, use an LED-compatible dimmer switch. Refer to the dimmer switch manufacturer's instructions for installation and compatibility. The lights provide true and vivid colors across their dimming range due to their high CRI90 rating.
Опис видеа: Кратак уводview video from Torchstar demonstrating the dimming capability of the recessed lights, showing the light output changing from bright to dim.
7. Одржавање
The TORCHSTAR 6 Inch Slim LED Recessed Lighting is designed for long-lasting performance with minimal maintenance.
- Чишћење: Ensure power is off before cleaning. Wipe the light fixture with a soft, dry, or slightly damp cloth. Do not use harsh chemicals or abrasive cleaners, as these can damage the finish or electrical components.
- Замена сијалице: This LED fixture has an integrated LED light source with a lifespan of approximately 50,000 hours and does not require bulb replacement. If the light stops functioning, refer to the troubleshooting section or contact customer support.
КСНУМКС. Решавање проблема
If you experience issues with your TORCHSTAR LED Recessed Lighting, refer to the following common problems and solutions:
| Проблем | Могући узрок | Решење |
|---|---|---|
| Светлост се не пали. | No power supply, loose wiring, faulty switch, or damaged fixture. | Check circuit breaker. Ensure all wire connections are secure. Test the switch. If the issue persists, contact a qualified electrician or customer support. |
| Светло трепери или се пригушује неравномерно. | Incompatible dimmer switch, loose wiring, or voltagе флуктуације. | Ensure you are using an LED-compatible dimmer. Check wire connections. Consult an electrician if voltagСумња се на проблеме. |
| Светло није тако јако као што се очекивало. | Dimmer setting is too low, or incorrect light placement. | Adjust the dimmer to maximum brightness. Ensure adequate spacing between lights for desired illumination levels. |
| Buzzing noise from the light. | Некомпатибилни прекидач за пригушивање јачине светла. | Replace the dimmer with an LED-compatible model. |
9. Гаранција и корисничка подршка
This TORCHSTAR product comes with a Двогодишња гаранција произвођача од дана куповине. Ова гаранција покрива недостатке у материјалу и изради при нормалној употреби.
Гаранција не покрива:
- Damage caused by improper installation or misuse.
- Оштећења узрокована неовлашћеним поправкама или модификацијама.
- Damage due to natural disasters or accidents.
For warranty claims, technical assistance, or any questions regarding your product, please contact TORCHSTAR customer support. You can find more information and contact details on the official TORCHSTAR Brand Store.