Увод
This manual provides detailed instructions for the setup, operation, and maintenance of your Digoo DG-C3 Wireless Weather Station. This device integrates a hygrometer, thermometer, weather forecast station, and alarm clock functions, offering comprehensive environmental monitoring and timekeeping capabilities. Please read this manual thoroughly before using the product to ensure correct operation and to maximize its features.
Садржај пакета
- Digoo DG-C3 Wireless Weather Station Unit
- УСБ кабл за напајање
- Кориснички приручник (овај документ)
Note: Batteries (3x AAA) are not included and must be purchased separately.
Производ је завршенview
Familiarize yourself with the various components of your Digoo DG-C3 weather station.
Предњи екран
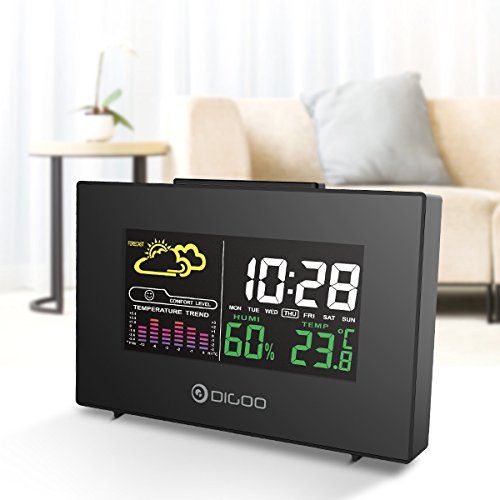
The front display features a color backlit screen showing the current time, day of the week, indoor humidity, indoor temperature, and a weather forecast icon. It also includes a comfort level indicator and a temperature trend graph.
- Време и датум: Digital display of current time and day.
- Временска прогноза: Icons indicating predicted weather conditions (e.g., sunny, cloudy, rainy).
- Ниво удобности: Indicates indoor comfort based on temperature and humidity.
- Тренд температуре: Bar graph showing recent temperature changes.
- Влажност: Перценtage display of indoor humidity.
- температура: Digital display of indoor temperature (Celsius or Fahrenheit).
Задњи панел
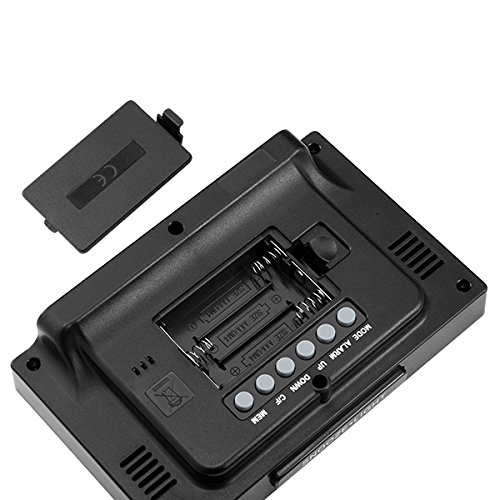
The back of the unit houses the battery compartment and various control buttons for setting the device.
- Одељак за батерије: Holds 3x AAA batteries for power backup.
- Дугме МОДЕ: Used to switch between display modes and enter setting mode.
- Дугме АЛАРМ: Used to set and activate/deactivate the alarm.
- Дугме ГОРЕ: Used to increase values during settings or view maximum records.
- Дугме ДОЛЕ: Used to decrease values during settings or view minimum records.
- Дугме °Ц/°Ф: Пребацује се између Целзијусових и Фаренхајтових температурних јединица.
- Дугме МЕМ: Навикли view memory records for temperature and humidity.
Горња плоча
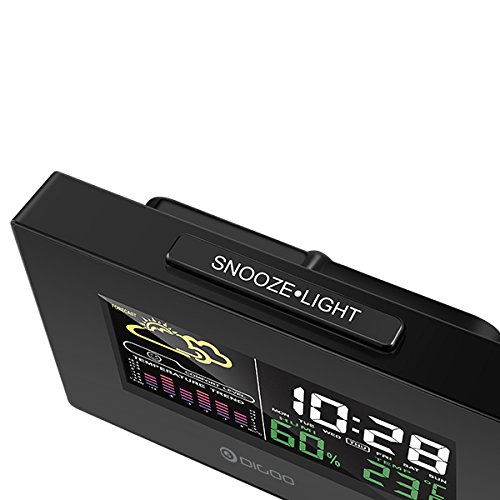
The top of the unit features a single button for snooze and backlight functions.
- SNOOZE·LIGHT Button: Press to activate the backlight or snooze the alarm.
Сетуп
1. Укључивање
- Инсталација батерије: Open the battery compartment cover on the back of the unit. Insert 3x AAA batteries, ensuring correct polarity (+/-). Close the cover. Batteries provide backup power and allow for portability.
- USB Power Connection: For continuous power and backlight, connect the provided USB cable to the USB port on the unit and to a compatible USB power adapter (not included) or a computer USB port.
- The display will light up and show default settings.
2. Initial Settings (Time, Date, Unit)
- Подешавање времена:
- Притисните и држите МОДЕ button for approximately 3 seconds to enter time setting mode. The hour digit will flash.
- Користите UP or ДОВН дугмад за подешавање сата.
- Притисните МОДЕ again to confirm the hour and move to minute setting. The minute digit will flash.
- Користите UP or ДОВН дугмад за подешавање минута.
- Притисните МОДЕ again to confirm and move to 12/24 hour format selection.
- Користите UP or ДОВН дугмад за избор 12-часовног или 24-часовног формата.
- Притисните МОДЕ да бисте потврдили и изашли из подешавања времена.
- Подешавање датума:
- Након подешавања времена, притисните МОДЕ again to enter date setting mode. The year will flash.
- Користите UP or ДОВН дугмад за подешавање године.
- Притисните МОДЕ to confirm and move to month setting.
- Користите UP or ДОВН дугмад за подешавање месеца.
- Притисните МОДЕ to confirm and move to day setting.
- Користите UP or ДОВН дугмад за подешавање дана.
- Притисните МОДЕ to confirm and exit date setting.
- Избор јединице температуре:
- Притисните тастер ° Ц/° Ф button on the back of the unit to switch between Celsius (°C) and Fahrenheit (°F) temperature display.
Упутство за употребу
1. Функција будилника
- Подешавање аларма:
- Притисните тастер АЛАРМ button once to display the current alarm time.
- Притисните и држите АЛАРМ button for approximately 3 seconds. The hour digit will flash.
- Користите UP or ДОВН дугмад за подешавање сата аларма.
- Притисните АЛАРМ again to confirm the hour and move to minute setting. The minute digit will flash.
- Користите UP or ДОВН дугмад за подешавање минута аларма.
- Притисните АЛАРМ да потврдите и изађете из подешавања аларма.
- Активирање/деактивирање аларма:
- Док сте у нормалном режиму приказа времена, притисните АЛАРМ button repeatedly to toggle the alarm ON or OFF. An alarm icon will appear on the display when the alarm is active.
- Одгода функција:
- Када се огласи аларм, притисните СНООЗЕ·ЛИГХТ button on the top of the unit to activate the snooze function. The alarm will temporarily stop and sound again after a few minutes (typically 5-10 minutes).
- To stop the alarm completely, press any other button on the back panel.
2. Временска прогноза
The weather station provides a weather forecast based on internal atmospheric pressure changes. The forecast icons (e.g., sunny, cloudy, rainy) are predictions for the next 12-24 hours and may not always match local weather services, which use more comprehensive data.
- The forecast icon is displayed on the upper left of the screen.
- The device requires a period of stable operation (typically 24 hours) to calibrate and provide accurate forecasts.
3. Приказ температуре и влажности
- The current indoor temperature and humidity are continuously displayed on the screen.
- Viewing Min/Max Records:
- Притисните тастер МЕМ button once to display the maximum recorded temperature and humidity.
- Притисните МЕМ again to display the minimum recorded temperature and humidity.
- Притисните МЕМ a third time to return to current readings.
- To clear the min/max records, press and hold the МЕМ дугме на 3 секунде viewвођење записа.
4. Контрола позадинског осветљења
- When powered by USB, the backlight will remain on.
- When powered by batteries only, press the СНООЗЕ·ЛИГХТ button to temporarily activate the backlight for a few seconds.
Одржавање
- Чишћење: Wipe the unit with a soft, dry cloth. Do not use abrasive cleaners or solvents. Avoid getting moisture into the unit.
- Замена батерије: When the display becomes dim or functions irregularly, replace the 3x AAA batteries in the back compartment. Ensure correct polarity.
- Складиштење: If not using the device for an extended period, remove the batteries to prevent leakage. Store in a cool, dry place.
Решавање проблема
| Проблем | Могући узрок | Решење |
|---|---|---|
| Екран је празан или замагљен. | Low batteries or no power connection. | Replace batteries or connect the USB power cable. |
| Нетачно време/датум. | Time/date not set correctly after power loss or initial setup. | Follow the "Initial Settings" section to reset time and date. |
| Weather forecast seems inaccurate. | Device needs calibration time; local conditions may differ from pressure-based forecast. | Allow 24 hours for calibration. Understand that the forecast is based on internal pressure changes. |
| Аларм се не оглашава. | Аларм није активиран или је јачина звука прениска (ако се може подесити). | Ensure the alarm icon is displayed. Check alarm settings. |
Спецификације
| Модел: | DG-C3 |
| Повезивање: | УСБ (за напајање) |
| Извор напајања: | 3x AAA Batteries (not included) or USB Power |
| Посебне карактеристике: | Hygrometer, Thermometer, Weather Forecast, Alarm Clock, Color Backlight, Portable |
| Приказ: | Color Backlit LCD |
| Јединица температуре: | °C / °F selectable |
Гаранција и подршка
For warranty information or technical support, please refer to the documentation provided at the time of purchase or contact your retailer. Keep your purchase receipt as proof of purchase.