1. Увод
Thank you for choosing the BONTRAGER SPEED STOP direct mount brake system. This manual provides essential information for the proper installation, operation, and maintenance of your new brakes. For optimal performance and safety, please read these instructions thoroughly before use and retain them for future reference.
The BONTRAGER SPEED STOP is a high-performance direct mount rim brake designed for road bicycles, offering reliable stopping power and precise modulation.

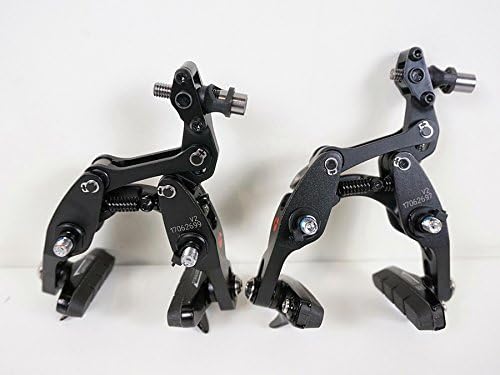
Слика 1.1: Готовоview of the BONTRAGER SPEED STOP direct mount brake set.
2. Безбедносне информације
- Препоручена професионална инсталација: Bicycle brake systems are critical safety components. If you are not experienced with bicycle mechanics, it is highly recommended to have these brakes installed and adjusted by a qualified bicycle mechanic.
- Редовна инспекција: Before each ride, inspect your brakes for proper function, cable tension, pad wear, and secure mounting. Do not ride with improperly functioning brakes.
- Трошење кочионих плочица: Worn brake pads reduce stopping power. Replace brake pads before they reach their wear limit indicators.
- Wet Weather Performance: Braking performance is significantly reduced in wet conditions. Apply brakes earlier and with less force than in dry conditions.
- Употреба шлема: Always wear an approved cycling helmet when riding your bicycle.
3. Садржај пакета
Your BONTRAGER SPEED STOP brake package should contain the following items:
- One (1) BONTRAGER SPEED STOP Front Brake Caliper
- One (1) BONTRAGER SPEED STOP Rear Brake Caliper
- Mounting hardware (bolts, washers)
- Brake pads (pre-installed)
If any items are missing or damaged, please contact your retailer or BONTRAGER customer support.
4. Подешавање и инсталација
This section outlines the general steps for installing your BONTRAGER SPEED STOP brakes. Specific frame and fork designs may require slight variations.
4.1. Mounting the Calipers
- Identify the front and rear calipers. They are typically marked or distinguishable by cable routing.
- Align the caliper mounting holes with the direct mount bosses on your bicycle frame (for the rear brake) and fork (for the front brake).
- Insert the mounting bolts through the caliper and into the frame/fork bosses.
- Hand-tighten the bolts initially. Do not fully tighten until cable installation and pad adjustment are complete.

Image 4.1: Direct mount brake calipers ready for cable installation.
4.2. Cable Installation and Tension Adjustment
- Route the brake cable from your brake lever through the housing and into the cable anchor mechanism on the caliper.
- Pull the cable taut and secure it with the cable anchor bolt. Ensure the cable end is properly seated.
- Use the barrel adjuster (if present on the caliper or lever) to fine-tune cable tension.
4.3. Brake Pad Adjustment
Proper brake pad alignment is crucial for effective braking and to prevent rim damage.
- Loosen the brake pad fixing bolt slightly.
- Position the brake pad so it makes full contact with the rim braking surface when the brake is applied. Ensure the pad does not touch the tire or drop below the rim.
- Tighten the brake pad fixing bolt securely. Repeat for all pads.

Image 4.2: Close-up of a brake caliper, showing the brake pad and its adjustment bolt.
4.4. Caliper Centering and Final Tightening
- With the brake pads adjusted, ensure the calipers are centered over the rim. Many direct mount brakes have a small centering screw or mechanism.
- Adjust the centering until both brake pads are an equal distance from the rim when the brake is not applied.
- Once centered, fully tighten the main caliper mounting bolts to the manufacturer's specified torque (refer to your bicycle frame/fork manual for torque specifications).

Image 4.3: Detail of the caliper, showing the centering adjustment screw (often marked L/R).
4.5. Коначна провера
Before riding, perform the following checks:
- Squeeze the brake levers firmly several times to ensure the cable is properly seated and stretched.
- Check that the brake pads contact the rim squarely and simultaneously.
- Ensure there is adequate clearance between the pads and the rim when the brake is released.
- Verify all bolts are securely tightened.
5. Упутство за употребу
The BONTRAGER SPEED STOP brakes are designed for powerful and controlled stopping. Familiarize yourself with their feel before riding in challenging conditions.
- Gradual Application: Apply brakes smoothly and gradually to avoid skidding and maintain control.
- Front vs. Rear Brake: The front brake provides most of the stopping power. Use both brakes simultaneously for maximum control and efficiency.
- Lever Feel: Ensure your brake levers have a firm, consistent feel. Spongy levers may indicate a problem with cable tension or installation.
Слика 5.1: Бочна страна view of the brake caliper, illustrating its compact design.
6. Одржавање
Regular maintenance will ensure the longevity and optimal performance of your BONTRAGER SPEED STOP brakes.
6.1. Чишћење
Clean the brake calipers and pads regularly with a mild soap and water solution. Avoid using harsh chemicals or solvents that could damage components or brake pads. Ensure rims are clean and free of grease or oil.
6.2. Инспекција
Повремено прегледајте следеће:
- Кочионе плочице: Check for wear, contamination (e.g., oil, grit), and embedded debris. Replace pads when they reach their wear limit.
- Brake Cables and Housing: Look for fraying, kinks, or corrosion. Replace if damaged. Lubricate cables periodically for smooth operation.
- Вијци за монтажу: Уверите се да су сви монтажни вијци чврсто затегнути и безбедно причвршћени.
- Caliper Movement: Check that the caliper arms move freely and return to their open position without sticking.
6.3. Замена кочионих плочица
When brake pads are worn, they must be replaced. Use genuine BONTRAGER replacement pads or compatible high-quality alternatives.
- Loosen the brake pad fixing bolt and remove the old pad.
- Install the new brake pad, ensuring correct orientation (often marked L/R for left/right and direction).
- Adjust the new pad's position as described in Section 4.3.
- Tighten the fixing bolt securely.
КСНУМКС. Решавање проблема
Ево неких уобичајених проблема и њихових могућих решења:
| Проблем | Могући узрок | Решење |
|---|---|---|
| Кочнице су сунђерасте или слабе | Insufficient cable tension, worn brake pads, contaminated pads/rim | Adjust cable tension (Section 4.2), replace pads (Section 6.3), clean pads and rim. |
| Brake pads rub the rim constantly | Caliper not centered, excessive cable tension, bent rim | Center calipers (Section 4.4), reduce cable tension, true the wheel. |
| Squealing noise during braking | Contaminated pads/rim, misaligned pads, loose components | Clean pads and rim, adjust pad angle (toe-in), check all bolts for tightness. |
8. Спецификације
- Модел: BONTRAGER SPEED STOP
- Тип: Direct Mount Rim Brake
- Тежина: Approximately 276g (per pair)
- Компатибилност: Designed for road bicycles with direct mount frame/fork bosses.
9. Гаранција и подршка
For warranty information, please refer to the official BONTRAGER warranty policy available on their website or contact your authorized BONTRAGER dealer. For technical support or further assistance, please visit the BONTRAGER support page or contact their customer service department.
Always use genuine BONTRAGER replacement parts to ensure compatibility and maintain warranty validity.