
1. Увод
This manual provides detailed instructions for the installation, operation, and maintenance of your Akozon Digital Programmable Timer. Please read this manual carefully before use to ensure proper function and safety.

Figure 1: Akozon Digital Programmable Timer 12V
2. Производ је готовview и карактеристике
The Akozon Digital Programmable Timer is a weekly programmable electronic timer designed for precise control of various electrical equipment. Its robust design and advanced features ensure reliable operation.
- аутоматска контрола: Automatically turns electrical equipment on and off according to preset schedules.
- Висока прецизност: Equipped with a high-precision chip for accurate timing.
- Недељни програм: Supports advanced programming for up to one week in advance.
- Више програма: Features 16 ON/OFF settings (programs) for daily or weekly scheduling.
- Резервно напајање: Integrated high-performance rechargeable battery maintains time display and stores data for over 12 months during power outagес.
- Издржљива конструкција: Housing made of hard, durable plastic for extended lifespan.
- ЛЦД екран: Clear LCD for easy viewing of time and program status.
- Монтажа на ДИН шину: Designed for convenient installation on a DIN rail.
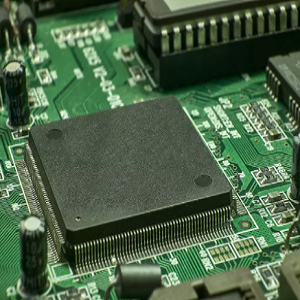
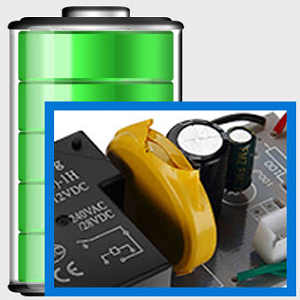
Figure 2: Internal components showing the high-precision chip and rechargeable backup battery.
3. Спецификације
| Број модела | Akozonqegcgmk04u-01 |
| Улазни волtage | 12В ДЦ/АЦ |
| Излазни капацитет | 25(16)A, 240VAC |
| Потрошња енергије | <1В |
| Временски опсег | 1 минут до 168 сата |
| Програми | 16 ON/OFF settings (daily/weekly) |
| Временска грешка | <±2 seconds/day |
| Меморија нестанка струје | >12 months (with internal rechargeable battery) |
| Радна температура | -20°Ц до 55°Ц |
| Метод инсталације | ДИН шина |
| Димензије (приближно) | 36 мм (Ш) к 86 мм (В) к 65 мм (Д) |
| Тежина (приближно) | 120г |
| Дисплаи | ЛЦД |

Слика 3: Детаљне димензије производа и кључне спецификације.
4. Безбедносне информације
- Увек искључите напајање пре инсталације или одржавања.
- Installation should be performed by a qualified electrician to prevent electric shock or damage to the device.
- Уверите се да је улазна волtage matches the timer's specifications (12V DC/AC). Connecting to incorrect voltagе може оштетити јединицу.
- Do not expose the device to excessive moisture or extreme temperatures outside the specified operating range.
- Do not disassemble the timer; refer servicing to qualified personnel.
5. Подешавање и инсталација
5.1 DIN Rail Installation
The timer is designed for easy installation on a standard 35mm DIN rail. Simply clip the timer onto the rail in your distribution box.

Слика 4: Прample of the timer installed on a DIN rail within a distribution box.
5.2 Упутства за ожичење
Refer to the wiring diagram below for correct connection. Ensure all connections are secure and comply with local electrical codes.
- Терминали 1 и 2: Power input (12V DC/AC).
- Terminals 3, 4, 5: Output contacts.
- 3: нормално затворено (НЦ)
- 4: Уобичајени (ЦОМ)
- 5: нормално отворен (НЕ)

Figure 5: Detailed wiring diagram showing connections for power input and output contacts.

Слика 6: Прamples of wiring methods, including direct load connection and connection via a contactor.
6. Упутство за употребу
6.1 Initial Setup and Unlocking
- Upon first use, connect the timer to power (12V DC/AC).
- Притисните тастер РЕСЕТ button to clear all previous settings and initialize the timer.
- The timer display may be locked. To unlock, press the Ц/Р button four times. The lock icon will disappear from the display. If no operation occurs for 15 seconds, the timer will automatically lock again.
6.2 Подешавање тренутног времена и дана
After unlocking, set the current time and day:
- Притисните тастер P button (Program button) once.
- Притисните тастер D+ button to set the current day of the week (MO, TU, WE, TH, FR, SA, SU).
- Притисните тастер H+ дугме за подешавање тренутног сата.
- Притисните тастер M+ дугме за подешавање тренутне минуте.
- Притисните тастер P поново притисните дугме да бисте изашли из режима подешавања времена.

Слика 7: Крупни план view of the timer's control buttons.

Figure 8: Explanation of button functions and display elements, including day, hour, minute, and reset.
6.3 Ручна контрола
Притисните тастер ПРИРУЧНИК Ц/Р button to cycle through manual control modes:
- НА: Output is continuously ON.
- АУТО: Timer operates according to programmed schedules.
- ВАН: Output is continuously OFF.
Изаберите АУТО for the timer to follow your programmed settings.
7. Програмирање распореда укључивања/искључивања
The timer supports up to 16 ON/OFF programs. Follow these steps to set your desired schedules:
- Притисните тастер P button to enter programming mode. The display will show "1 ON".
- Притисните D+ to select the day(s) for this program. You can choose a single day, weekdays, weekends, or all days.
- Притисните H+ to set the ON hour.
- Притисните M+ to set the ON minute.
- Притисните P поново. На дисплеју ће се приказати „1 ИСКЉУЧЕНО“.
- Притисните D+ to select the day(s) for this OFF program (usually the same as ON, but can be different).
- Притисните H+ to set the OFF hour.
- Притисните M+ to set the OFF minute.
- Repeat steps 1-8 for additional ON/OFF programs (up to 16). Press P to advance to the next program number.
- Да бисте изашли из режима програмирања, притисните ПРИРУЧНИК Ц/Р button. Ensure the timer is set to АУТО mode for programs to execute.
Note: If you need to cancel a program, press the Ц/Р дугме док viewing the specific ON or OFF program. This will clear the settings for that program.
8. Пријаве
The Akozon Digital Programmable Timer is versatile and can be used in various applications, including:
- Controlling lamps and lighting systems (e.g., streetlights, garden lights, neon signs).
- Managing water heaters and preheaters.
- Automating agricultural facilities (e.g., irrigation systems).
- Controlling broadcasting equipment.
- Scheduling household appliances.
- Operating sprayers and bottling equipment.

Слика 9: Прamples of environments where the timer can be used, such as controlling outdoor lighting and industrial equipment.
9. Одржавање
- Keep the timer clean and free from dust. Use a soft, dry cloth for cleaning.
- Немојте користити абразивна средства за чишћење или раствараче.
- Осигурајте одговарајућу вентилацију око уређаја како бисте спречили прегревање.
- The internal battery is designed for long-term backup. If the timer consistently loses time or program settings after a power outage, the internal battery may need professional inspection.
КСНУМКС. Решавање проблема
| Проблем | Могући узрок | Решење |
|---|---|---|
| Екран је празан. | Нема напајања или је унутрашња батерија испражњена. | Check power connections. Allow time for the internal battery to charge (connect to power for several hours). |
| Timer does not respond to button presses. | Timer is locked. | Притисните тастер Ц/Р button four times to unlock. |
| Програми се не извршавају. | Тајмер није у АУТОМАТСКОМ режиму. Неправилна подешавања програма. | Притисните ПРИРУЧНИК Ц/Р until "AUTO" is displayed. Review and correct program settings. |
| Time or settings are lost after power outage. | Internal backup battery is not charging or is depleted. | Ensure the timer is connected to power for sufficient time to charge the internal battery. If the issue persists, contact customer support. |
| Output is always ON or OFF, ignoring programs. | Тајмер је у ручном режиму УКЉУЧЕНО или ИСКЉУЧЕНО. | Притисните ПРИРУЧНИК Ц/Р until "AUTO" is displayed. |
11. Гаранција и подршка
Akozon products are manufactured to high-quality standards. For warranty information or technical support, please refer to the contact details provided with your purchase or visit the official Akozon webсајту.
Сачувајте доказ о куповини за гаранцијске захтеве.