
1. Увод
Thank you for choosing the Walfront LCD Digital Programmable Weekly Timer Switch. This device is designed for automatic control of various electrical appliances based on user-defined schedules. Please read this manual carefully before installation and operation to ensure proper use and to prevent damage.
2. Безбедносне информације
Упозорење: Електричну инсталацију треба да обавља само квалификовано особље. Искључите напајање пре инсталације или одржавања како бисте спречили струјни удар.
- Уверите се да је улазна волtage matches the timer's specifications (24V for this model).
- Do not exceed the maximum load capacity of 16A 250VAC (resistive load).
- Држите уређај даље од воде и прекомерне влаге.
- Do not attempt to disassemble or repair the unit yourself. Contact support if issues arise.
3. Производ је готовview
The Walfront LCD Digital Programmable Weekly Timer Switch is a high-precision device built with durable, moisture-resistant, and corrosion-protected materials. It features a clear LCD display and supports up to 16 ON/OFF programs daily and weekly.
3.1 Кључне карактеристике
- High-quality construction for long lifespan.
- Automatic ON/OFF control for various electrical devices.
- Built-in 1.2V/40mA rechargeable battery for memory retention.
- Industrial-grade chip for high precision and strong anti-interference.
- Up to 16 ON and 16 OFF programming settings per day/week.
- LCD display showing real-time, hour, minute, and ON/AUTO/OFF status.
- DIN rail mounting design.
3.2 Компоненте

Слика 1: Фронт view of the Walfront LCD Digital Programmable Weekly Timer Switch. Shows the LCD display and control buttons.

Слика 2: Назад view of the timer switch, illustrating the wiring terminals and basic electrical specifications printed on the unit.
4. Подешавање и инсталација
This timer is designed for DIN rail mounting. Ensure the DIN rail is securely installed before attaching the timer.
4.1 Дијаграм ожичења

Слика 3: Wiring diagrams showing direct connection (left) and connection with an AC contactor (right). The direct connection illustrates neutral and live wire inputs and load output. The AC contactor diagram shows 220V power input and output to the load device.
Direct Wiring: Connect the neutral and live wires to the designated input terminals (L and N). Connect the load to the output terminals (typically 3 and 4 for normally open, or 3 and 5 for normally closed, as indicated on the device). Refer to the diagram on the device for exact terminal numbering.
Wiring with AC Contactor: For higher loads, connect the timer to control an AC contactor. The timer's output will switch the coil of the contactor, which in turn controls the main power to the load. This setup is shown on the right side of Image 3.
4.2 Initial Power-Up and Battery Charging
Upon first use, connect the timer to power. The internal 1.2V/40mA rechargeable battery will begin charging. If the display is blank or shows incorrect time, allow it to charge for a few minutes. Press the "Reset" button (often labeled with a small 'R' or 'C' and requires a pointed object) to clear all settings and start fresh.
5. Упутство за употребу
5.1 Подешавање тренутног времена
- Притисните тастер "CLOCK" button (often labeled with a clock icon) and hold it.
- Док држи "CLOCK", притисните тастер "D+" дугме за подешавање текућег дана у недељи.
- Док држи "CLOCK", притисните тастер "H+" дугме за подешавање тренутног сата.
- Док држи "CLOCK", притисните тастер "M+" дугме за подешавање тренутне минуте.
- Отпустите "CLOCK" дугме. Време је сада подешено.
5.2 Setting 12/24 Hour Mode
By default, the timer operates in 24-hour mode. To switch between 12-hour (AM/PM) and 24-hour modes, press and hold the "CLOCK" button for approximately 5 seconds. The display will show "AM" for 12-hour mode or switch back to 24-hour format.
5.3 Програмирање распореда укључивања/искључивања
The timer supports up to 16 ON and 16 OFF programs. Each program consists of an ON time and an OFF time.
- Притисните тастер "PROG" дугме једном. На дисплеју ће се приказати „1 УКЉУЧЕНО“.
- Притисните "D+" to select the day(s) for this ON program (e.g., Mon-Fri, Sat-Sun, or specific days).
- Притисните "H+" да бисте подесили жељени сат укључивања.
- Притисните "M+" да бисте подесили жељени минут укључивања.
- Притисните "PROG" поново. На дисплеју ће се приказати „1 ИСКЉУЧЕНО“.
- Repeat steps 2-4 to set the OFF time for the first program.
- Наставите да притискате "PROG" to cycle through "2 ON", "2 OFF", up to "16 ON", "16 OFF", setting each as needed.
- Након подешавања свих жељених програма, притисните дугме "CLOCK" button to exit programming mode and return to real-time display.
Напомена: If you need to cancel a program, press the "PROG" button to select the program, then press the "РУЧНИК" button until "----" appears on the display for that program's time slot.
5.4 Manual Override (ON/AUTO/OFF)
Притисните тастер "РУЧНИК" button to cycle through the operating modes:
- НА: Излаз је континуирано УКЉУЧЕН, игноришући све програме.
- АУТО: The timer operates according to the programmed ON/OFF schedules.
- ВАН: Излаз је континуирано ИСКЉУЧЕН, игноришући све програме.
Ensure the timer is in "AUTO" mode for programmed operation.
5.5 Функција закључавања тастера
To prevent accidental changes to settings, the timer features a key lock function.

Слика 4: The timer display showing the key lock symbol, indicating that the buttons are locked.
- To lock the keys: Press and hold the "C/R" (Cancel/Reset) button for approximately 4 seconds until a lock symbol appears on the LCD.
- To unlock the keys: Press and hold the "C/R" button again for approximately 4 seconds until the lock symbol disappears.
6. Спецификације
| Параметар | Валуе |
|---|---|
| Улазни волtage | AC/DC 24V (This model) |
| Contact Rated Voltage | AC 180V~264V (50/60Hz) |
| Капацитет оптерећења | 16A 250VAC (Resistive Load) |
| ОН/ОФФ операције | 16 ON / 16 OFF (Manual/Auto) |
| Дисплаи | ЛЦД |
| Потрошња енергије | 4.5VA (Max) |
| Грешка | ≤2 seconds/day (at 25℃) |
| Начин монтаже | DIN Rail (sold separately) |
| Временски опсег | 1 минут до 168 сата |
| Минимални интервал | 1 минут |
| Радна температура | -10℃ до 55℃ |
| Радна влажност | 35-85% РХ |
| Димензије (Д к Ш к В) | 86 к 36 к 65 мм |
| Унутрашња батерија | 1.2V/40mA rechargeable, >15 days backup |
| Број кола | Changeover switch (SPDT) |
| Век трајања | Mechanical: 107, Electrical: 105 |
| Тежина | 125г |
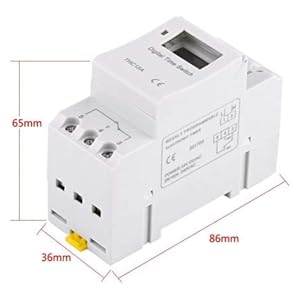
Слика 5: Diagram illustrating the dimensions of the timer switch: 86mm length, 36mm width, and 65mm height.
7. Одржавање
- Keep the timer clean and free from dust. Use a dry, soft cloth for cleaning.
- Немојте користити абразивна средства за чишћење или раствараче.
- Периодично проверавајте спојеве ожичења како бисте били сигурни да су безбедни.
- The internal battery is designed for long life and typically does not require replacement. If the timer loses settings frequently after power outagе, батерији ће можда бити потребно сервисирање од стране квалификованог техничара.
КСНУМКС. Решавање проблема
| Проблем | Могући узрок | Решење |
|---|---|---|
| Екран је празан. | No power supply or internal battery discharged. | Check power connections. Allow the timer to charge for a few minutes after connecting to power. |
| Timer does not switch ON/OFF as programmed. | Timer is not in "AUTO" mode, programs are incorrect, or key lock is active. | Press "MANUAL" until "AUTO" is displayed. Review and correct programs. Unlock keys if necessary. |
| Дугмад не реагују. | Функција закључавања тастера је активна. | Press and hold "C/R" for 4 seconds to unlock the keys. |
| Време је нетачно. | Minor drift (within specifications) or internal battery issue. | Reset and re-set the time. If inaccuracy persists or settings are lost frequently, contact support. |
9. Гаранција и подршка
Walfront strives to provide high-quality products. If you encounter any issues with your product, please contact us for prompt assistance. We offer return and refund services for product defects.
For support, please refer to the contact information provided with your purchase or visit the Walfront store on Amazon: Амазон продавница у Волфронту.