1. Увод
The BNT Dummy Fake Security Camera is designed to provide a realistic visual deterrent against potential intruders. Its appearance closely mimics that of a functional surveillance camera, aiming to reduce the likelihood of criminal activity by creating the impression of active monitoring. This manual provides essential information for the proper setup, operation, and maintenance of your dummy camera.

Image 1.1: Two BNT white dummy fake security cameras, showcasing their realistic design.
2. Шта је у кутији
Upon opening your package, you should find the following components:
- BNT Bullet Simulation Fake Camera (White) x 2
- Вијци за уградњу
- Кориснички приручник (овај документ)
- Warning Security Alert Sticker Decal x 2

Image 2.1: Package contents showing two dummy cameras, warning stickers, and screws.
3. Карактеристике
- Реалистичан дизајн: Mimics the appearance of a real surveillance camera.
- Трепереће ЛЕД светло: Features a built-in red LED light that illuminates at night, simulating active recording.
- Фотоелектрични сензор: Automatically activates the red LED light in low-light conditions.
- Издржљива конструкција: Made from Acrylonitrile Butadiene Styrene (ABS) for indoor and outdoor use.
- Отпоран на временске услове: IP65 International Protection Rating ensures resistance to water.
- Једноставна инсталација: No wiring required, mounts easily to ceilings or walls.
- Подесиви угао: Features 2-axis rotation for flexible positioning (360-degree rotation, 90-degree tilt).
- Извор напајања: Operates on 2 AA batteries (not included).
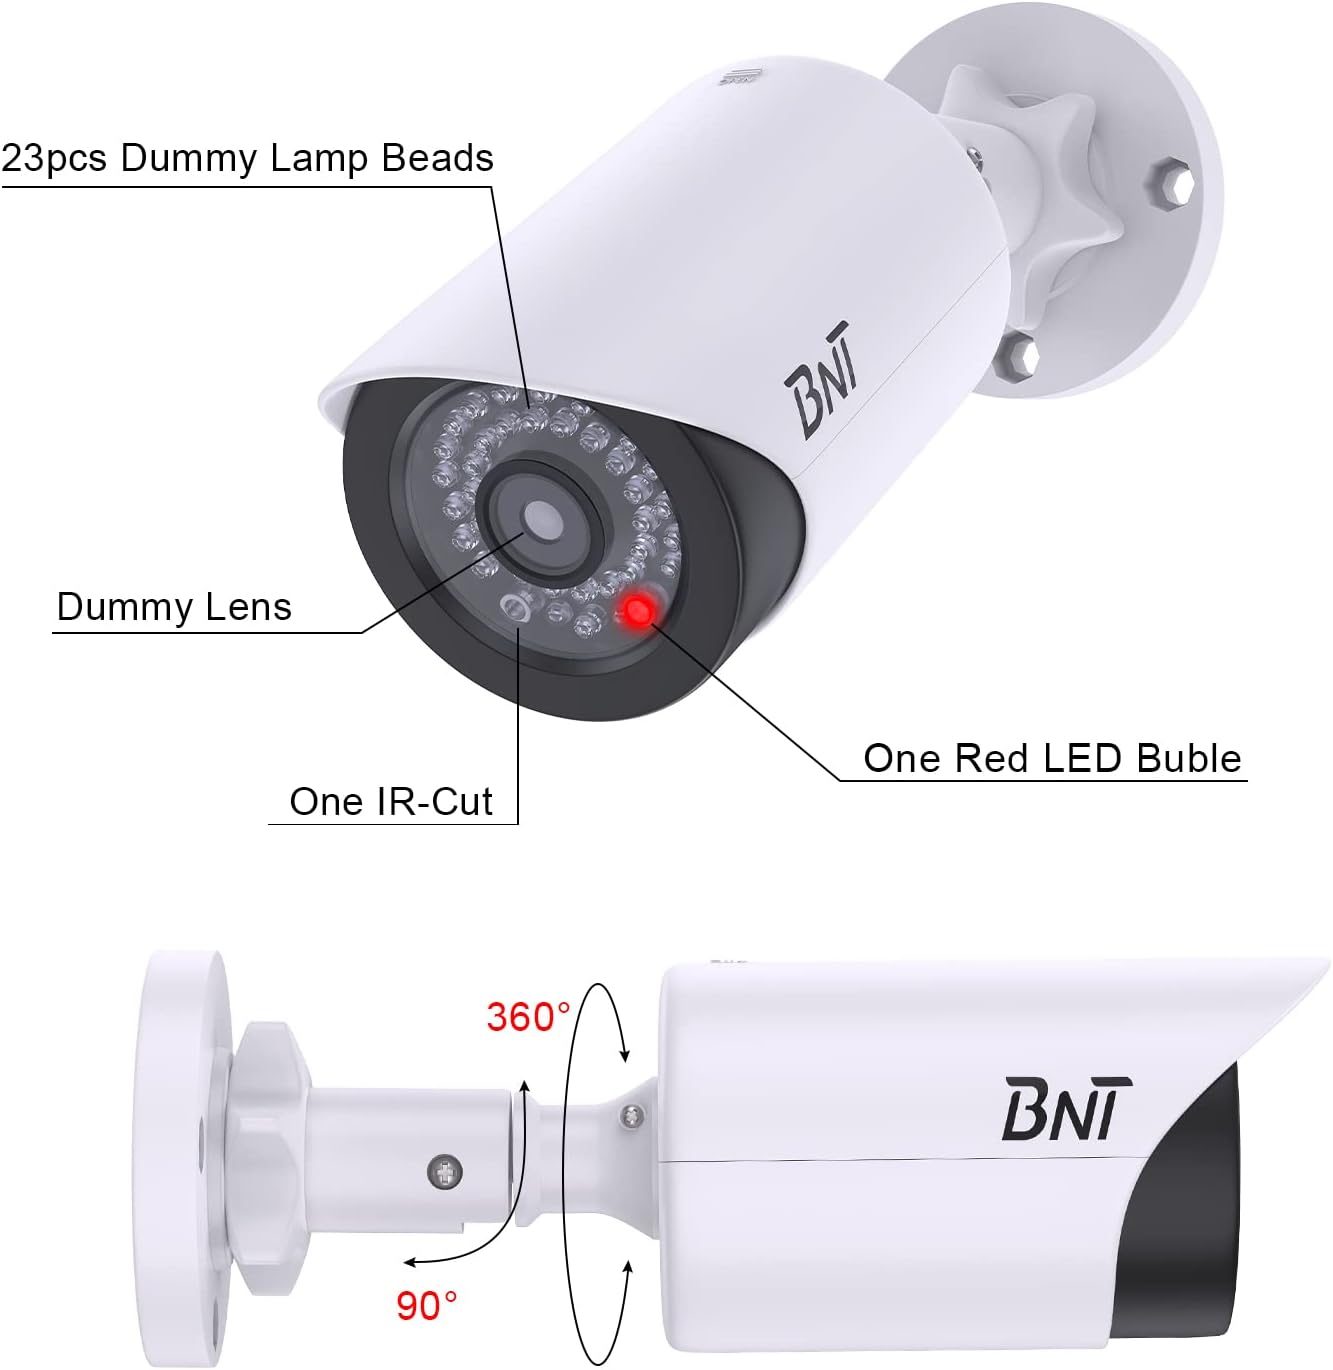
Image 3.1: Close-up of the dummy camera's front, showing the dummy lens, red LED, and rotation capabilities.
4. Подешавање и инсталација
4.1. Инсталација батерије
- Locate the battery compartment on the camera. This is typically found by sliding open the back cover.
- Уметните 2 АА батерије (нису укључене) у одељак, водећи рачуна о исправном поларитету (+/-).
- Добро затворите одељак за батерије.

Image 4.1: Illustration of battery insertion into the dummy camera.
4.2. Монтажа камере
The camera can be easily installed on a ceiling or wall using the provided screws. No complex wiring is necessary.
- Choose a suitable location for installation, considering visibility and desired deterrent effect.
- Position the mounting base against the surface and mark the screw holes.
- Drill pilot holes if necessary, then secure the mounting base with the provided screws.
- Причврстите камеру на монтирану базу.
- Adjust the camera's angle using its 2-axis rotation feature to achieve the desired coverage.
Video: BNT Dummy Fake Security Camera Overview
Видео 4.2.1: Овај видео пружа општи прегледview of the BNT Dummy Fake Security Camera, highlighting its features and realistic appearance.
Video: Protecting Property with Fake Cameras
Video 4.2.2: This video demonstrates how fake cameras can be used to enhance property security and deter potential threats.
5. Упутство за употребу
The BNT Dummy Fake Security Camera is designed for simple, autonomous operation:
- Once batteries are installed, the built-in photoelectric sensor will detect ambient light levels.
- During daylight hours, the red LED light will remain off.
- As darkness falls, the photoelectric sensor will automatically activate the red LED light, causing it to illuminate. This simulates the operation of a real security camera's night vision or recording indicator.
- The camera provides 24/7 visual deterrence without any manual intervention after initial setup.

Image 5.1: The dummy camera's red LED light is active at night, providing a visual deterrent.
6. Одржавање
- Замена батерије: When the red LED light dims or stops illuminating, it is time to replace the batteries. Ensure to use high-quality AA batteries to prevent leakage and damage to the battery case.
- Заштита животне средине: When replacing batteries, take care to avoid exposing the internal components to rain or moisture to maintain the lifespan of the battery case.
- одлагање: Please dispose of used batteries properly according to local regulations to protect the environment.
- Чишћење: Periodically wipe the camera's exterior with a soft, damp крпа за уклањање прашине и остатака. Избегавајте употребу јаких хемикалија.
КСНУМКС. Решавање проблема
7.1. LED Light Not Illuminating at Night
- Проверите батерије: Ensure that 2 AA batteries are correctly installed and are not depleted. Replace if necessary.
- Test Photoelectric Sensor: In a dark environment, cover the LED light with your hand. If the red LED light turns on, the product is functioning correctly. If it does not, check battery installation again.
- Фактори животне средине: Ensure the camera is not installed in an area with ambient light at night (e.g., streetlights, porch lights) that might prevent the photoelectric sensor from detecting sufficient darkness to activate the LED.
8. Спецификације
| Феатуре | Детаљ |
|---|---|
| Назив модела | BNT Dummy (Model BNT-K8FaCam-2PW) |
| Унутрашња/спољна употреба | У затвореном, на отвореном |
| Извор напајања | Напајање батеријама (2 АА батерије, нису укључене) |
| Материјал | акрилонитрил бутадиен стирен (АБС) |
| Тип монтаже | Плафон, зид |
| Viewинг Англе | 120 степени |
| Оцена међународне заштите | ИПКСНУМКС (водоотпоран) |
| Димензије артикла (Д к Ш к В) | 7.6 к 5.4 к 2.9 инча |
| Тежина артикла | 5.2 унци (148 грама) |
| Посебна карактеристика | Powered by 2 AA batteries (not included) |
9. Гаранција и подршка
BNT provides reliable 24-month after-sales service for this product. If you have any questions, concerns, or require assistance with your BNT Dummy Fake Security Camera, please contact our dedicated customer service team. We are committed to ensuring your satisfaction.