
1. Увод
This manual provides essential information for the safe and effective operation of your Skyking MECO-G R-2025THz Digital Auto-Ranging Clamp Meter. This True RMS meter is designed for measuring AC current up to 1000A, voltage, resistance, frequency, and temperature. Please read this manual thoroughly before use and retain it for future reference.
2. Безбедносне информације
To ensure safe operation and avoid damage to the meter, observe the following safety precautions:
- Always adhere to safety regulations as per GB4793-1 and IEC 61010-1. This meter is rated for CAT III 600V and CAT II 1000V.
- Не прекорачујте максималне улазне вредности наведене за сваку функцију.
- Ensure test leads are properly connected to the correct input terminals before making any measurements.
- Inspect the meter, test leads, and accessories for any damage before each use. Do not use if damaged.
- Never attempt to measure current on circuits with voltage exceeding the meter's rating.
- Exercise extreme caution when working with live electrical circuits.
3. Производ је готовview
The Skyking MECO-G R-2025THz is a compact and versatile digital clamp meter. Key components include:
- Цуррент Цлamp вилица: For non-contact AC current measurement. Features a 45mm jaw opening.
- Rotary Function Dial: Selects measurement functions (OFF, 1000A~, 600A~, 60A~, V, mV, Ω, Hz/Duty, Temp).
- ЛЦД екран: 3 digits, 6000 counts, True RMS readings. Includes backlight for low-light conditions.
- Функционална дугмад: Includes buttons for Hz/Duty, Range, and Select.
- Улазни прикључци: Dedicated ports for 'V', 'COM', and 'Hz/°C°F Ω' test lead connections.
- Окидач: Located on the side for opening the clamp вилица.
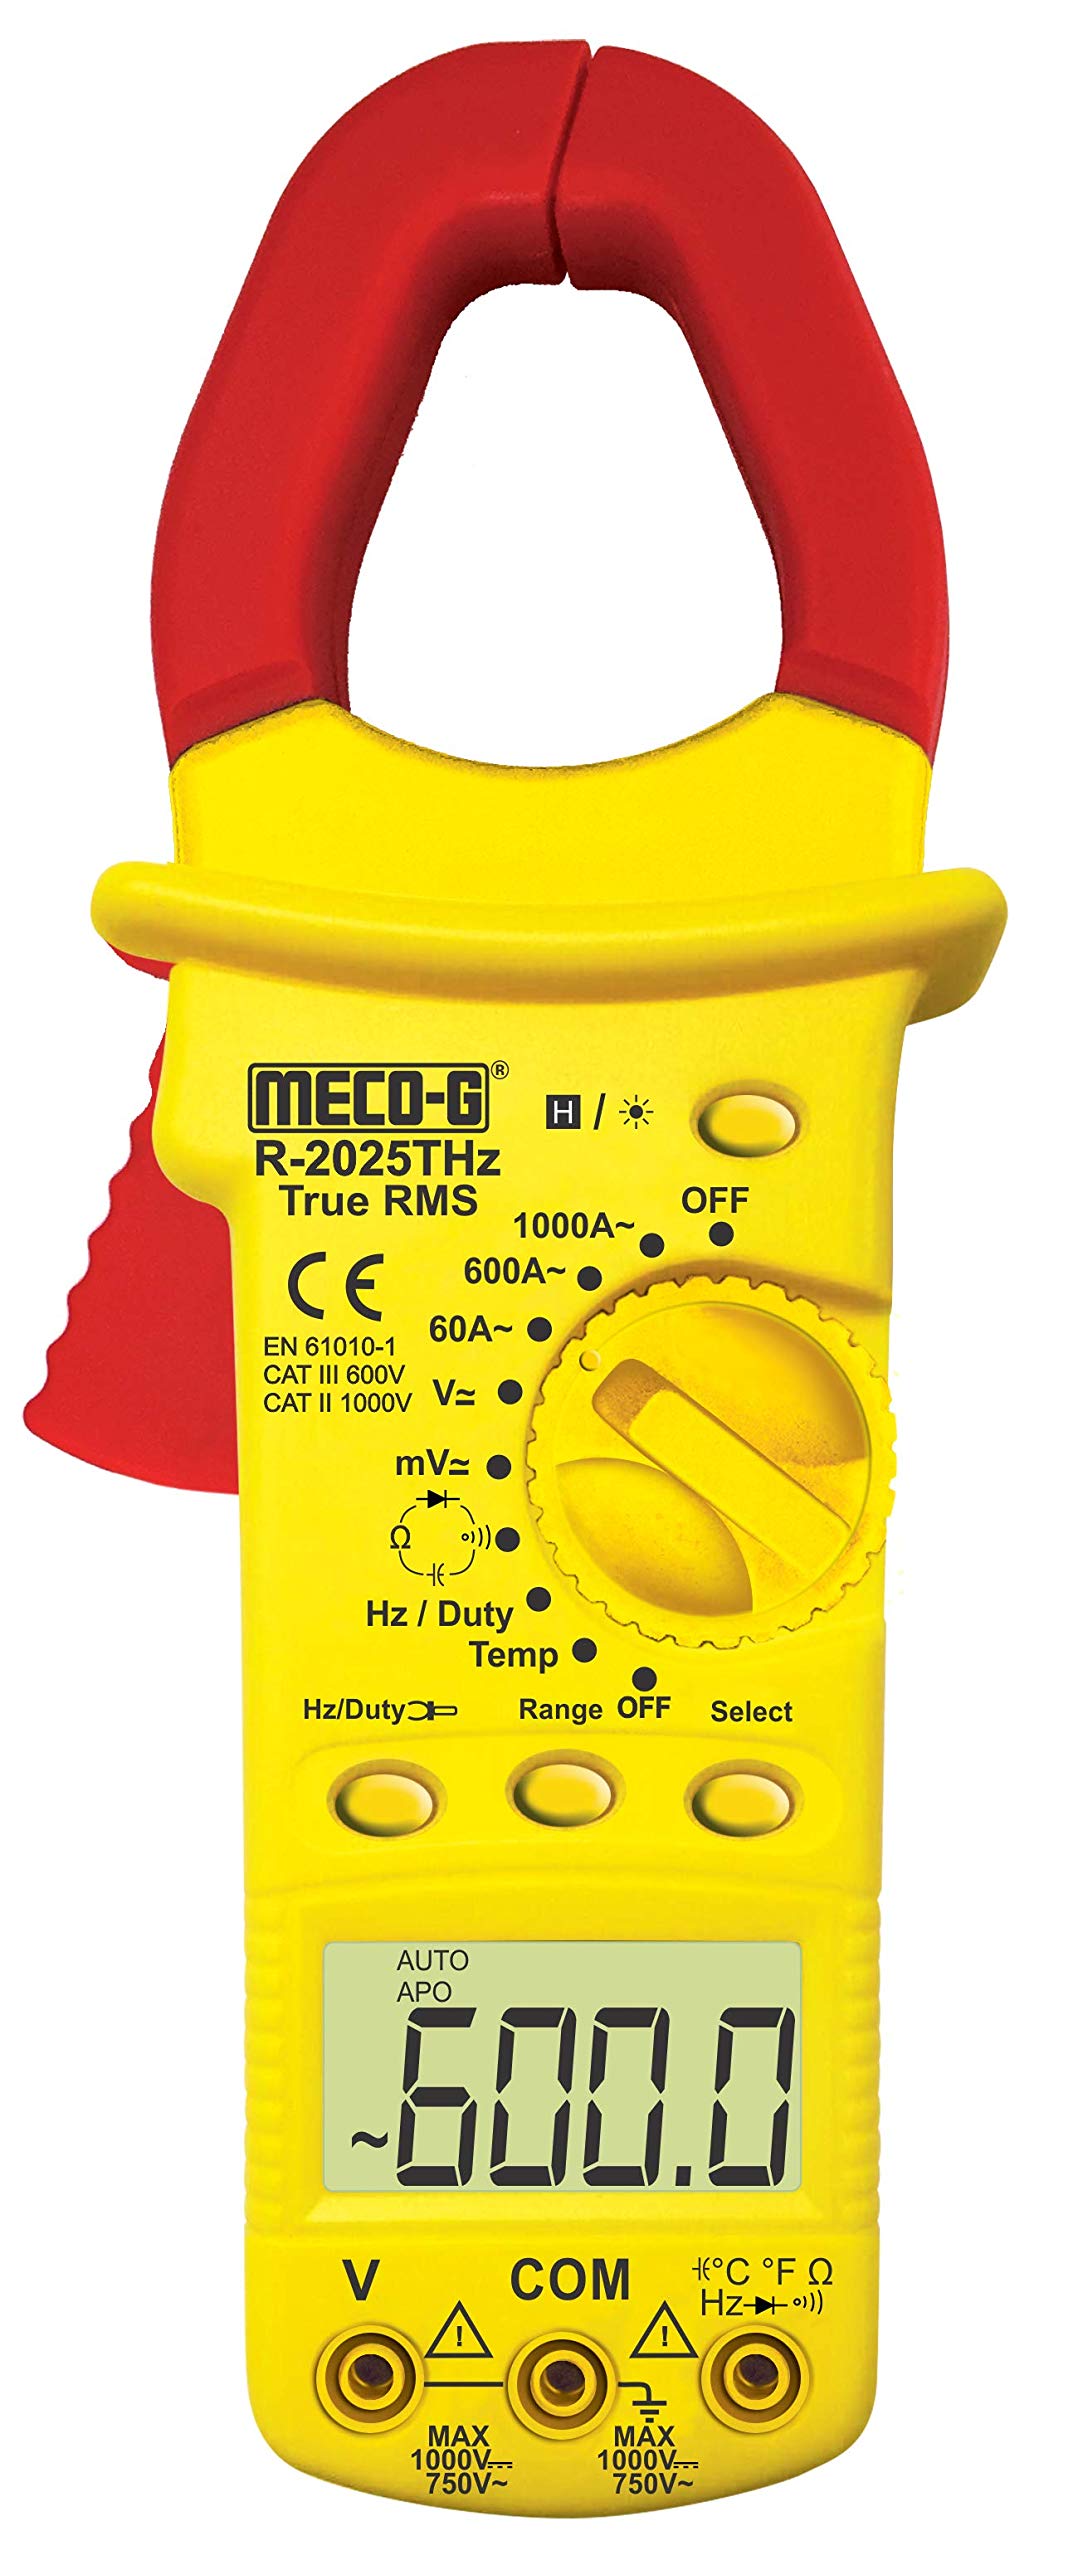
This image displays the main components of the clamp meter, including the current clamp, function selector dial, LCD display, and input jacks for test leads.
4. Подешавање
Пре употребе цлamp meter, perform the following setup steps:
4.1. Инсталација батерије
- Уверите се да је мерач ИСКЉУЧЕН.
- Пронађите поклопац одељка за батерије на задњој страни мерача.
- Одврните завртањ (завртње) за причвршћивање и скините поклопац.
- Insert the required batteries (not included) according to the polarity indicators inside the compartment.
- Вратите поклопац батерије и причврстите га завртњем (завртњима).
4.2. Повезивање мерних каблова
Фор волtage, resistance, frequency, and temperature measurements, connect the test leads as follows:
- Insert the red test lead into the 'V' or 'Hz/°C°F Ω' input terminal.
- Insert the black test lead into the 'COM' (common) input terminal.
5. Упутство за употребу
Follow these steps for various measurement functions:
5.1. Укључивање/искључивање
Rotate the function dial from the 'OFF' position to the desired measurement function to turn the meter ON. Rotate back to 'OFF' to power down. The meter features an Auto Power-Off function after 15 minutes of inactivity.
5.2. AC Current Measurement (1000A, 600A, 60A)
- Rotate the function dial to the '1000A~', '600A~', or '60A~' position.
- Притисните окидач да отворите цлamp вилица.
- Encircle only one conductor of the circuit with the clamp вилица. Уверите се да је вилица потпуно затворена.
- Очитајте вредност наизменичне струје на ЛЦД екрану.
5.3. Волtage Measurement (V, mV)
- Повежите мерне каблове као што је описано у одељку 4.2.
- Rotate the function dial to the 'V' or 'mV' position.
- Додирните мерне сонде до жељених мерних тачака у колу.
- Прочитајте књtage value on the LCD display. Use the 'Select' button to switch between AC and DC voltagе ако је применљиво.
5.4. Мерење отпора (Ω)
- Повежите мерне каблове као што је описано у одељку 4.2.
- Rotate the function dial to the 'Ω' position.
- Уверите се да је коло или компонента која се тестира искључена из струје.
- Додирните мерне сонде преко компоненте или кола да бисте измерили отпор.
- Очитајте вредност отпора на ЛЦД екрану.
5.5. Frequency / Duty Cycle Measurement (Hz/Duty)
- Повежите мерне каблове као што је описано у одељку 4.2.
- Rotate the function dial to the 'Hz/Duty' position.
- Touch the test probes to the desired test points.
- Press the 'Hz/Duty' button to toggle between frequency and duty cycle measurements.
- Очитајте вредност на ЛЦД екрану.
5.6. Temperature Measurement (Temp)
- Connect the K-Type Thermocouple leads (included) to the 'V' and 'COM' input terminals, observing polarity.
- Rotate the function dial to the 'Temp' position.
- Place the thermocouple probe at the point where temperature is to be measured.
- Read the temperature value on the LCD display. Use the 'Select' button to switch between Celsius (°C) and Fahrenheit (°F).
5.7. Функција чувања података
Press the 'Hold' button (if available, or 'Select' button may serve this function) to freeze the current reading on the display. Press it again to release the hold function.
5.8. Функција позадинског осветљења
Press the 'Back Light' button (if available, or 'Select' button may serve this function) to illuminate the LCD display for better visibility in dark environments. Press it again to turn off the backlight.
6. Одржавање
Правилно одржавање осигурава дуготрајност и тачност вашег цл-аamp метар:
- Чишћење: Обришите мерач casinг са огласомamp тканина. Немојте користити абразивна средства за чишћење или раствараче.
- Замена батерије: When the low battery indicator appears on the display, replace the batteries promptly to ensure accurate readings. Refer to Section 4.1 for battery installation.
- Складиштење: If the meter is not used for an extended period, remove the batteries to prevent leakage. Store the meter in a dry environment, within the specified storage temperature range of -10°C to 50°C (14°F to 122°F).
КСНУМКС. Решавање проблема
If you encounter issues with your clamp мерач, погледајте следеће уобичајене проблеме и решења:
- Без приказа: Check if the meter is turned ON. Verify battery installation and ensure batteries are not depleted. Replace batteries if necessary.
- Нетачна очитавања: Ensure test leads are correctly connected. Verify that the correct measurement function and range are selected. Check for any damage to the test leads or meter.
- Meter Turns Off Automatically: This is a normal function (Auto Power-Off) designed to conserve battery life. The meter will turn off after 15 minutes of inactivity. Rotate the function dial to turn it back on.
8. Спецификације
| Феатуре | Спецификација |
|---|---|
| Дисплаи | 3 Digits, 6000 Counts Trms |
| Аутоматско искључивање | 15 minutes idle |
| Радна температура и влажност | 0°C ~ 40°C (32°F ~ 104°F) & ≤ 80% RH |
| Температура и влажност складиштења | -10 ° Ц ~ 50 ° Ц (14 ° Ф ~ 122 ° Ф) |
| Безбедносни прописи | GB4793-1, IEC 61010-1, CAT II 600V, CAT III 1000V |
| Индикација слабе батерије | Battery icon displayed |
| Отварање вилице | 45мм |
| Димензије (Д к Ш к В) | 140 x 70 x 35mm (Approx.) |
| Тежина | 180gms. Approx (With Battery) |
| Материјал | Метал |
| Извор напајања | Напајање батеријама (батерије нису укључене) |
| Број модела | R-2025THz |
9. Гаранција и подршка
For warranty information or technical support, please refer to the documentation provided at the time of purchase or contact your retailer. Keep your purchase receipt as proof of purchase.