1. Увод
This manual provides detailed instructions for the installation, operation, and maintenance of your ASRock B365 PRO4 ATX Motherboard. Please read this manual thoroughly before proceeding with installation to ensure correct setup and to prevent damage to the components.
The ASRock B365 PRO4 motherboard supports 9th and 8th Generation Intel Core Processors, offering a robust platform for personal computing. It features a Digi Power Design with an 8 Power Phase Design, ensuring stable power delivery to the CPU.
2. Безбедносне информације
- Увек искључите напајање пре инсталирања или уклањања било којих компоненти.
- Wear an anti-static wrist strap to prevent electrostatic discharge (ESD) damage to sensitive components.
- Држите матичну плочу за ивице како бисте избегли додиривање осетљивих компоненти.
- Обезбедите одговарајућу вентилацију унутар кућишта рачунара како бисте спречили прегревање.
- Држите матичну плочу даље од влаге и екстремних температура.
3. Подешавање и инсталација
3.1 Садржај пакета
Проверите да ли су све ставке присутне у пакету:
- ASRock B365 PRO4 Motherboard
- Водич за брзу инсталацију
- ЦД за подршку
- И / О штит
- 2 к САТА каблови за пренос података
- 3 x шрафа за M.2 утичнице
- 1 x одстојник за M.2 утичницу

Image: ASRock B365 PRO4 Motherboard and its included accessories, including the quick installation guide, support CD, I/O shield, SATA cables, and M.2 screws/standoff.
3.2 Изглед матичне плоче
Упознајте се са кључним компонентама и конекторима на матичној плочи.

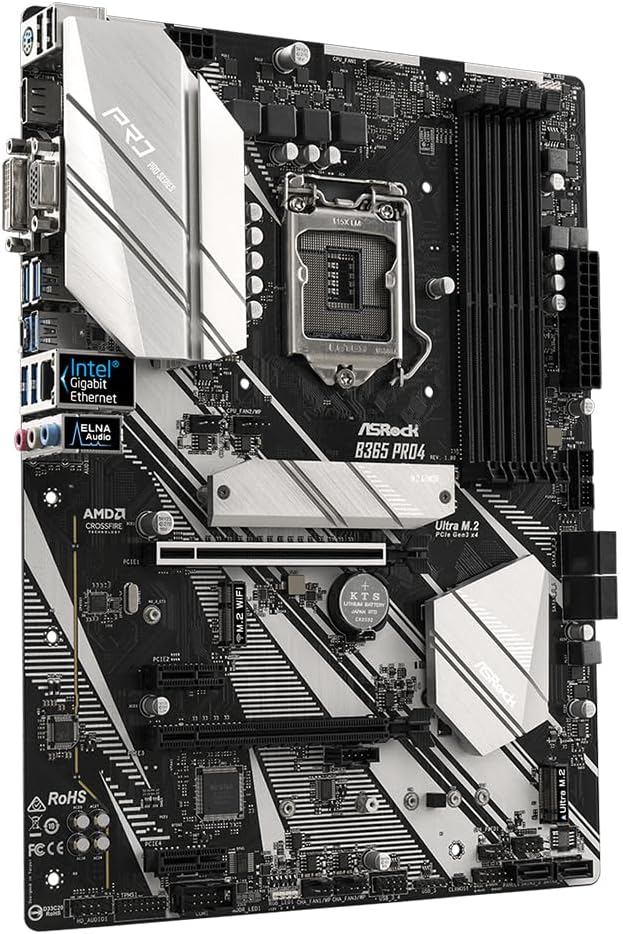
Слика: Одозго надоле view of the ASRock B365 PRO4 Motherboard, highlighting the CPU socket, RAM slots, PCIe slots, and M.2 slots.

Слика: Под углом view of the ASRock B365 PRO4 Motherboard, showing the heatsinks and various connectors.
3.3 Инсталација процесора (LGA1151)
- Отворите полугу процесорског утичнице и подигните плочу за оптерећење.
- Пажљиво поравнајте процесор са сокетом, водећи рачуна да се златни троугао на процесору поклапа са троуглом на сокету.
- Пажљиво поставите процесор у утичницу без присиљавања.
- Затворите плочу за утовар и осигурајте је полугом.
3.4 Инсталација меморије (RAM)
The motherboard features 4 DDR4 DIMM slots, supporting dual-channel memory up to 64GB.
- Отворите копче на оба краја DIMM слота.
- Поравнајте зарез на РАМ модулу са кључем у ДИММ слоту.
- Insert the RAM module firmly until the clips snap into place.
3.5 Инсталација уређаја за складиштење
The motherboard supports 6 SATA3 ports and 2 Ultra M.2 ports.
- SATA дискови: Connect SATA data cables to the SATA ports on the motherboard and to your storage devices (HDDs/SSDs). Connect power cables from your power supply to the devices.
- M.2 SSD дискови: Locate the M.2 slots. Insert the M.2 SSD into the slot at an angle, then gently push it down and secure it with the provided screw and standoff.
3.6 Инсталација картице за проширење (PCIe)
The motherboard has 2 PCI-Express 3.0 x16 slots and 2 PCI-Express 3.0 x1 slots.
- Select an appropriate PCIe slot for your expansion card (e.g., graphics card).
- Уклоните одговарајући метални носач са кућишта рачунара.
- Align the card with the slot and press firmly until it is seated correctly.
- Secure the card with a screw to the PC case.
3.7 Connecting Peripherals to the I/O Panel
Задњи И/О панел пружа разне портове за повезивање екстерних уређаја.
Слика: Крупни план view of the ASRock B365 PRO4 Motherboard's rear I/O panel, showing ports for PS/2, USB 2.0, USB 3.1 Gen 1, VGA, DVI-D, HDMI, LAN, and audio jacks.
- УСБ портови: Connect USB devices (keyboard, mouse, external drives) to the available USB 2.0 (5 ports) and USB 3.1 Gen 1 (8 ports, including 1 Type-C rear) ports.
- Видео излази: Connect your monitor to the VGA, DVI-D, or HDMI port.
- ЛАН порт: Повежите Етхернет кабл за приступ мрежи.
- Аудио прикључци: Connect speakers, headphones, or microphones to the audio jacks.
- ПС/2 порт: Connect a PS/2 keyboard or mouse.
4. Упутство за употребу
4.1 Прво покретање и подешавање BIOS-а
- After assembling all components, connect the power supply and monitor.
- Power on your system. Press Дел or F2 током покретања да бисте ушли у услужни програм за подешавање BIOS/UEFI.
- Configure boot order, system time, and other necessary settings. Save changes and exit.
- Install your operating system from a bootable USB drive or optical media.
4.2 Инсталација драјвера
After installing the operating system, install the necessary drivers from the provided Support CD or download the latest versions from the ASRock webсајт. Кључни покретачи укључују:
- Драјвери за чипсет
- Аудио драјвери (Realtek ALC892)
- LAN Drivers (Intel I219V Gigabit Ethernet)
- Графички драјвери (за интегрисану графику или дискретну графичку картицу)
5. Одржавање
- Уклањање прашине: Редовно чистите прашину са матичне плоче и вентилатора кућишта компримованим ваздухом. Уверите се да је систем искључен из струје пре чишћења.
- Ажурирања BIOS-а: Проверите ASRock website periodically for BIOS updates. Updates can improve system stability and compatibility. Follow the instructions carefully when updating the BIOS.
- Управљање кабловима: Уверите се да су каблови уредно постављени како бисте побољшали проток ваздуха и спречили сметње.
КСНУМКС. Решавање проблема
- Нема напајања:
- Check all power connections, including the 24-pin ATX and 8-pin 12V CPU power connectors.
- Уверите се да је прекидач за напајање у положају УКЉУЧЕНО.
- Без приказа:
- Verify that the monitor is connected to the correct video output (either integrated graphics or discrete GPU).
- Поново инсталирајте графичку картицу и РАМ модуле.
- Нестабилност/падови система:
- Check RAM modules for proper seating.
- Ensure CPU cooler is properly installed and making good contact.
- Ажурирајте драјвере и BIOS на најновије верзије.
- M.2 SSD није детектован:
- Ensure the M.2 SSD is correctly seated and secured.
- Check BIOS settings to ensure M.2 slots are enabled and configured correctly (SATA vs. PCIe mode).
7. Спецификације
| Феатуре | Детаљ |
|---|---|
| ЦПУ Соцкет | ЛГА 1151 |
| Компатибилни процесори | 9th/8th Generation Intel Core Processors (up to 95W) |
| Чипсет | Интел Б365 |
| Меморија | 4 x DDR4 DIMM slots, Dual Channel, Non-ECC, Buffered, Max 64GB (2666/2400/2133 MHz) |
| Слотови за проширење | 2 x PCIe 3.0 x16, 2 x PCIe 3.0 x1 |
| Подршка за више графика | AMD Quad CrossFireX and CrossFire Technology |
| Складиштење | 6 x SATA3 ports (RAID 0, 1, 5, 10), 2 x Ultra M.2 ports (PCIe Gen3 x4 & SATA3) |
| Аудио | Реалтек АЛЦКСНУМКС КСНУМКС-Цханнел ХД Аудио |
| ЛАН | Intel I219V Gigabit Ethernet |
| УСБ портови | 8 x USB 3.1 Gen1 (1 Type-C rear, 5 rear, 2 via header), 5 x USB 2.0 (2 rear, 3 via header) |
| Видео излази | 1 x VGA, 1 x DVI-D, 1 x HDMI |
| Форм Фацтор | ATX (12.0 x 9.0 inch / 30.5 x 22.9 cm) |
8. Гаранција и подршка
8.1 Информације о гаранцији
The ASRock B365 PRO4 Motherboard comes with a 1-годишња ограничена гаранција. This warranty covers defects in materials and workmanship under normal use. For specific terms and conditions, please refer to the warranty card included with your product or visit the official ASRock webсајту.
Note: Damage caused by improper installation, misuse, unauthorized modifications, or natural disasters is not covered under warranty.
8.2 Техничка подршка
For technical assistance, driver downloads, BIOS updates, or further troubleshooting, please visit the official ASRock support webсајт:
You may also contact ASRock customer service directly through their webсајт за персонализовану подршку.