1. Увод
The Thsinde 18Z-III is a 20000-count, 4 1/2 digit automatic digital multimeter designed for high precision, stable performance, and reliability. This battery-driven instrument features a 21mm high LCD display for clear readings and includes a peak value retention function. It is capable of measuring DC/AC voltage, DC/AC current, resistance, capacitance, diode, temperature, continuity, electric field induction (NCV), and frequency. Utilizing a double integral A/D conversion core, the 18Z-III is an ideal tool for laboratories, factories, and electronics enthusiasts.
2. Безбедносне информације
To ensure safe operation and avoid damage to the meter, please observe the following safety precautions:
- Увек користите исправну функцију и опсег за мерења.
- Не прекорачујте максималне улазне вредности наведене за сваки опсег.
- Пре сваке употребе проверите да ли су мерни каблови оштећени. Не користите ако је изолација угрожена.
- Ensure the meter is switched off before connecting or disconnecting test leads to a circuit.
- Будите изузетно опрезни када радите са струјним колима под напоном. Избегавајте контакт са голим жицама или терминалима.
- Do not operate the meter if it appears damaged or if the battery cover is not properly closed.
- Replace the battery promptly when the low battery indicator appears to ensure accurate readings.
- Придржавајте се локалних и националних сигурносних кодекса.
3. Садржај пакета
Проверите да ли су све ставке присутне у пакету:
- Thsinde 18Z-III Digital Multimeter
- 9V батерија (унапред инсталирана или укључена засебно)
- Мерни каблови (1 пар)
- Alligator Clips (2 pieces)
- English User's Manual (this document)
4. Карактеристике производа
- Приказ: 20000 Counts, 4 1/2 digit LCD with LED backlight.
- Функције мерења: ДЦ/АЦ Волtage, DC/AC Current, Resistance, Capacitance, Diode, Temperature, Continuity, NCV (Non-Contact Voltage), Frequency, Duty Cycle.
- Право РМС мерење: Пружа тачна очитавања за несинусоидне таласне облике.
- Аутоматско рангирање: Аутоматски бира одговарајући опсег мерења.
- Задржавање података: Замрзава приказано очитавање.
- Максимално задржавање: Captures and displays the maximum peak value.
- Индикација слабе батерије: Упозорава када је потребна замена батерије.
- Аутоматско искључивање: Штеди трајање батерије аутоматским искључивањем након периода неактивности.
- Заштита од преоптерећења: Штити мерач од оштећења услед прекомерног уноса.
- Аларм високог притиска: Provides an alert under certain high voltagе услови.

Слика 1: Завршеноview of Thsinde 18Z-III Multimeter's capabilities and display features.
5. Производ је готовview
Familiarize yourself with the components and controls of your Thsinde 18Z-III Digital Multimeter.
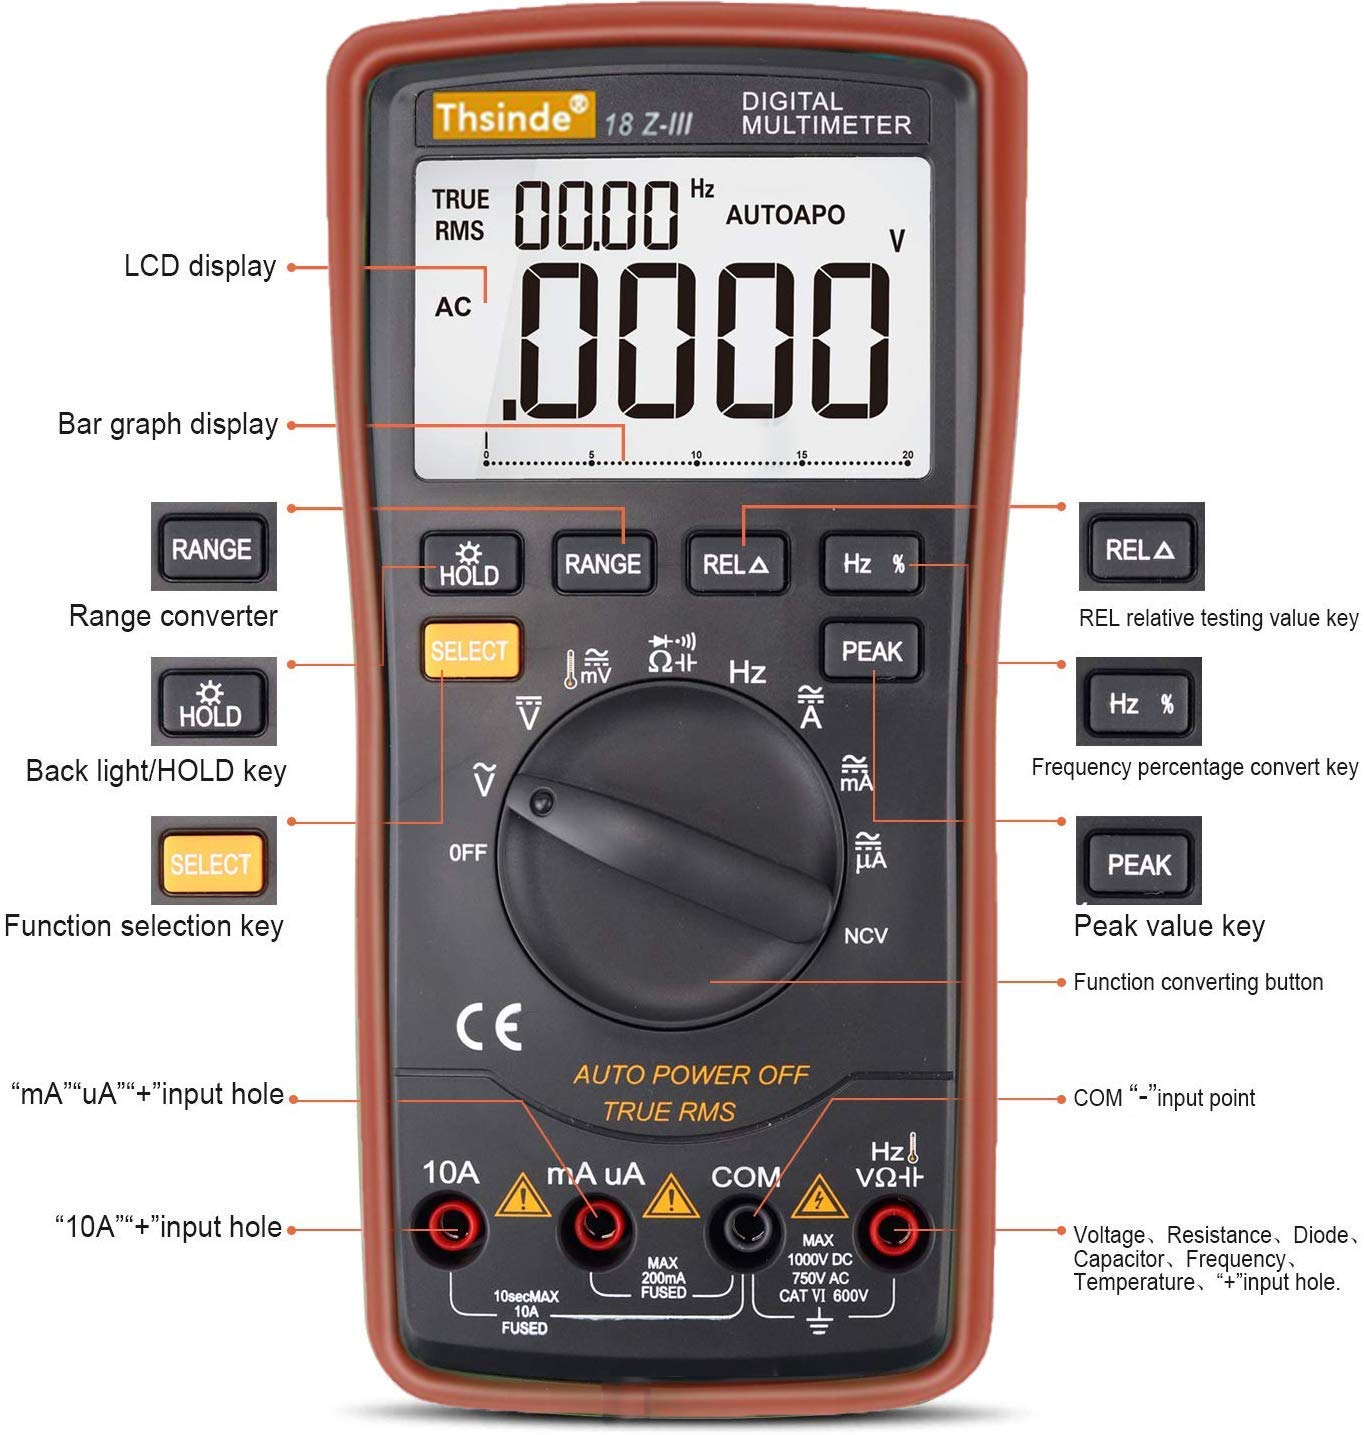
Figure 2: Front panel layout and controls of the Thsinde 18Z-III Digital Multimeter.
- ЛЦД екран: Приказује очитавања мерења, јединице и индикаторе функција.
- Приказ тракастог графикона: Provides an analog representation of the measured value.
- Дугме РАНГЕ: Ручно бира опсег мерења (онемогућава аутоматско подешавање опсега).
- HOLD / Backlight Button: Short press to activate Data Hold; long press to toggle backlight.
- Дугме СЕЛЕЦТ: Toggles between different measurement modes within a single rotary switch position (e.g., AC/DC, Diode/Continuity).
- REL A Button: Активира режим релативног мерења.
- Hz % Button: Toggles between frequency and duty cycle measurement.
- Дугме ПЕАК: Activates peak hold function.
- Ротациони прекидач функција: Selects the primary measurement function (OFF, V, mV, A, mA, uA, Ohm, Capacitance, Diode/Continuity, NCV, Temperature, Frequency).
- Улазни прикључци:
- 10A Input: For measuring currents up to 10A.
- mA uA Input: За мерење миллиampовде и микроampere currents.
- COM Input: Common (negative) terminal for all measurements.
- VΩHz Input: Positive terminal for Voltage, Resistance, Capacitance, Frequency, Diode, and Temperature measurements.
6. Подешавање
6.1 Инсталација батерије
The Thsinde 18Z-III Multimeter operates on a single 9V battery, which is included. The battery compartment is located on the back of the unit.
- Ensure the multimeter is turned ОФФ.
- Locate the screw on the battery compartment cover on the back of the meter.
- Use a screwdriver to loosen the screw and remove the battery cover.
- Повежите батерију од 9V са спојницама батерије, водећи рачуна о исправном поларитету (+ и -).
- Ставите батерију у одељак и вратите поклопац, причврстивши га завртњем.
6.2 Повезивање мерних каблова
Увек повежите црни мерни кабл са ЦОМ прикључак. Повежите црвени мерни кабл са одговарајућим улазним прикључком на основу типа мерења:
- Фор Волtage, Resistance, Capacitance, Frequency, Diode, and Temperature measurements: Connect the red test lead to the ВΩХз Јацк.
- For mA/uA Current measurements: Connect the red test lead to the mA uA Јацк.
- For 10A Current measurements: Connect the red test lead to the 10А Јацк.
Ensure test leads are fully inserted into the jacks.
7. Упутство за употребу
Turn the rotary function switch to the desired measurement function. The meter will automatically select the appropriate range unless the АСОРТИМАН дугме је притиснуто.
7.1 ДЦ/АЦ Волtage Measurement (V, mV)
- Прикључите црни проводник ЦОМ и црвени тестни проводник до ВΩХз.
- Окрените окретни прекидач у положај V (for volts) or mV (for millivolts).
- Притисните СЕЛЕЦТ to toggle between DC and AC voltage ako je potrebno.
- Повежите мерне сонде преко кола или компоненте коју треба мерити.
7.2 DC/AC Current Measurement (A, mA, uA)
ОПРЕЗ: Never connect the meter in parallel with a voltagизвор при мерењу струје. То може да прегори осигурач или оштети мерач.
- Прикључите црни проводник ЦОМ.
- За струје до 200mA, повежите црвени мерни кабл са mA uAЗа струје до 10A, повежите црвени мерни кабл са 10А.
- Turn the rotary switch to the appropriate current range (A, mA, или uA).
- Притисните СЕЛЕЦТ to toggle between DC and AC current if necessary.
- Open the circuit and connect the test probes in series with the circuit to be measured.
7.3 Мерење отпора (Ω)
ОПРЕЗ: Уверите се да је коло искључено из струје и да су сви кондензатори испражњени пре мерења отпора.
- Прикључите црни проводник ЦОМ и црвени тестни проводник до ВΩХз.
- Окрените окретни прекидач у положај Ω.
- Повежите мерне сонде преко компоненте коју треба мерити.
7.4 Мерење капацитивности (F)
ОПРЕЗ: Ensure capacitors are fully discharged before measurement to prevent damage to the meter.
- Прикључите црни проводник ЦОМ и црвени тестни проводник до ВΩХз.
- Окрените окретни прекидач у положај Капацитет симбол.
- Повежите испитне сонде преко кондензатора.
7.5 Тест диода и континуитета
- Прикључите црни проводник ЦОМ и црвени тестни проводник до ВΩХз.
- Окрените окретни прекидач у положај Диода/Континуитет симбол.
- Притисните СЕЛЕЦТ to toggle between Diode Test and Continuity Test.
- For Diode Test: Connect the red probe to the anode and the black probe to the cathode. The display shows the forward voltage drop. Reverse the probes; the display should show OL (Open Loop).
- For Continuity Test: Connect the probes across the circuit. A continuous beep indicates continuity (low resistance).
7.6 Нон-Цонтацт Волtagе (НЦВ) Детекција
- Окрените окретни прекидач у положај НЦВ.
- Move the top front part of the meter close to the conductor being tested.
- The meter will beep and the NCV indicator will light up if AC voltage is detected. The intensity of the beeping and light indicates the strength of the electric field.
7.7 Мерење температуре
- Прикључите црни проводник ЦОМ и црвени тестни проводник до ВΩХз.
- Окрените окретни прекидач у положај Температура symbol (usually °C/°F).
- Insert the temperature probe (thermocouple, if included) into the ВΩХз и ЦОМ утичнице, поштујући поларитет.
- Поставите врх температурне сонде на или близу објекта чија температура треба да се мери.
- Притисните СЕЛЕЦТ to switch between Celsius (°C) and Fahrenheit (°F).

Figure 3: Thsinde 18Z-III Multimeter performing a temperature measurement.
7.8 Frequency and Duty Cycle Measurement (Hz, %)
- Прикључите црни проводник ЦОМ и црвени тестни проводник до ВΩХз.
- Окрените окретни прекидач у положај Hz.
- Повежите тест сонде преко извора сигнала.
- Притисните Хз % to toggle between frequency (Hz) and duty cycle (%).
7.9 Data Hold (HOLD)
Притисните тастер ХОЛД button briefly to freeze the current reading on the display. Press it again to release the hold function.
7.10 Peak Hold (PEAK)
Притисните тастер ПЕАК button to capture and display the maximum peak value of a measurement. Press it again to exit peak hold mode.
7.11 Позадинско осветљење
Притисните и држите ХОЛД button for approximately 2 seconds to turn the LCD backlight on or off. The backlight will automatically turn off after about 15 seconds to conserve battery.
7.12 Аутоматско искључивање
The meter will automatically power off after approximately 15 minutes of inactivity to save battery life. To disable this feature, hold down the СЕЛЕЦТ button while turning the rotary switch from ОФФ to any function. To re-enable, simply power off and on normally.
8. Спецификације
| Параметар | Спецификација |
|---|---|
| Дисплаи | 19999/20000 Counts, 4 1/2 Digit LCD |
| ДЦ Волtage | 200mV/2V/20V/200V/1000V |
| АЦ Волtage | 200mV/2V/20V/200V/750V |
| ДЦ Цуррент | 200uA/2000uA/20mA/200mA/10A |
| АЦ Цуррент | 200uA/2000uA/20mA/200mA/10A |
| Отпор | 200Ω/2kΩ/20kΩ/200kΩ/2MΩ/20MΩ |
| Капацитет | 20nF/200nF/2uF/20uF/200uF/2000uF |
| Температура | -20°Ц до 1000°Ц / -4°Ф до 1832°Ф |
| Фреквенција | 10Хз-20МХз |
| Дути Цицле | 0.1%-99% |
| Извор напајања | 9В батерија (укључена) |
| Воркинг Енвиронмент | 0°C to 40°C, relative humidity <75% |
| Тежина артикла | 454 г |
| Димензије | 22.5 к 16.5 к 6 цм |
| Материјал | АБС |
9. Одржавање
9.1 Замена батерије
When the low battery indicator appears on the display, replace the 9V battery immediately to ensure accurate measurements. Follow the steps in Section 6.1 for battery installation.
9.2 Чишћење
Обришите ц бројилаasinг са огласомamp крпом и благим детерџентом. Не користите абразивна средства или раствараче. Уверите се да је мерач потпуно сув пре употребе.
9.3 Замена осигурача
If the current measurement function fails, the fuse may need replacement. This meter uses HRC fuses. Refer to a qualified technician for fuse replacement to ensure proper type and rating are used.
КСНУМКС. Решавање проблема
| Проблем | Могући узрок | Решење |
|---|---|---|
| Нема дисплеја или је дисплеј замагљен | Low battery; Meter off; Poor battery connection. | Replace battery; Turn rotary switch to a function; Check battery connection. |
| Приказано је „OL“ (преоптерећење) | Улазна вредност прелази изабрани опсег; Отворено коло (за отпор/континуитет). | Switch to a higher range (if not auto-ranging); Check circuit connection. |
| Нетачна очитавања | Low battery; Incorrect function/range selected; Damaged test leads. | Replace battery; Select correct function/range; Inspect and replace test leads if damaged. |
| Мерење струје не ради | Blown fuse; Incorrect input jack used. | Replace fuse (refer to 9.3); Ensure red lead is in 10A or mA uA jack. |
| Нема звучног сигнала за континуитет | Open circuit; Meter not in continuity mode. | Check circuit for breaks; Press SELECT to ensure continuity mode is active. |
11. Гаранција и подршка
For warranty information or technical support, please refer to the documentation provided at the time of purchase or contact Thsinde customer service directly. Keep your purchase receipt as proof of purchase.
За додатну помоћ, можете посетити веб-сајт произвођача webсајт или контактирајте њихове канале за подршку.