
Увод
This manual provides detailed instructions for the setup, operation, and maintenance of your Homtime C1 Mini Snooze Alarm Clock. Please read this manual thoroughly before using the product to ensure proper function and longevity.

Image: The Homtime C1 Mini Alarm Clock, light blue in color, is shown on a decorative tray next to a small potted plant. The digital display shows the time 20:08.
Производ је завршенview
The Homtime C1 Mini is a compact digital alarm clock designed for convenience and functionality. It features a clear LCD display, dual USB charging ports for mobile devices, and a snooze function. Its design is suitable for various environments including bedrooms, offices, and for travel.
Кључне карактеристике:
- Digital Time Display
- Функција одлагања
- Два УСБ порта за пуњење
- Dimmable LCD Screen
- Компактан и преносив дизајн
Садржај пакета:
- Homtime C1 Mini Alarm Clock
- Повер Адаптер
- Кориснички приручник (овај документ)
Сетуп
- Прикључак за напајање: Connect the provided power adapter to the DC input port on the back of the alarm clock. Plug the adapter into a standard wall outlet. The display will illuminate.
- Battery Installation (Optional for backup): За резервно копирање подешавања времена и аларма током нестанка струјеtages, install 3 AAA batteries (not included) into the battery compartment located on the bottom of the unit. Ensure correct polarity.
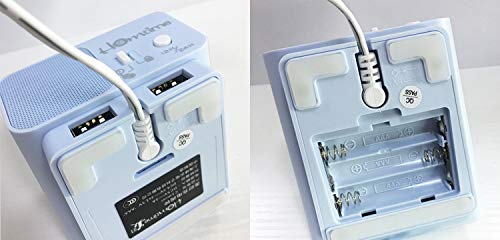
Image: A split image showing the bottom of the Homtime C1 Mini. The left side displays the rear with two USB charging ports and a power input. The right side shows the open battery compartment, designed for AAA batteries.
Упутство за употребу
1. Подешавање времена
- Притисните и држите "Time Set" button (usually located on the top or back) until the hour digits begin to flash.
- Користите "+" or "-" buttons to adjust the hour. Pay attention to AM/PM indicators if present.
- Притисните тастер "Time Set" поново притисните дугме да бисте потврдили сате и прешли на подешавање минута.
- Користите "+" or "-" дугмад за подешавање минута.
- Притисните тастер "Time Set" button one last time to save the time setting.
2. Подешавање аларма
- Притисните и држите "Alarm Set" дугме док цифре сата аларма не почну да трепћу.
- Користите "+" or "-" дугмад за подешавање сата аларма.
- Притисните тастер "Alarm Set" button again to confirm the alarm hour and move to alarm minute adjustment.
- Користите "+" or "-" дугмад за подешавање минута аларма.
- Притисните тастер "Alarm Set" button one last time to save the alarm setting.
- Да бисте активирали/деактивирали аларм, притисните дугме "Alarm On/Off" button (or a dedicated alarm icon button). An alarm icon will appear on the display when active.
3. Функција одлагања
When the alarm sounds, press the large button on the top of the clock (often labeled "одложи" or simply the main control button). The alarm will pause for approximately 9 minutes and then sound again. To turn off the alarm completely, press any other button or let it sound for its full duration.
4. Дисплаи Бригхтнесс
The LCD screen has multiple brightness levels. Press the "Dimmer" button (or a dedicated light icon button) repeatedly to cycle through the available brightness settings (e.g., High, Medium, Low, Off).
5. USB портови за пуњење
The Homtime C1 Mini features dual USB charging ports on the back of the unit. These ports are designed to charge compatible mobile devices such as smartphones and tablets. Simply connect your device's USB charging cable to one of the ports. Charging will begin automatically.
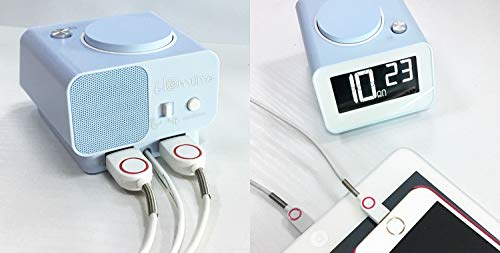
Слика: Задњи део view of the Homtime C1 Mini alarm clock, showing two white USB charging cables plugged into its dual USB ports. This illustrates the charging functionality.
Одржавање
- Чишћење: Wipe the unit with a soft, dry cloth. Do not use abrasive cleaners or solvents, as they may damage the surface.
- Снага: Ensure the power adapter is securely connected. Disconnect from power during extended periods of non-use.
- Окружење: Avoid placing the clock in direct sunlight, near heat sources, or in excessively humid environments.
Решавање проблема
| Проблем | Могући узрок | Решење |
|---|---|---|
| Приказ сата је празан. | Нема снаге или снагеtage. | Check power adapter connection. If using battery backup, ensure batteries are installed correctly and are not depleted. |
| Аларм се не оглашава. | Аларм није активиран или је погрешно подешен. | Уверите се да је аларм укључен (икона аларма је видљива). Проверите да ли је време аларма правилно подешено. |
| УСБ пуњење не ради. | Проблем са каблом или некомпатибилност уређаја. | Try a different USB cable. Ensure the device is compatible with USB charging. Check if the clock is powered on. |
| Екран је превише светао/таман. | Потребно је подесити подешавање осветљености. | Press the "Dimmer" button to cycle through brightness levels. |
Спецификације
- Бренд: Хомтиме
- Модел: C1 Mini
- Тип приказа: Дигитални ЛЦД
- Извор напајања: Electrical (AC Adapter)
- Резервна батерија: 3 к ААА батерије (нису укључене)
- Посебне карактеристике: Alarm, Dual USB Charging Ports, Dimmable Screen
- Материјал оквира: Акрилонитрил Бутадиен Стирен, Пластика
- Тип монтаже: Таблетоп
- Земља порекла: Кина
Гаранција и подршка
For warranty information and customer support, please refer to the warranty card included with your product or visit the official Homtime webсајту. Сачувајте рачун о куповини за гаранције.
For further assistance, you may contact Homtime customer service through their official channels. Please have your model number (C1 Mini) and purchase details ready.