1. Увод
This manual provides essential instructions for the safe and effective use of your DT321B Digital Multimeter. This portable device is designed for measuring AC/DC voltage, DC current, resistance, and includes features for diode testing, continuity, battery testing, and transistor (hFE) measurements. Please read this manual thoroughly before operation and retain it for future reference.
2. Безбедносне информације
Always observe basic safety precautions when using this multimeter to reduce the risk of fire, electric shock, or personal injury.
- Немојте примењивати волtagе или струја која прелази максималне наведене границе за мултиметар.
- Уверите се да су мерни каблови у добром стању и правилно повезани пре него што извршите било какво мерење.
- Never use the multimeter if it appears damaged or if the test leads are damaged.
- Будите опрезни када радите са вол.tagизнад 30V AC RMS, 42V вршне струје или 60V DC. Ови напониtagпредстављају опасност од удара.
- Always disconnect power to the circuit under test before measuring resistance or continuity.
- Do not operate the multimeter in explosive atmospheres.
- Замените батерије када се појави индикатор празне батерије како бисте осигурали тачна очитавања.
3. Производ је готовview
The DT321B Digital Multimeter features a clear LCD display and a rotary switch for selecting various measurement functions. Input jacks are provided for connecting test leads.

Слика 3.1: Предња страна view of the DT321B Digital Multimeter with key components labeled. The display shows numerical readings, the hold button freezes the current reading, and the rotary switch selects measurement functions. The '10A' jack is for high current measurements, 'COM' is the common ground, and 'VΩmA' is for voltage, resistance, and low current measurements.
The multimeter includes a blue backlight for improved visibility in low-light conditions and a data hold function to freeze the displayed reading.
4. Подешавање
4.1 Инсталација батерије
The DT321B Digital Multimeter requires two 1.5V batteries (Type 7, typically AAA) for operation. To install or replace batteries:
- Уверите се да је мултиметар искључен.
- Пронађите поклопац одељка за батерије на задњој страни уређаја.
- Одврните завртањ (завртње) за причвршћивање и скините поклопац.
- Insert the two 1.5V batteries, observing the correct polarity (+ and -) as indicated inside the compartment.
- Вратите поклопац одељка за батерије и причврстите га завртњем (завртњима).
5. Упутство за употребу
Before making any measurements, ensure the test leads are securely plugged into the correct input jacks.

Figure 5.1: The DT321B Multimeter with test probes connected. The black probe is connected to the 'COM' (common) jack, and the red probe is connected to the 'VΩmA' jack for most voltage, resistance, and low current measurements.
5.1 Меасуринг ДЦ Волtagе (V–)
- Insert the red test lead into the 'VΩmA' jack and the black test lead into the 'COM' jack.
- Поставите ротациони прекидач на жељену јачину једносмерне струјеtage (V–) range (e.g., 200m, 2, 20, 200, 1000V). If the voltage is unknown, start with the highest range and work downwards.
- Connect the test probes across the component or circuit to be measured.
- Прочитајте књtagе вредност на ЛЦД екрану.
5.2 Меасуринг АЦ Волtagе (V∼)
- Insert the red test lead into the 'VΩmA' jack and the black test lead into the 'COM' jack.
- Поставите ротациони прекидач на жељену јачину наизменичне струјеtage (V∼) range (e.g., 200, 750V).
- Connect the test probes across the component or circuit to be measured.
- Прочитајте књtagе вредност на ЛЦД екрану.
5.3 Measuring DC Current (A–)
ОПРЕЗ: To avoid damage to the multimeter or the circuit, never connect the test leads in parallel across a voltage source when measuring current. Always connect in series.
- For currents up to 200mA, insert the red test lead into the 'VΩmA' jack. For currents up to 10A, insert the red test lead into the '10A MAX' jack. The black test lead always goes into the 'COM' jack.
- Set the rotary switch to the desired DC Current (A–) range (e.g., 200u, 2m, 20m, 200m, 10A).
- Open the circuit where current is to be measured and connect the multimeter in series with the circuit.
- Прочитајте тренутну вредност на ЛЦД екрану.
5.4 Measuring Resistance (Ω)
ОПРЕЗ: Ensure the circuit under test is completely de-energized before measuring resistance.
- Insert the red test lead into the 'VΩmA' jack and the black test lead into the 'COM' jack.
- Set the rotary switch to the desired Resistance (Ω) range (e.g., 200, 2k, 20k, 200k, 2M).
- Повежите мерне сонде преко компоненте коју треба мерити.
- Очитајте вредност отпора на ЛЦД екрану.
5.5 Тест диоде
- Insert the red test lead into the 'VΩmA' jack and the black test lead into the 'COM' jack.
- Set the rotary switch to the diode symbol (→|).
- Спојите црвену сонду на аноду, а црну сонду на катоду диоде. На дисплеју ће се приказати интензитет струје.tagе дроп.
- Reverse the probes. The display should show 'OL' (open loop) for a good diode.
5.6 Тест континуитета
- Insert the red test lead into the 'VΩmA' jack and the black test lead into the 'COM' jack.
- Set the rotary switch to the continuity symbol (♫).
- Connect the test probes across the circuit or component. If continuity exists (resistance below a certain threshold), the buzzer will sound.
5.7 Battery Testing (1.5V / 9V)
- Insert the red test lead into the 'VΩmA' jack and the black test lead into the 'COM' jack.
- Set the rotary switch to the '1.5V BATT' or '9V BATT' position.
- Connect the red probe to the positive terminal and the black probe to the negative terminal of the battery.
- Прочитајте запремину батеријеtagе на дисплеју.
5.8 Transistor (hFE) Test
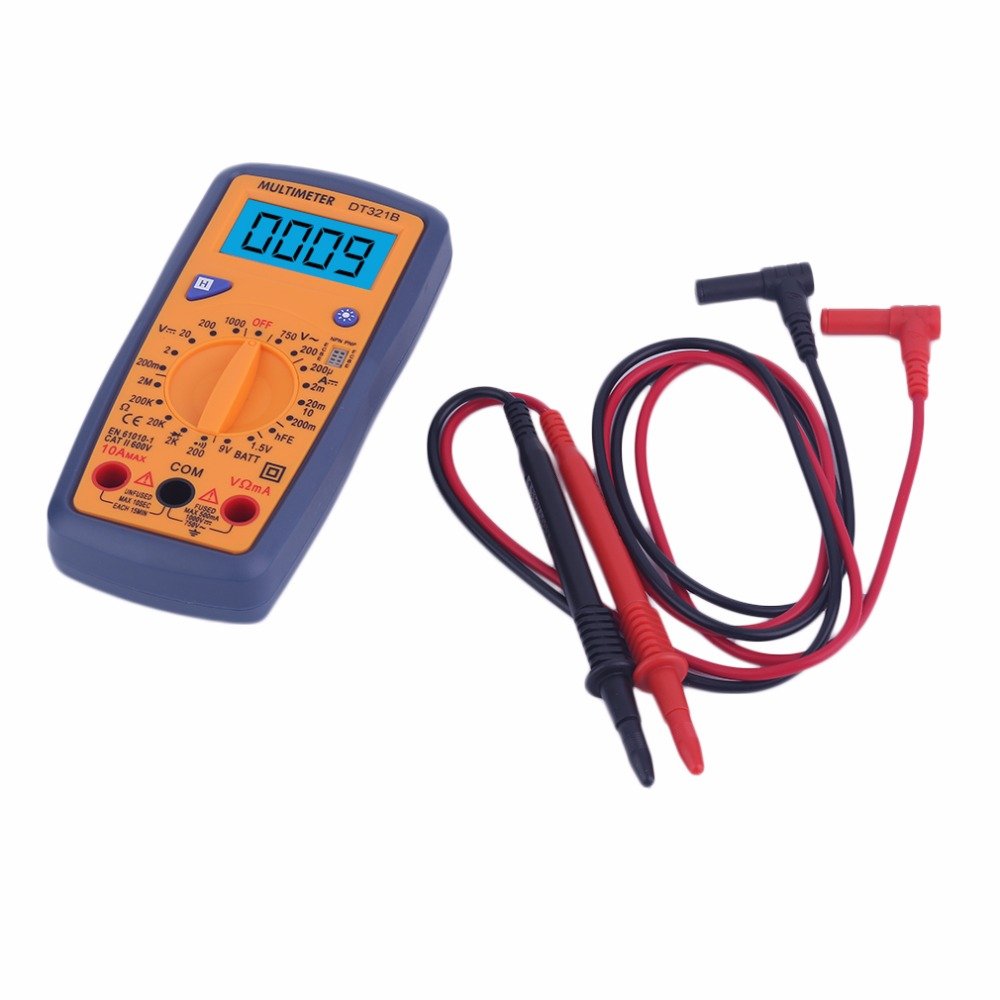
Figure 5.2: The DT321B Multimeter in use, with an inset showing a transistor being tested. The multimeter can measure the hFE (current gain) of NPN and PNP transistors.
- Set the rotary switch to the 'hFE' position.
- Identify the NPN or PNP type of the transistor.
- Insert the transistor leads (Emitter, Base, Collector) into the corresponding sockets in the 'hFE' test socket on the multimeter.
- Read the hFE value on the LCD display.
5.9 Функција задржавања података
Press the 'Hold' button to freeze the current reading on the display. Press it again to release the hold function and resume live readings.
5.10 Функција позадинског осветљења
The multimeter features a blue backlight. Press the backlight button (often integrated with the 'Hold' button or a separate button with a light symbol) to turn the backlight on or off for improved visibility.
6. Одржавање
6.1 Чишћење
Обришите кућиште огласомamp cloth and a mild detergent. Do not use abrasives or solvents. Ensure the multimeter is completely dry before use.
6.2 Замена батерије
When the low battery symbol appears on the display, replace the batteries as described in Section 4.1. Remove batteries if the multimeter is not used for extended periods to prevent leakage.
КСНУМКС. Решавање проблема
- Нема дисплеја или бледи дисплеј: Проверите постављање батерија и пуњење. Замените батерије ако је потребно.
- Нетачна очитавања: Ensure the rotary switch is set to the correct function and range. Check test lead connections. Verify the circuit under test is properly prepared (e.g., de-energized for resistance).
- Приказано је „OL“ (преоптерећење): The measured value exceeds the selected range. Switch to a higher range or check for an open circuit.
- No continuity buzzer: Ensure the multimeter is in continuity mode and the circuit is closed.
8. Спецификације
| Меасуремент | Домет | Прецизност |
|---|---|---|
| ДЦ Волtage | 200мВ, 2В, 20В, 200В, 1000В | ±0.5% |
| АЦ Волtage | 200В, 750В | ±1.0% |
| ДЦ Цуррент | 200uA, 2mA, 20mA, 200mA, 10A | ±1.8% |
| Отпор | 200Ω, 2кΩ, 20кΩ, 200кΩ, 2МΩ | ±1.0% |
Опште спецификације:
- Величина ЛЦД екрана: 45к23мм
- Величина производа: 160к76к32мм
- Напајање: 2 x 1.5V batteries (Type 7 / AAA)
- Лов Волtage Symbol Display: Да
- Заштита од преоптерећења: Да
- Diode Detection: Да
- On-off Detection & Buzzer: Да
- Откривање капацитета батерије: 1.5В / 9В
- Transistor Detection (hFE): Да
- Задржавање података: Да
- Дисплеј са позадинским осветљењем: Да
9. Гаранција и подршка
Specific warranty and support information for the DT321B Digital Multimeter is not available in the provided product details. Please refer to the retailer or manufacturer's website for any applicable warranty terms or customer support contacts.