1. Увод
This manual provides detailed instructions for the installation, operation, and maintenance of your KICKER car audio system. This system includes a KICKER 48DCWR122-RS Dual 12" CompR Series Subwoofer Enclosure, a KICKER 46CXA8001 Mono Amplifier, and a Harmony Audio HA-AK8 Amplifier Installation Kit. Please read this manual thoroughly before attempting installation or operation to ensure proper function and safety.
Мере предострожности:
- Always disconnect the vehicle's battery negative terminal before beginning any electrical work.
- Уверите се да су све жице правилно постављене и осигуране како бисте спречили оштећења или кратки спојеви.
- Use appropriate personal protective equipment during installation.
- Консултујте професионалног инсталатера ауто аудио система ако нисте сигурни у вези са било којим делом процеса инсталације.
2. Садржај пакета
Проверите да ли су све ставке присутне у вашем пакету:
- 1 x KICKER 48DCWR122-RS Dual 12" CompR Series Subwoofer Enclosure
- 1 x KICKER 46CXA8001 Car Audio Class D Mono Ampлифиер
- 1 x Harmony Audio HA-AK8 Car Stereo Complete 8 Gauge Ampлифиер Инсталл Кит

Слика 2.1: Предња страна view of the KICKER Dual 12 inch CompR Subwoofer Enclosure. This image shows the two 12-inch subwoofers mounted in a black carpeted enclosure with the KICKER logo.

Слика 2.2: Врх view of the KICKER 46CXA8001 Mono Ampлифиер. Тхе amplifier is a compact black unit with the KICKER logo and model number CXA800.1 visible.

Figure 2.3: Harmony Audio HA-AK8 8 Gauge Amplifier Installation Kit components. This image displays various cables, a fuse holder, terminals, and zip ties included in the installation kit.
3. Подешавање и инсталација
Правилна инсталација је кључна за оптималне перформансе и безбедност. Препоручује се да овај систем инсталира квалификовани стручњак.
3.1 Subwoofer Enclosure Placement
The KICKER 48DCWR122-RS enclosure is designed for freestanding placement. Choose a secure location in your vehicle, typically the trunk or cargo area, where it will not shift during driving. Ensure adequate ventilation around the enclosure.

Слика 3.1: Задња страна view of the KICKER Dual 12 inch CompR Subwoofer Enclosure. This view shows the rear panel, typically where the speaker terminals are located for connection to an ampлифиер.
3.2 Amplifier Installation (KICKER 46CXA8001)
Монтирајте amplifier in a location that provides good air circulation and is protected from moisture and excessive heat. Common locations include under a seat, in the trunk, or attached to the subwoofer enclosure.
3.2.1 Power Wiring (HA-AK8 Kit)
- Power Cable (+12V): Connect the 8-gauge power cable from the HA-AK8 kit to the vehicle's positive battery terminal. Install the fuse holder (included in HA-AK8 kit) as close to the battery as possible (within 18 inches) to protect the vehicle's electrical system. Route the power cable to the amp+12V терминал на пуњачу.
- Ground Cable (GND): Connect the 8-gauge ground cable from the HA-AK8 kit to a clean, unpainted metal surface on the vehicle's chassis. Ensure a solid, low-resistance connection. Connect the other end to the amplifier's GND terminal. The ground cable should be as short as possible, ideally less than 3 feet.
- Remote Turn-On Cable (REM): Connect a thin gauge wire (typically blue) from your head unit's remote output to the ampREM терминал пуњача. Ова жица окреће ampукључивање и искључивање горионика помоћу ваше главне јединице.
3.2.2 Сигнални улаз
The 46CXA8001 amplifier supports both high-level (speaker level) and low-level (RCA) inputs. Use the appropriate input type based on your head unit's outputs.
- Улаз ниског нивоа: If your head unit has RCA outputs, connect them to the ampRCA улазни прикључци компаније Lifer.
- Улаз високог нивоа: If your head unit does not have RCA outputs, use the speaker-level inputs. Refer to the amplifier's specific wiring diagram for connecting speaker wires directly to the ampлифиер.
3.2.3 Излаз звучника
Connect the subwoofer enclosure's speaker terminals to the amplifier's SPEAKER output terminals. Ensure correct polarity (+ to + and - to -) for optimal sound. The 48DCWR122-RS enclosure is wired for a 2 Ohm load.
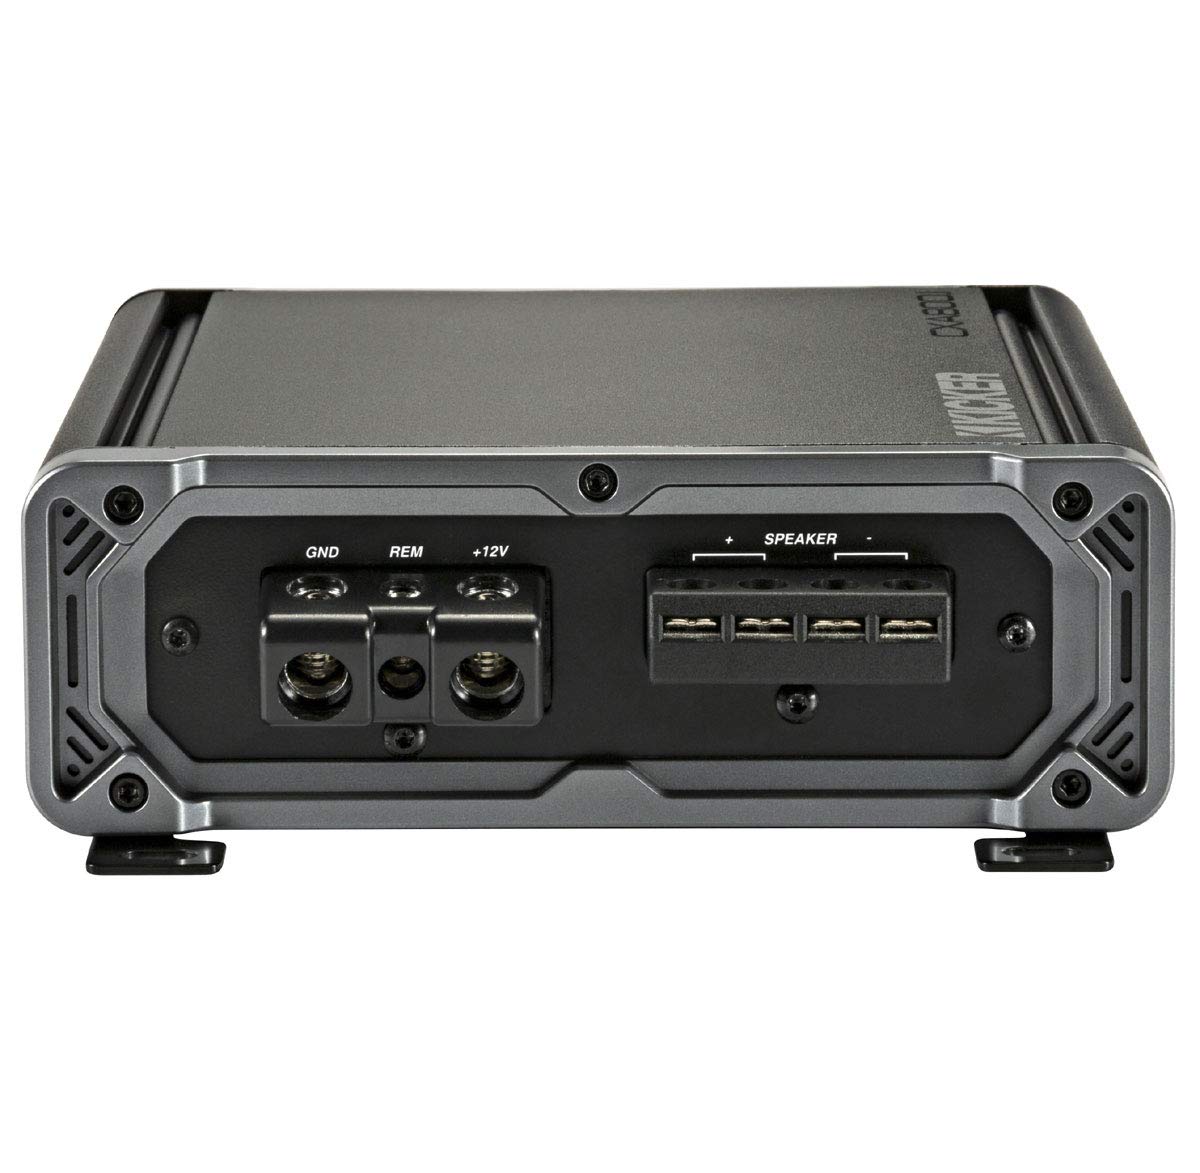
Figure 3.2: Connection side of the KICKER 46CXA8001 Mono Amplifier. This image shows the power (GND, REM, +12V) and speaker output terminals on one side of the ampлифиер.
4. Упутство за употребу
Once the system is installed, follow these steps for initial setup and operation:
4.1 Почетно укључивање
- Двапут проверите све прикључке ожичења.
- Reconnect the vehicle's battery negative terminal.
- Укључите главну јединицу. ampУређај за напајање требало би да се укључи (што је назначено ЛЕД диодом).
4.2 Amplifier Settings (KICKER 46CXA8001)
The 46CXA8001 amplifier features several adjustable controls:
- Гаин Цонтрол: Adjust the gain to match the output voltagваше главне јединице. Почните са минимумом појачања и полако га повећавајте док не чујете изобличење, а затим мало смањите. Ово није контрола јачине звука.
- Low Pass Crossover (LPF): Variable from 50-200Hz. Set this to filter out frequencies above your desired subwoofer range. A common starting point is 80-100Hz.
- Подзвучни филтер: Fixed at 25Hz. This filters out extremely low frequencies that the subwoofer cannot reproduce efficiently, protecting it from damage.
- KICKER EQ Boost: Variable to +12dB, centered at 40Hz. Use this to fine-tune the bass response to your preference. Use sparingly to avoid distortion.
5. Одржавање
Regular maintenance ensures the longevity and performance of your KICKER system.
- Чишћење: Задржи amplifier and subwoofer enclosure clean and free of dust and debris. Use a soft, dry cloth. Do not use liquid cleaners directly on components.
- Везе: Periodically check all power, ground, remote, and speaker connections to ensure they are secure and free from corrosion.
- вентилација: Осигурајте amplifier's heatsink fins are not obstructed to allow for proper cooling.
КСНУМКС. Решавање проблема
If you experience issues with your system, refer to the following common problems and solutions:
6.1 Нема струје / AmpЛајфајер се не укључује
- Проверите осигурач: Verify the fuse in the HA-AK8 kit's fuse holder is intact. Replace if blown.
- Прикључак за напајање: Ensure the +12V power cable is securely connected to the battery and ampлифиер.
- Уземљење: Confirm the ground cable has a solid connection to the chassis and ampлифиер.
- Даљинско укључивање: Check that the remote wire is connected to both the head unit and amplifier, and that the head unit is powered on.
6.2 No Sound from Subwoofer
- Прикључци звучника: Verify speaker wires are correctly connected to both the amplifier and subwoofer enclosure, with correct polarity.
- Улаз сигнала: Ensure RCA or high-level input cables are securely connected to both the head unit and ampлифиер.
- AmpЛифиер Добитак: Повећајте amplifier's gain control slightly.
- Head Unit Settings: Check head unit's subwoofer output settings and volume.
6.3 Изобличени звук
- Подешавање појачања: Смањите amplifier's gain control. It may be set too high.
- Улазни ниво: Ensure the head unit's volume is not excessively high, causing the input signal to clip.
- Crossover Setting: Adjust the LPF setting on the ampлифиер.
6.4 AmpПрегревање усисивача
- вентилација: Осигурајте amplifier has adequate airflow and is not covered.
- импеданса: Verify the subwoofer's impedance matches the amplifier's capabilities (the 48DCWR122-RS is 2 Ohm, which the 46CXA8001 supports).
- Подешавање појачања: Смањите ampдобитак онога ко спасава живот.
7. Спецификације
7.1 KICKER 48DCWR122-RS Dual 12" CompR Series Subwoofer Enclosure
- Управљање напајањем: 1000 В РМС / 2000 В Пеак
- Препоручени опсег снаге: 500 - 1000 Watts RMS
- Номинална импеданса: 2 Охм
- Фреквенцијски одзив: 25 - 500Хз
- Осетљивост: 98дБ
- Материјал конуса: полипропилен
- Сурроунд материјал: Ribbed Santoprene
- Конструкција кућишта: MDF (Medium Density Fiberboard) with extensive internal bracing
- Тип кућишта: Ported, Front-facing port
- Димензије (приближне):
- Box Top Depth: 14"
- Box Bottom Depth: 17 1/4"
- Box Height: 16"
- Box Width: 32 3/8"
7.2 KICKER 46CXA8001 Car Audio Class D Mono Ampлифиер
- РМС излазна снага:
- 600 В к 1 @ 2 Охм
- 800 В к 1 @ 1 Охм
- Максимална излазна снага:
- 1200 В к 1 @ 2 Охм
- 1600 В к 1 @ 1 Охм
- Фреквенцијски одзив: 25Хз - 200Хз
- Однос сигнал/шум: 95дБ
- Осетљивост улаза:
- High level: 250mV-10V
- Low level: 125mV-5V
- Активни кросовер: 12dB/octave, variable 50-200Hz, low pass only
- Подзвучни филтер: 24dB/octave high-pass fixed @ 25Hz
- KICKER EQ Boost: Variable to +12dB, centered @ 40Hz
- Димензије (приближне): 8-1/8" Length x 2-3/8" Height x 7-3/16" Width
8. Гаранција и подршка
KICKER products are engineered for performance and reliability. For specific warranty information regarding your KICKER 48DCWR122-RS subwoofer enclosure and 46CXA8001 amplifier, please refer to the warranty card included with your product or visit the official KICKER website. For support with the Harmony Audio HA-AK8 installation kit, please refer to Harmony Audio's documentation.
If you require technical assistance or have questions not covered in this manual, please contact KICKER customer support or your authorized KICKER dealer.