1. Увод
This manual provides detailed instructions for the installation, operation, and maintenance of your Lapetus 8-Channel 1080N Hybrid 5-in-1 AHD Digital Video Recorder (DVR). This DVR supports multiple video input types, including Analog, AHD, HD-TVI, CVI, and 1080P NVR, offering a versatile solution for your surveillance needs. Please read this manual thoroughly before using the device to ensure proper setup and functionality.
2. Садржај пакета
Проверите да ли су све ставке наведене у наставку укључене у ваш пакет:
- 1 x Lapetus 8CH Digital Video Recorder (Model LT-6708NH)
- 1 к 12В/2000мА напајање за ДВР
- 1 к УСБ миш
- 1 к Упутство за употребу
Note: Hard Disk Drive (HDD) and cameras are not included and must be purchased separately for recording functionality.
3. Производ је готовview
3.1 Предња плоча

Слика: Фронт view of the Lapetus 8CH DVR, showing the brand logo, status indicators, and navigation buttons.
The front panel features status indicators and control buttons:
- ИР: Infrared receiver for remote control (if applicable).
- Снага: Indicates the DVR is powered on.
- ХДД: Indicates Hard Disk Drive activity.
- Аларм: Indicates an active alarm event.
- Дугмад за навигацију: Used to navigate menus and settings on a connected display.
3.2 Задња плоча
Слика: Позади view of the Lapetus 8CH DVR, displaying various input and output ports for video, audio, network, and power.
Задња плоча садржи све потребне портове за повезивање:
- VIDEO IN (1-8): BNC connectors for connecting up to 8 surveillance cameras.
- AUDIO IN (4CH): RCA connectors for audio input from microphones.
- AUDIO OUT (1CH): RCA connector for audio output to a speaker or ampлифиер.
- ДВИ: Излаз за мултимедијални интерфејс високе дефиниције за повезивање са монитором или телевизором.
- ВГА: Излаз за видео графички низ за повезивање са монитором.
- УСБ: USB ports for connecting the included mouse, USB flash drives for backup, or external storage.
- NET (RJ-45): Ethernet port for network connection.
- ДЦ 12В: Power input for the DVR.
- ПТЗ контрола: RS485 port for controlling Pan-Tilt-Zoom cameras.
- Alarm In/Out: Ports for connecting external alarm sensors and output devices.
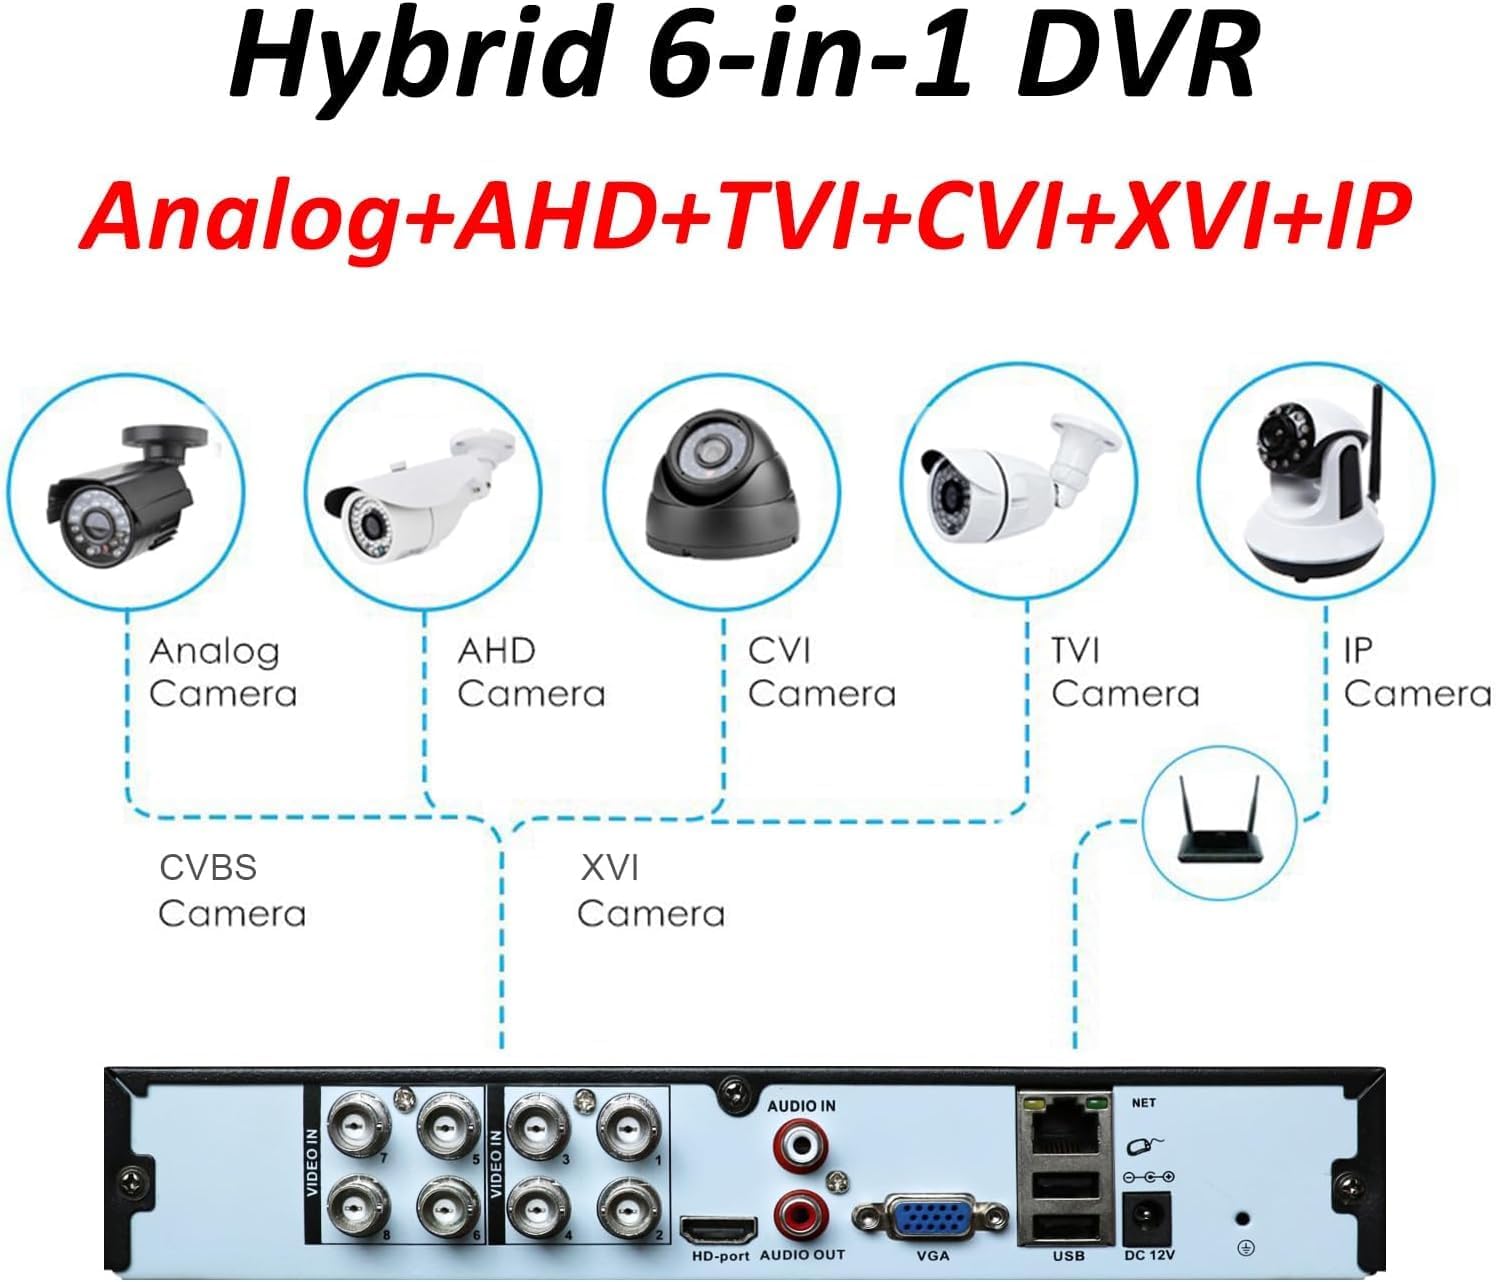
3.3 Hybrid Compatibility

Image: Diagram illustrating the 5-in-1 hybrid compatibility of the DVR, showing connections for Analog, AHD, CVI, TVI, and IP cameras.
The Lapetus DVR is a 5-in-1 hybrid system, supporting the following camera types:
- Analog Cameras: Traditional CCTV cameras.
- AHD Cameras: Analog High Definition cameras.
- HD-TVI Cameras: High Definition Transport Video Interface cameras.
- CVI Cameras: Composite Video Interface cameras.
- ИП камере: Internet Protocol cameras (via NVR mode).
4. Подешавање
4.1 Инсталација хардвера
- Hard Disk Drive (HDD) Installation:
- Одврните горњи поклопац DVR-а.
- Повежите SATA кабл за пренос података и кабл за напајање са DVR-а на HDD.
- Причврстите чврсти диск (HDD) за кућиште DVR-а помоћу приложених вијака.
- Замените горњи поклопац.
- Повежите камере: Connect your surveillance cameras to the BNC "VIDEO IN" ports on the rear panel. Ensure cameras are powered separately.
- Повежи екран: Connect a monitor or TV to the DVR using either the HDMI or VGA port.
- Повежите миш: Plug the USB mouse into one of the USB ports on the rear panel.
- Повежи мрежу (опционо): За даљински viewing and network features, connect an Ethernet cable from your router to the "NET" (RJ-45) port.
- Укључено: Connect the 12V/2000mA power adapter to the "DC 12V" port and plug it into a power outlet. The DVR will power on automatically.
4.2 Почетна конфигурација
Upon first boot, the DVR may guide you through an initial setup wizard. Follow the on-screen prompts to set the language, date/time, network settings, and format the installed HDD. Formatting the HDD is crucial for recording.
4.3 Mobile App Setup (XMEye)

Image: Step-by-step guide for downloading and connecting to the DVR using the XMEye mobile application.
To access your DVR remotely via a smartphone, download and configure the XMEye app:
- Преузмите апликацију: Scan the QR code displayed on the DVR's interface or download directly:
- За Андроид: http://xmeye.net/android/xmeye.apk
- За иОС: https://itunes.apple.com/en/app/id884006786
- Региструјте се и пријавите се: Open the XMEye app, register a new user account, and log in.
- Додај уређај: Tap the "+" icon or select "Add Device". You can add the device manually by entering its serial number (found in the DVR's system information) or by scanning a QR code if available.
- Connect and Preview: Once the device is added, you should be able to connect and view live video feeds from your cameras.
5. Оперативни
5.1 Режими снимања
DVR подржава различите режиме снимања:
- Упутство: Start and stop recording manually.
- Заказано: Set specific times for continuous recording.
- Детекција покрета: Recording starts automatically when motion is detected in the camera's view.
- Аларм: Recording triggered by external alarm inputs.
You can configure recording intervals from 1 to 120 minutes per segment.
5.2 Репродукција
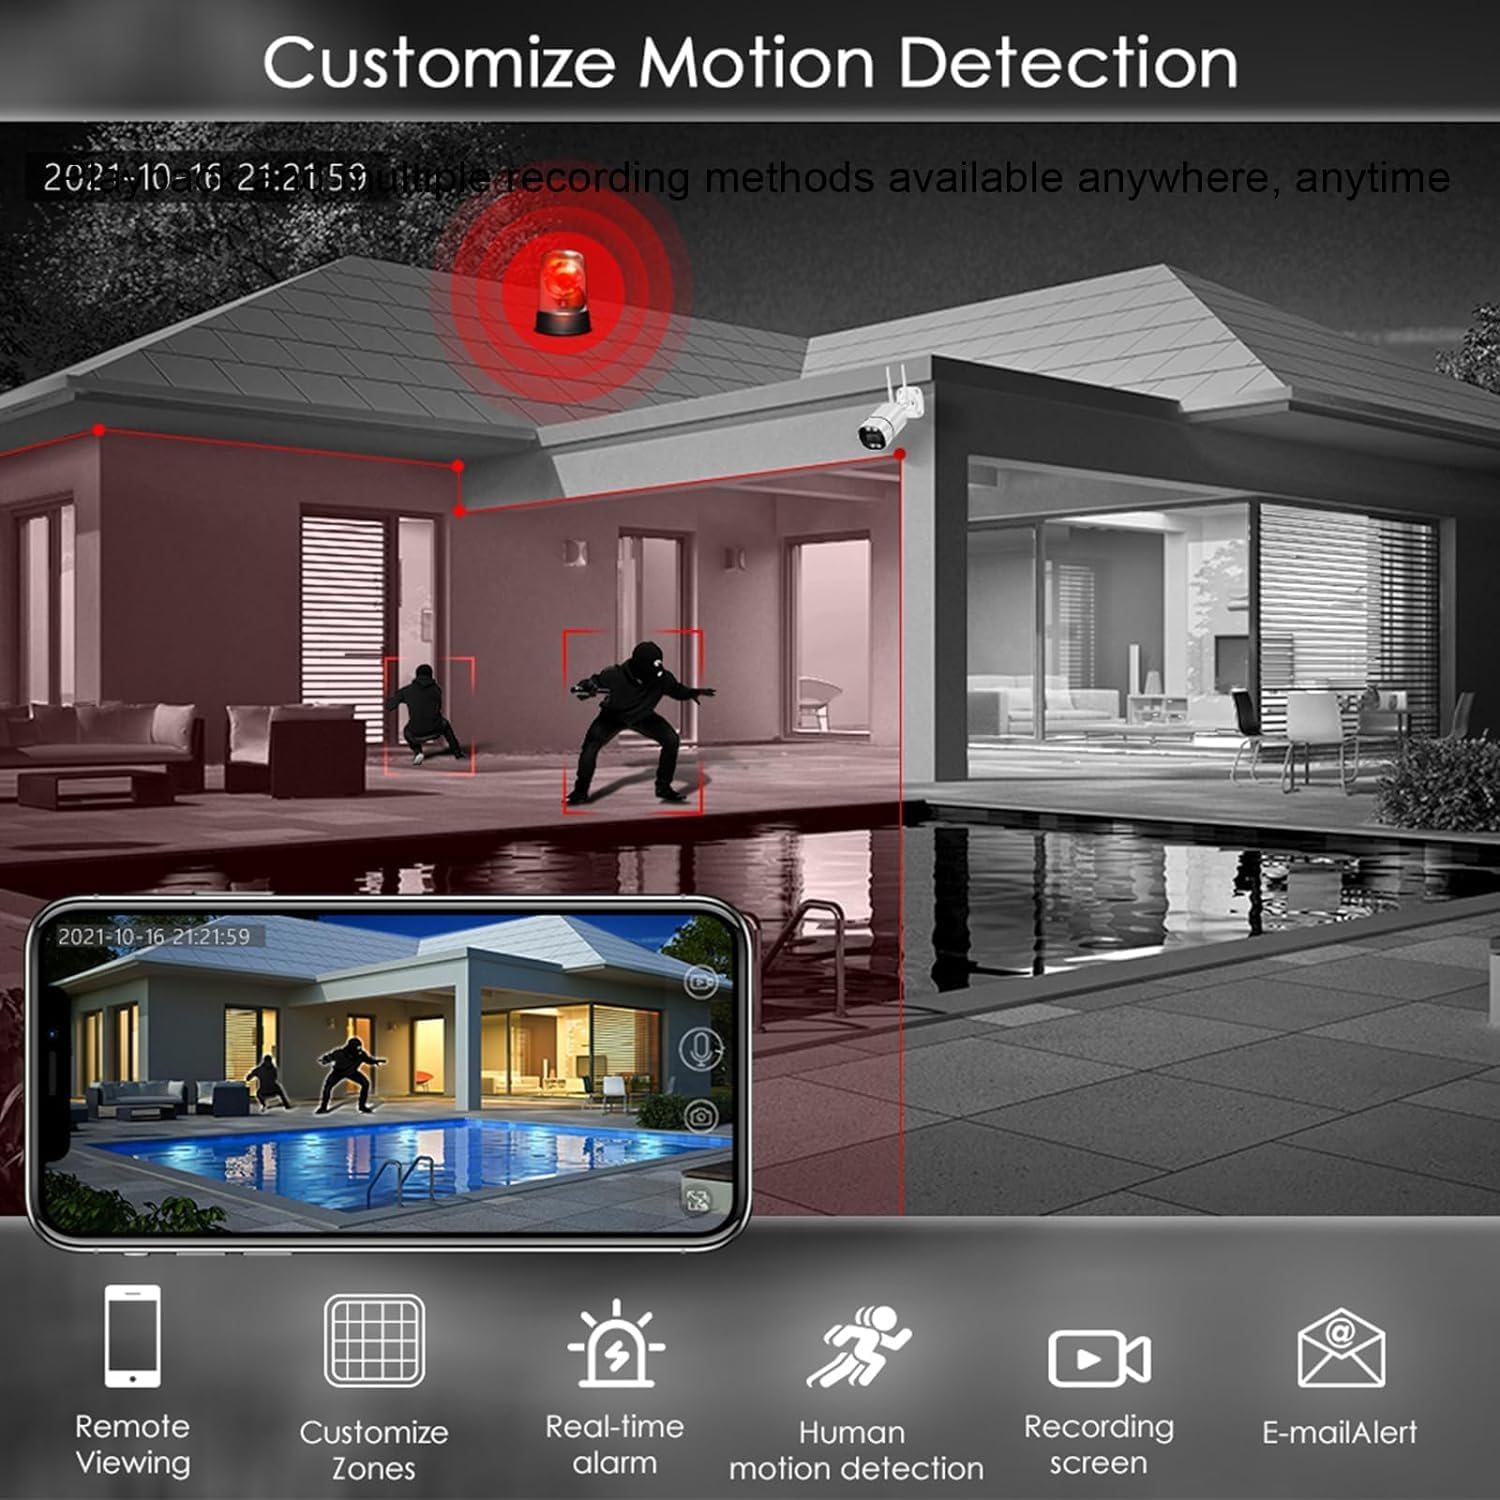
Image: Graphical representation of the DVR's playback interface, showing timeline navigation, fast forward, fast retreat, and single-frame play options.
То реview снимљено фооtage:
- Access the playback menu from the main interface.
- Select the desired date and time using the on-screen calendar and timeline.
- Use the control buttons (fast forward, fast retreat, pause, single-frame play) to navigate through the footage.
5.3 Детекција покрета

Image: Screenshot showing the motion detection customization interface, allowing users to define detection zones and set up alerts.
Configure motion detection to optimize recording and receive alerts:
- Navigate to the "Alarm" or "Motion Detection" settings in the DVR menu.
- Select the camera channel you wish to configure.
- Define specific detection zones within the camera's view to minimize false alarms.
- Set up actions upon motion detection, such as recording, email notification, mobile push alerts, or buzzer activation.
5.4 Ремоте Viewинг
Once the mobile app (XMEye) is configured and the DVR is connected to the internet, you can view live feeds and playback recorded footage from your smartphone or tablet anytime, anywhere, provided you have an internet connection.
5.5 Video Compression (H.265+)

Image: Comparison illustrating the efficiency of H.265+ video compression, showing significantly reduced file sizes compared to H.264 for the same video content.
The DVR utilizes H.265+ video compression technology. This advanced format provides more efficient video storage, reducing file sizes compared to the older H.264 standard, while maintaining video quality. This allows for longer recording times on the same hard disk capacity.
6. Спецификације
| Феатуре | Спецификација |
|---|---|
| Оперативни систем | Ембеддед Линук |
| Системски ресурси | Pentaplex function: live, recording, playback, backup & remote access |
| Encode & Decode Capacity | 8x 1080N@30fps |
| Видео улази | 8CH (Analog, AHD, HD-TVI, CVI, IP) |
| Видео излази | 1CH HDMI, 1CH VGA, 1CH CVBS |
| Аудио улази/излази | 4ЦХ / 1ЦХ |
| Alarm Inputs/Outputs | 4ЦХ / 1ЦХ |
| Нет Интерфаце | РЈ-45 Етхернет |
| ПТЗ контрола | Support (RS485) |
| Подршка за хард диск | 1 SATA HDD, up to 6TB (HDD not included) |
| УСБ портови | Multiple (for mouse, backup) |
| Повер Суппли | ДЦ 12В |
| Број модела ставке | LT-6708NH |
| Тежина артикла | 2.57 фунти |
| Димензије пакета | 13.66 к 10.91 к 3.15 инча |
КСНУМКС. Решавање проблема
This section addresses common issues you might encounter with your DVR.
- Нема видео излаза на монитору:
- Ensure the monitor is powered on and set to the correct input source (HDMI/VGA).
- Check that the HDMI/VGA cable is securely connected to both the DVR and the monitor.
- Try connecting to a different display or using an alternative video output port (e.g., switch from HDMI to VGA).
- No Camera Image / Black and White Image:
- Verify that cameras are powered on and their cables are securely connected to the DVR's "VIDEO IN" ports.
- Ensure camera type (Analog, AHD, TVI, CVI, IP) is compatible with the DVR and correctly configured in the DVR's camera settings.
- Check cable integrity; damaged cables can cause signal loss or color issues.
- For black and white images, ensure sufficient lighting for color cameras or check camera settings for day/night mode.
- Нема снимања:
- Confirm that a Hard Disk Drive (HDD) is installed and properly connected inside the DVR.
- Access the DVR menu and ensure the HDD has been formatted.
- Check recording schedules and motion detection settings to ensure they are correctly configured and active.
- Verify that the HDD is not full. If it is, enable overwrite mode or replace the HDD.
- DVR Keeps Rebooting:
- Ensure the power adapter is the correct voltagе и amperage (12V/2000mA) and is functioning properly.
- Disconnect the HDD temporarily to see if the issue persists; a faulty HDD can cause reboots.
- Ensure adequate ventilation around the DVR to prevent overheating.
- Mobile App Connection Issues:
- Verify the DVR is connected to the internet via the RJ-45 port and has a stable network connection.
- Ensure your smartphone has an active internet connection (Wi-Fi or mobile data).
- Double-check the device ID or serial number entered in the XMEye app.
- Ensure the DVR's network settings (e.g., DHCP, DNS) are correctly configured.
- Ноћни вид не ради:
- Confirm that your cameras are equipped with infrared (IR) night vision capabilities.
- Ensure there are no obstructions blocking the camera's IR LEDs.
- Check camera settings for IR control or day/night mode.
8. Одржавање
- Чишћење: Regularly clean the DVR's exterior with a soft, dry cloth. Avoid using liquid cleaners directly on the device. Ensure ventilation openings are free from dust and debris.
- вентилација: Place the DVR in a well-ventilated area, away from direct sunlight, heat sources, and excessive dust. Do not block any ventilation holes.
- Ажурирања фирмвера: Периодично проверавајте произвођачеве webсајт за ажурирања фирмвера. Ажурирање фирмвера може побољшати перформансе, додати функције и поправити грешке. Пажљиво пратите упутства за ажурирање.
- Резервна копија података: Редовно правите резервне копије важних снимљених датотекаtagна екстерни УСБ диск или мрежну меморију како бисте спречили губитак података.
- Циклус напајања: If the DVR experiences minor glitches, try power cycling it (unplug, wait 30 seconds, then plug back in).
9. Гаранција и подршка
For warranty information, please refer to the documentation provided at the time of purchase or contact your retailer. For technical support, please reach out to the manufacturer, Lapetus, through their official support channels.