Midiplus ED 9 Pro MKII

Midiplus ED-9 Pro MKII Electronic Drum Kit

Упутство за употребу корисника

1. Увод

Thank you for choosing the Midiplus ED-9 Pro MKII Electronic Drum Kit. This advanced electronic drum set is designed to provide a realistic and versatile drumming experience for musicians of all levels. Featuring a new Z12K drum sound module, the ED-9 Pro MKII includes 20 group preset drum kits and allows for 10 user-editable groups, utilizing true multi-sampled drum lossless studio recordings. It also incorporates a built-in metronome, 10 demo songs, and an easy-to-use fast recording function. The kit is expandable with an additional second Crash cymbal (Crash2) and a fourth Tom drum (Tom4). This manual provides essential information for setup, operation, maintenance, and troubleshooting to ensure you get the most out of your ED-9 Pro MKII.

2. Мере предострожности

Please read and understand all safety instructions before operating the Midiplus ED-9 Pro MKII. Retain this manual for future reference.

  • Напајање: Користите само наведени адаптер за напајање. Уверите се да је јачина звукаtage matches the requirements of the drum module. Unplug the power cord during lightning storms or when unused for long periods.
  • Локација: Place the drum kit on a stable, level surface to prevent tipping. Avoid locations with extreme temperatures, humidity, dust, or direct sunlight. Keep away from heat sources like radiators.
  • Вода и влага: Do not expose the unit to rain, moisture, or spills. Do not place objects filled with liquids on the unit. If liquid enters the unit, disconnect power immediately and contact service personnel.
  • вентилација: Do not block ventilation openings. Ensure adequate airflow around the drum module to prevent overheating.
  • Руковање: Handle all components with care. Avoid dropping or subjecting the unit to strong impacts. Do not attempt to modify or repair the unit yourself. Refer all servicing to qualified service personnel.
  • Каблови: Route all cables carefully to prevent tripping hazards and damage. Do not place heavy objects on cables.

3. Садржај пакета

Carefully unpack all items and ensure all components are present before beginning assembly.

  • Z12K Drum Sound Module
  • 10" Dual-trigger Mesh Head Snare Pad
  • 8" Dual-trigger Mesh Head Tom Pads (x4)
  • 12" Rubber Dual-trigger Hi-Hat Cymbal Pad with Choke
  • 12" Rubber Dual-trigger Crash Cymbal Pads with Choke (x2)
  • 12" Rubber 3-trigger Ride Cymbal Pad with Choke
  • Хи-Хат контролна педала
  • Кицк Пад
  • Кицк Педал
  • Drum Rack System (Frame)
  • Cymbal Arms and Tom Holders
  • Multi-cable Snake for Pad Connections
  • Повер Адаптер
  • Кориснички приручник (овај документ)
Midiplus ED-9 Pro MKII Electronic Drum Kit components laid out

Image: All components of the Midiplus ED-9 Pro MKII Electronic Drum Kit, including the drum module, mesh head pads, rubber cymbals, pedals, and the drum rack frame.

4. Водич за подешавање

Follow these steps to assemble your Midiplus ED-9 Pro MKII electronic drum kit. It is recommended to have ampле простор за монтажу.

  1. Саставите сталак за бубањ:

    Unfold the main rack frame components. Connect the horizontal and vertical bars using the provided clamps and tighten them securely. Ensure the frame is stable and level. Adjust the height and angle of the legs as needed.

  2. Attach Tom Holders and Cymbal Arms:

    Insert the tom holders into the designated clamps on the rack. Position them according to your preferred setup. Similarly, attach the cymbal arms to the rack, ensuring they are securely fastened and can support the weight of the cymbals.

  3. Mount the Drum Pads:

    Attach the 10" Snare pad to its dedicated holder. Mount the four 8" Tom pads onto their respective holders. Adjust the angle and height of each pad for comfortable playing. Ensure all pads are securely tightened to prevent movement during play.

  4. Mount the Cymbal Pads:

    Place the 12" Hi-Hat, two 12" Crash, and one 12" Ride cymbal pads onto their respective cymbal arms. Secure them with the provided wing nuts or clamps. Adjust the angle and height of each cymbal for optimal playability.

  5. Set Up Pedals:

    Position the Kick Pad in front of the rack. Attach the Kick Pedal to the Kick Pad. Place the Hi-Hat Control Pedal on the floor in a comfortable position relative to the Hi-Hat cymbal.

  6. Повежите модул бубња:

    Mount the Z12K Drum Sound Module to the designated module holder on the rack. Ensure it is firmly attached.

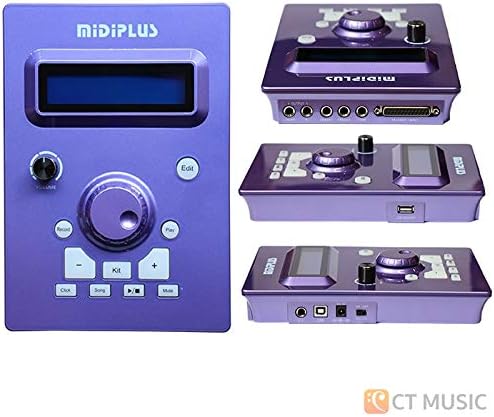
    Midiplus Z12K Drum Sound Module

    Image: The Midiplus Z12K Drum Sound Module, showing its front panel controls and various input/output ports.

  7. Повежите каблове:

    Use the multi-cable snake to connect each drum pad and cymbal pad to the corresponding input on the Z12K Drum Sound Module. The inputs are typically labeled (e.g., SN for Snare, T1 for Tom1, HH for Hi-Hat, CR1 for Crash1, RD for Ride, etc.). Connect the Hi-Hat Control Pedal and Kick Pad to their respective inputs. Ensure all connections are secure.

  8. Прикључак за напајање:

    Connect the power adapter to the DC IN port on the drum module, then plug the adapter into a suitable power outlet. Do not power on the module until all other connections are made.

  9. Аудио излаз:

    Connect the AUDIO OUT (L/MONO, R) jacks of the drum module to your amplifier, headphones, or audio interface using appropriate cables (not included).

5. Цомпонент Оверview

5.1 Z12K Drum Sound Module

The heart of your ED-9 Pro MKII, the Z12K module provides all the drum sounds, effects, and control functions.

  • Екран: Shows current kit, song, tempo, and menu options.
  • Дугме за јачину звука: Подешава укупну јачину звука.
  • Дугмад за навигацију: Used to scroll through menus and adjust parameters (e.g., Up/Down, Left/Right).
  • Дугме за комплет: Selects drum kits.
  • Дугме за песму: Selects demo songs.
  • Дугме за метроном: Activates/deactivates the metronome.
  • Дугме за снимање: Initiates and stops recording.
  • Дугме за уређивање: Enters kit editing mode.
  • УСБ порт: За повезивање са рачунаром за пренос MIDI података.
  • Улази окидача: Connects to drum and cymbal pads.
  • Аудио излази: Connects to headphones, ampлифиер, или аудио интерфејс.

5.2 Drum Pads and Cymbals

  • Mesh Head Pads (Snare, Toms): These provide a realistic rebound and feel, similar to acoustic drums. The snare and tom pads are dual-trigger, meaning they can produce different sounds from the head and rim.
  • Rubber Cymbals (Hi-Hat, Crash, Ride): Durable rubber construction for quiet practice and consistent triggering.
    • Хи-Хат: Dual-trigger with choke function. Works in conjunction with the Hi-Hat control pedal for open, closed, and foot splash sounds.
    • Пад: Dual-trigger with choke function. Allows for a natural cymbal swell and quick muting.
    • вожња: 3-trigger (bow, bell, edge) with choke function, offering versatile sound options.

6. Основна операција

6.1 Укључивање и искључивање

  • Укључено: Ensure all connections are secure. Press the POWER button on the module. The display will light up.
  • Искључивање: Притисните и држите дугме POWER док се екран не искључи.

6.2 Избор комплета бубњева

The ED-9 Pro MKII comes with 20 preset drum kits and allows for 10 user-editable kits.

  1. Притисните тастер КИТ дугме.
  2. Use the navigation buttons (e.g., Up/Down arrows) to scroll through the available drum kits.
  3. The selected kit will be active immediately.

6.3 Using the Metronome

The built-in metronome is essential for practicing with accurate timing.

  • Притисните тастер МЕТРОНОМЕ дугме за укључивање/искључивање.
  • While the metronome is active, use the navigation buttons to adjust the tempo (BPM).

6.4 Playing Demo Songs

The module includes 10 demo songs for practice and enjoyment.

  1. Притисните тастер ПЕСМА дугме.
  2. Use the navigation buttons to select a demo song.
  3. Притисните тастер ПЛАИ button to start the song. Press again to stop.

6.5 Recording Your Performance

The ED-9 Pro MKII allows for easy recording of your drumming.

  1. Притисните тастер РЕЦОРД button once to arm recording (the record indicator will flash).
  2. Start playing. Recording will begin automatically when you hit a pad.
  3. Притисните тастер РЕЦОРД дугме поново да бисте зауставили снимање.
  4. To play back your recording, press the ПЛАИ дугме.

6.6 Editing Drum Kits

You can customize and save your own drum kits. Refer to the full Midiplus ED-9 Pro MKII advanced manual for detailed editing instructions.

  1. Select a user kit (1-10) or a preset kit you wish to modify.
  2. Притисните тастер ЕДИТ дугме.
  3. Use the navigation buttons to select the parameter you wish to edit (e.g., instrument sound, volume, pitch, reverb for a specific pad).
  4. Adjust the value using the appropriate buttons.
  5. To save your changes, follow the on-screen prompts or refer to the module's specific save procedure (usually involves pressing and holding a button or navigating to a save option).

7. Одржавање и њега

Proper care will extend the life and performance of your electronic drum kit.

  • Чишћење:

    Wipe the drum module, pads, and cymbals with a soft, dry cloth. For stubborn dirt, use a slightly damp cloth and then dry thoroughly. Do not use abrasive cleaners, waxes, or solvents, as they can damage the surfaces.

  • Складиштење:

    When not in use for extended periods, store the drum kit in a cool, dry place, away from direct sunlight and extreme temperatures. If disassembling, pack components carefully to prevent damage.

  • Управљање кабловима:

    Periodically check all cables for wear and tear. Ensure they are not kinked or pinched. Proper cable management can prevent damage and ensure reliable performance.

  • Напетост мреже главе:

    The mesh heads can be adjusted for tension using a standard drum key (not included). Adjusting tension affects rebound feel but does not change the sound, as the sound is produced by the module's sensors. Do not overtighten.

КСНУМКС. Решавање проблема

If you encounter issues with your ED-9 Pro MKII, refer to the following common problems and solutions.

ПроблемМогући узрокРешење
Нема звука из модула.
  • Напајање није повезано или укључено.
  • Јачина звука је прениска.
  • Излазни каблови су искључени или неисправни.
  • Слушалице/ampУређај за спасавање није повезан или је неисправан.
  • Ensure power adapter is connected and module is powered on.
  • Increase the module's master volume.
  • Check all audio output cables and connections.
  • Verify headphones/ampЛифиер ради исправно.
Одређени пад/чинела не покреће звук.
  • Pad cable loose or disconnected.
  • Кабл неисправан.
  • Pad sensitivity too low.
  • Incorrect pad connected to input.
  • Check the cable connection from the pad to the module.
  • Try swapping the cable with a known working one.
  • Adjust the pad's sensitivity setting in the module's edit menu.
  • Ensure the correct pad is plugged into the correct input jack on the module.
Hi-Hat pedal not working correctly.
  • Pedal cable loose or disconnected.
  • Pedal calibration issue.
  • Check the cable connection from the pedal to the module.
  • Refer to the module's manual for Hi-Hat pedal calibration instructions.
Unwanted sounds or double triggering.
  • Pad sensitivity too high.
  • Crosstalk between pads.
  • Decrease the sensitivity of the affected pad in the module's settings.
  • Adjust crosstalk settings in the module (if available) or reposition pads slightly.

9. Техничке спецификације

ФеатуреОпис
Назив моделаED 9 Pro MKII
Звучни модул бубњеваЗ12К
Снаре Пад10" Dual-trigger Mesh Head
Том падови8" Dual-trigger Mesh Head (x4)
Хи-Хат чинеле12" Rubber Dual-trigger with Choke
Crash Cymbals12" Rubber Dual-trigger with Choke (x2)
Риде Цимбал12" Rubber 3-trigger with Choke
Preset Drum Kits20 Групе
User Drum Kits10 Groups (editable)
МетрономеУграђени
Демо песме10 песама
Функција снимањаEasy listening learning fast recording
ПовезивањеUSB (for MIDI), Audio Out (L/MONO, R), Headphone Out, Aux In
ПроширивостScalable for second Crash cymbal (Crash2) and fourth Tom drum (Tom4)
Тежина артикла71.8 фунти (приближно 32.5 кг)
Димензије пакета37 x 28 x 15 инча (приближно 94 x 71 x 38 цм)
Врста материјалаRubber (for cymbals and some pad components)
БојаBlack, White, Silver (frame and module accents)

10. Гаранција и подршка

Midiplus products are manufactured to high quality standards. For specific warranty information, please refer to the warranty card included with your product or visit the official Midiplus webсајту.

If you require technical assistance or have questions not covered in this manual, please contact Midiplus customer support through their official channels. Keep your purchase receipt as proof of purchase for warranty claims.

Онлине ресурси: For the latest drivers, firmware updates, and additional support documentation, please visit the Midiplus official webсајту.

© 2024 Мидиплус. Сва права задржана.

Ask a question about this manual

Ask about setup, troubleshooting, compatibility, parts, safety, or missing instructions. Manuals+ will review the question and use this page’s manual context to help answer it.