
HoldPeak HP-890CN
HoldPeak HP-890CN Digital Multimeter User Manual
Model: HP-890CN
1. Увод
Thank you for choosing the HoldPeak HP-890CN Digital Multimeter. This device is designed for stable and reliable performance, featuring an anti-drop design and a clear 25mm high LCD display. It is capable of measuring various electrical parameters including DC/AC voltage, diode, resistance, capacitance, frequency, duty cycle, temperature, and hFE, along with a non-contact voltage (NCV) detection function. Please read this manual thoroughly before use to ensure safe and proper operation.
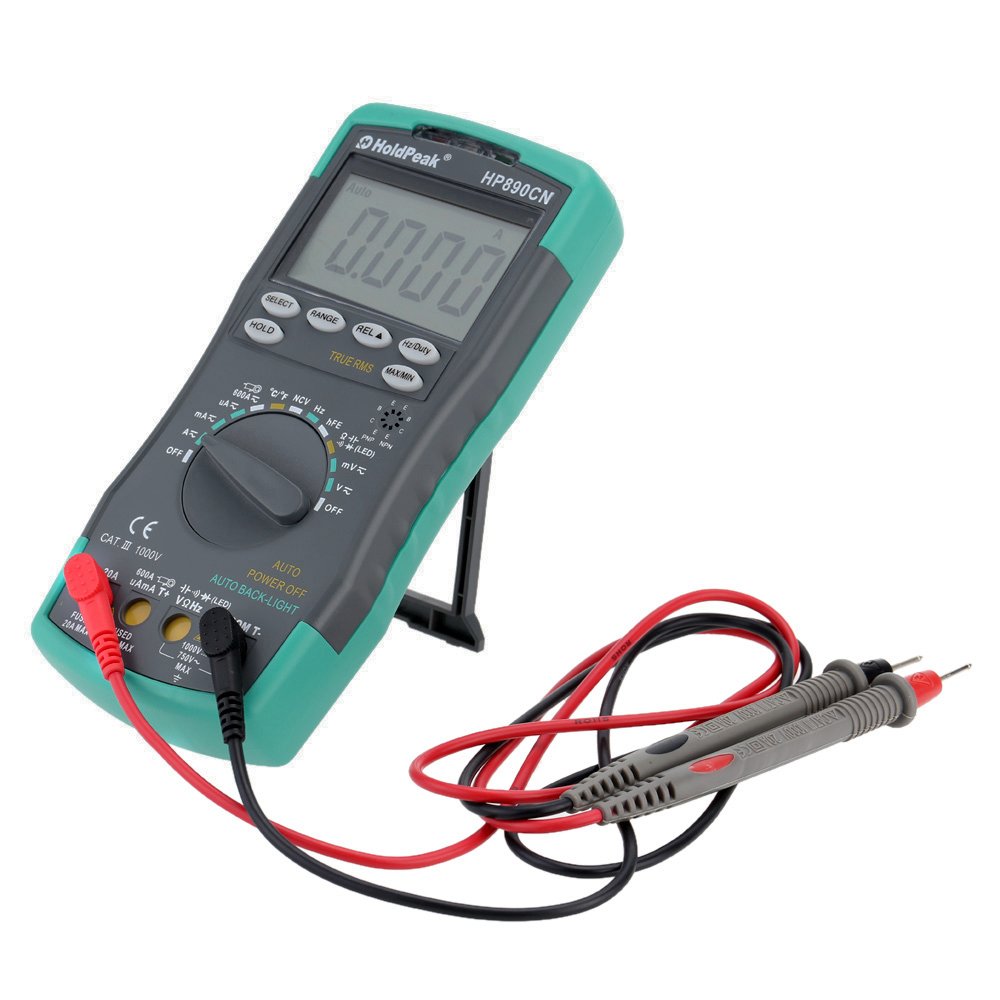
Figure 1: HoldPeak HP-890CN Digital Multimeter
2. Безбедносне информације
WARNING: To avoid electrical shock or damage to the meter, please observe the following safety precautions:
- Always remove test leads from the circuit before opening the case or battery cover.
- Do not operate the meter with the case or battery cover open.
- To prevent damage or injury, ensure quick-acting fuses with the specified amp and volt ratings are installed.
- This device complies with IEC 1010-1 1000V CAT III, Pollution Degree 2 standards.
- Увек користите исправну функцију и опсег за мерења.
- Никад не примењивати волtagе или струја која прелази максимално наведене границе.
- Будите опрезни када радите са вол.tagизнад 30V AC RMS, 42V вршне струје или 60V DC. Ови напониtagпредстављају опасност од удара.
- Keep fingers behind the probe barriers during measurements.

Слика 2: Задња страна view of the multimeter showing safety warnings and battery compartment.
3. Производ је готовview
The HoldPeak HP-890CN Digital Multimeter features a large LCD display and intuitive controls for ease of use. Below is a diagram illustrating the main components and their functions.

Figure 3: Labeled diagram of the HP-890CN Multimeter.
Кључне компоненте:
- ЛЦД екран: Shows measurement readings, units, and function indicators. Features smart backlight.
- Функцијски прекидач: Ротациони прекидач за избор функција мерења (Volumetagе, струја, отпор, итд.).
- Улазни прикључци:
- ЦОМ: Common input jack for the black test lead.
- ВΩХз: Улаз за волtage, resistance, frequency, capacitance, diode, and temperature measurements (red test lead).
- mAµA: Input for current measurements up to 600mA (red test lead).
- 20А: Input for current measurements up to 20A (red test lead).
- Дугмад:
- СЕЛЕЦТ: Toggles between functions within a single rotary switch position (e.g., AC/DC, Diode/Continuity).
- ДОМЕТ: Manually selects measurement range (auto-ranging is default).
- REL (Relative Value): Measures relative changes.
- Hz/Дужност: Бира мерење фреквенције или радног циклуса.
- ДРЖАТИ: Замрзава тренутно очитавање на екрану.
- TRUE RMS: Indicates True RMS measurement capability for AC.
- МАКС/МИН: Бележи максималне и минималне очитавања.
- NCV Induction Area: За бесконтактне волtagе детекција.
- hFE Testing Interface: Утичница за тестирање транзистора.
- Ногара: Интегрисани сталак за практичност viewing (rotates 180 degrees).
4. Подешавање
4.1 Инсталација батерије
The multimeter requires either two 1.5V AAA batteries or one 9V 6F22 battery (not included). The specific battery type included with your product may vary. To install or replace batteries:
- Уверите се да је мултиметар искључен и да су сви мерни каблови искључени.
- Пронађите одељак за батерије на задњој страни мерача.
- Користите одвијач да бисте отпустили завртањ који причвршћује поклопац батерије.
- Скините поклопац батерије.
- Insert the new batteries, observing the correct polarity (+ and -).
- Вратите поклопац батерије и чврсто притегните завртањ.

Слика 4: Унутрашњи view of the multimeter, showing the battery compartment.
4.2 Повезивање мерних каблова
Always connect the black test lead to the COM jack. Connect the red test lead to the appropriate input jack based on the measurement you intend to perform:
- Фор Волtage, Resistance, Capacitance, Frequency, Diode, and Temperature: Connect the red lead to the ВΩХз Јацк.
- For Current up to 600mA: Connect the red lead to the мАµА Јацк.
- For Current up to 20A: Connect the red lead to the 20А Јацк.
5. Упутство за употребу
Before taking any measurements, ensure the test leads are correctly connected and the function switch is set to the desired measurement type.
5.1 Укључивање/искључивање
Rotate the function switch from the OFF position to any desired measurement function to turn the meter ON. Rotate it back to OFF to power it down. The meter features an auto power-off function to conserve battery life.
5.2 Меасуринг ДЦ Волtagе (V=)
- Set the function switch to the V= position.
- Connect the black test lead to the COM jack and the red test lead to the VΩHz jack.
- Connect the test probes across the component or circuit to be measured, in parallel.
- Прочитајте књtagе вредност на ЛЦД екрану.
5.3 Меасуринг АЦ Волtagе (В~)
- Поставите функцијски прекидач у положај В~.
- Connect the black test lead to the COM jack and the red test lead to the VΩHz jack.
- Connect the test probes across the component or circuit to be measured, in parallel.
- Прочитајте књtage value on the LCD display. This meter provides True RMS readings for AC voltage.

Слика 5: Мерење AC јачине струјеtage from a power outlet.
5.4 Measuring DC/AC Current (A= / A~)
CAUTION: Always connect the meter in series with the circuit when measuring current. Ensure the circuit is de-energized before connecting the meter.
- Set the function switch to the A= or A~ position. Use the SELECT button to toggle between DC and AC if necessary.
- Повежите црни тест кабл на ЦОМ прикључак.
- За струје до 600mA, повежите црвени мерни кабл са мАµА jack. For currents up to 20A, connect the red test lead to the 20А Јацк.
- Break the circuit and connect the test probes in series with the circuit.
- Прикључите напајање на коло и очитајте тренутну вредност на ЛЦД екрану.
5.5 Мерење отпора (Ω)
- Поставите функцијски прекидач у положај Ω.
- Connect the black test lead to the COM jack and the red test lead to the VΩHz jack.
- Connect the test probes across the component to be measured. Ensure the component is de-energized.
- Очитајте вредност отпора на ЛЦД екрану.
5.6 Мерење капацитета (F)
- Set the function switch to the capacitance (F) position.
- Connect the black test lead to the COM jack and the red test lead to the VΩHz jack.
- Connect the test probes across the capacitor. Ensure the capacitor is fully discharged before measurement.
- Прочитајте вредност капацитивности на ЛЦД екрану.
5.7 Measuring Frequency (Hz) / Duty Cycle (%)
- Set the function switch to the Hz/% position.
- Connect the black test lead to the COM jack and the red test lead to the VΩHz jack.
- Повежите тест сонде преко извора сигнала.
- Press the Hz/Duty button to toggle between frequency and duty cycle measurements.
- Очитајте вредност на ЛЦД екрану.
5.8 Тест диоде
- Set the function switch to the Diode/Continuity position. Press SELECT to choose Diode Test.
- Connect the black test lead to the COM jack and the red test lead to the VΩHz jack.
- Спојите црвену сонду на аноду, а црну сонду на катоду диоде.
- Прочитајте напред волtage drop on the LCD display. Reverse the probes to check for open circuit (OL).
5.9 Тест континуитета
- Set the function switch to the Diode/Continuity position. Press SELECT to choose Continuity Test.
- Connect the black test lead to the COM jack and the red test lead to the VΩHz jack.
- Повежите тестне сонде преко кола или компоненте.
- Ако је отпор испод приближно 50Ω, огласиће се звучни сигнал, што указује на континуитет.
5.10 Мерење температуре (°C/°F)
- Поставите функцијски прекидач у положај °Ц/°Ф.
- Connect the K-type thermocouple probe to the VΩHz and COM jacks, observing polarity.
- Поставите врх термопара на или близу објекта чија температура треба да се мери.
- Read the temperature on the LCD display. Use the SELECT button to switch between Celsius and Fahrenheit.
5.11 hFE Test (Transistor Test)
- Поставите функцијски прекидач у положај хФЕ.
- Insert the transistor's Emitter, Base, and Collector leads into the corresponding holes in the hFE socket, ensuring correct NPN or PNP type.
- Read the hFE value (DC current gain) on the LCD display.
5.12 Нон-Цонтацт Волtagе (НЦВ) Детекција
- Set the function switch to the NCV position.
- Move the NCV induction area of the meter close to the conductor being tested.
- Ako AC voltage is detected (90V to 1000V AC RMS), the NCV red indicator will light up, and the buzzer will sound. The intensity of the sound and light indicates the strength of the detected voltage.
5.13 Посебне функције
- ДРЖАТИ: Притисните да замрзнете тренутно очитавање на екрану. Притисните поново да бисте отпустили.
- REL (Relative Value): Press to store the current reading as a reference. Subsequent measurements will show the difference from this reference.
- МАКС/МИН: Press to enter MAX/MIN mode. The meter will display the maximum or minimum reading recorded since entering this mode. Press again to cycle between MAX, MIN, and current reading.
6. Одржавање
6.1 Чишћење
Обришите бројило огласомamp cloth and mild detergent. Do not use abrasives or solvents. Keep the contacts of the input jacks clean.
6.2 Замена батерије
When the battery symbol appears on the LCD, the batteries need to be replaced. Refer to section 4.1 for battery installation instructions.
6.3 Замена осигурача
WARNING: To avoid electrical shock, disconnect the test leads before opening the case. Replace fuses only with quick-acting fuses of the specified type and rating.
The meter is protected by two fuses:
- Ф1: 600mA/250V fast-blow fuse for the mAµA input.
- Ф2: 20A/250V fast-blow fuse for the 20A input.
За замену осигурача:
- Turn the meter OFF and disconnect all test leads.
- Уклоните поклопац батерије и батерије.
- Unscrew the screws holding the back case and carefully open the meter.
- Carefully remove the old fuse by gently prying it from its clips.
- Install a new fuse of the correct type and rating.
- Reassemble the meter, ensuring all screws are tightened.
КСНУМКС. Решавање проблема
- Random values in mV mode: It is normal for the display to show random values in mV mode when the input terminals are open (not connected to a circuit). Simply short the input terminals to zero the reading. This will not affect measurement results.
- Нема дисплеја или дисплеј је замагљен: Проверите ниво напуњености батерије. Замените батерије ако су празне.
- No reading in current mode: Check if the fuse is blown. Replace if necessary (refer to section 6.3). Ensure test leads are connected to the correct current input jack (mAµA or 20A) and in series with the circuit.
- Приказано је „OL“: Indicates an overload (measurement exceeds the selected range) or an open circuit.
8. Спецификације
| Параметар | Спецификација |
|---|---|
| Бранд | ХолдПеак |
| Модел | HP-890CN |
| Боја | Gray + Blue-Green |
| Материјал | Пластика |
| Мак Дисплаи | 6000 цоунтс |
| Контрола домета | Аутоматски домет |
| Величина екрана | 60 × 35 мм |
| ДЦ Волtage | 60mV/600mV/6V/60V/600V/1000V |
| АЦ Волtagе (Прави РМС) | 60mV/600mV/6V/60V/600V/750V |
| ДЦ Цуррент | 600µA/6000µA/60mA/600mA/6A/20A |
| АЦ струја (прави РМС) | 600µA/6000µA/60mA/600mA/6A/20A |
| Отпор | 600Ω/6KΩ/60KΩ/600KΩ/6MΩ/60MΩ |
| Капацитет | 9.999nF/99.99nF/999.9nF/9.999µF/99.99µF/999.9µF/9.99mF/99.99mF |
| Фреквенција | 9.999Hz/99.99Hz/999.9Hz/9.999KHz/99.99KHz/999.9KHz/9.999MHz |
| Дути Цицле | 0.1% до 99.9% |
| Температура | -20 ~ 1000 ° Ц / -4 ~ 2222 ° Ф |
| Диодни тест | Да |
| Цонтинуити Буззер | Да |
| Транзистор хФЕ Тест | 0-1000 |
| НЦВ Детецтион | 90V ~ 1000V AC rms |
| Повер Суппли | 2 * 1.5V AAA batteries / 1 * 9V 6F22 battery (not included) |
| Оперативно окружење | 0-40°Ц (32-104°Ф) |
| Окружење за складиштење | -20-60°Ц (-4-140°Ф) |
| Величина производа (Д×Ш×В) | Approx. 19 × 8.5 × 3.5 cm (7.67 × 3.35 × 1.37 inches) |
| Тежина производа | 300 грама (10.58 унци) |
| Произвођач | MIS-E0833 |
| УПЦ | 783950206936, 791592905193 |
9. Садржај пакета
Пакет укључује следеће ставке:
- 1 * HoldPeak HP-890CN Digital Multimeter
- 1 * Торба за складиштење
- 1 * Pair of Test Leads (Red and Black)
- 1 * K-Type Thermocouple Probe
- 1 * Упутство за употребу на енглеском језику

Figure 6: Multimeter and included accessories.

Figure 7: Included storage bag for the multimeter.
10. Гаранција и подршка
For warranty information or technical support, please refer to the documentation provided with your purchase or contact the seller/manufacturer directly. Keep your purchase receipt as proof of purchase.
Ask a question about this manual
Ask about setup, troubleshooting, compatibility, parts, safety, or missing instructions. Manuals+ will review the question and use this page’s manual context to help answer it.