1. Увод
Хвала вам на куповиниasing the XTUGA ES602 Professional DJ Mixer. This manual provides essential information for the safe and efficient operation of your mixer. Please read it thoroughly before use and retain it for future reference.
The XTUGA ES602 is a versatile 7-channel mixing console designed for stage audio, DJ applications, and music production. It features XLR and LINE inputs, +48V phantom power, a built-in digital effect processor, USB/MP3 playback, and Bluetooth connectivity.
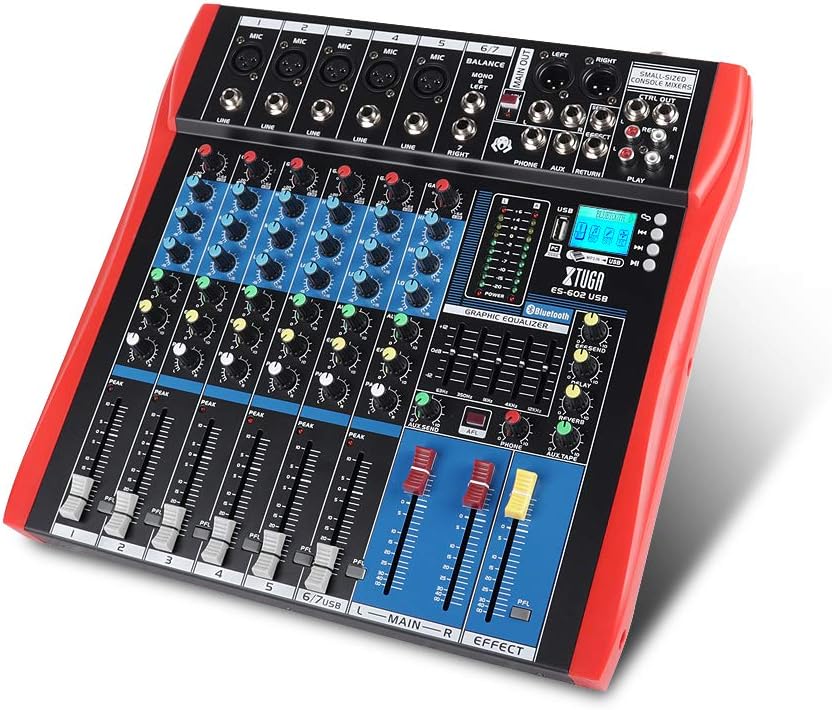
Figure 1: XTUGA ES602 Professional DJ Mixer overview. This image displays the top panel of the mixer, showing all input channels, control knobs, faders, and the master section with the USB/MP3/Bluetooth module.
2. Безбедносна упутства
- Напајање: Користите само наведени адаптер за напајање. Уверите се да је јачина звукаtagе одговара вашем локалном извору напајања.
- Вода и влага: Не излажите уређај киши или влази. Не стављајте предмете напуњене течношћу на уређај.
- вентилација: Обезбедите одговарајућу вентилацију. Не блокирајте вентилационе отворе.
- Извори топлоте: Држите уређај даље од извора топлоте као што су радијатори, грејни уређаји, шпорети или други уређаји који производе топлоту.
- Чишћење: Clean only with a dry cloth. Avoid liquid cleaners.
- Сервисирање: Не покушавајте сами да сервисирате овај уређај. Сво сервисирање препустите квалификованом сервисеру.
- Фантомска снага: When using condenser microphones, ensure +48V phantom power is activated only after connecting the microphone and before connecting to other devices to prevent damage.
3. Карактеристике
The XTUGA ES602 mixer offers a range of features for professional audio mixing:
- 7-канални миксер: Equipped with XLR and LINE inputs for versatile connectivity.
- +48В фантомско напајање: Available for condenser microphones.
- Појединачне контроле канала: Each channel features GAIN, 3-band EQ (HIGH, MID, LOW), AUX, EFFECT, PAN control knobs, and a volume fader.
- PFL (Pre-Fader Listen) Switch: Allows monitoring of individual channels via headphones.
- Built-in Digital Effect Processor: Includes REPEAT, EFF SEND, DELAY, SEND, and RETURN controls for integrated effects.
- USB/MP3 Playback and Recording: Direct USB input for MP3 playback from U-disk and recording capabilities.
- Блуетоотх повезивање: Seamlessly connect mobile phones, tablets, and other Bluetooth-enabled devices for audio playback.
- Главни излази: XLR (L/R) and 1/4" (L/R) stereo output jacks.
- РЕЦ излаз: Dedicated REC (L/R) output for external recording devices.
- Интерфејс слушалица: For monitoring audio.
- ЛЕД индикатори: Power and output level indicator lights for easy monitoring.
- Издржљив дизајн: Ultra-thin, all-metal chassis for high density dust resistance and durability.
4. Контроле и функције
This section details the various controls and connections on your XTUGA ES602 mixer.
4.1 Input Channels (Channels 1-7)
- MIC Input (XLR): Connects balanced microphones.
- LINE Input (1/4" Jack): Connects line-level instruments or devices.
- +48V PHANTOM Power Switch: Activates phantom power for condenser microphones on XLR inputs.
- Дугме ГАИН: Подешава осетљивост улаза за сваки канал.
- HIGH, MID, LOW EQ Knobs: 3-band equalizer for adjusting the treble, midrange, and bass frequencies of each channel.
- АУКС дугме: Controls the send level to the auxiliary output.
- ЕФФЕЦТ дугме: Controls the send level to the internal effect processor.
- ПАН дугме: Adjusts the stereo position (left/right) of the channel.
- PFL Switch: Engages Pre-Fader Listen for monitoring the channel's signal before the fader.
- ПЕАК ЛЕД: Светли када је улазни сигнал превисок, што указује на могуће пресецање (клипање).
- Фадер канала: Adjusts the output volume of the individual channel.
4.2 Главни део
- MAIN OUT (XLR & 1/4" Jacks): Balanced stereo main outputs for connecting to ampлифери или звучници са напајањем.
- REC OUT (RCA Jacks): Stereo output for connecting to recording devices.
- PHONES Jack (1/4"): Stereo headphone output for monitoring.
- AUX SEND/RETURN Jacks: For connecting external effects processors or monitoring systems.
- MAIN Faders (L/R): Контролише укупну излазну јачину звука миксера.
- EFFECT Level Knob: Adjusts the overall level of the internal effects.
- REPEAT, DELAY Knobs: Controls parameters of the digital effect processor.
- LEVEL Meter: LED display showing the main output level.

Слика 2: Детаљно view of the XTUGA ES602 mixer's channel controls and LED level meters. This image highlights the individual channel knobs for GAIN, EQ, AUX, EFFECT, PAN, and the main output level indicators.
4.3 USB/MP3/Bluetooth Module
- УСБ порт: For connecting a USB flash drive for MP3 playback or connecting to a computer for recording/playback.
- ЛЦД екран: Shows current mode, track information, and Bluetooth status.
- Контролна дугмад: Play/Pause, Stop, Previous/Next Track, Mode selection (USB/Bluetooth/PC).
- Блуетоотх индикатор: Приказује статус Bluetooth везе.

Figure 3: Close-up of the Bluetooth and MP3 connection section on the XTUGA ES602 mixer. This image shows the USB port, LCD display, and control buttons for media playback and Bluetooth pairing.
5. Подешавање
Follow these steps to set up your XTUGA ES602 mixer.
5.1 Прикључак за напајање
- Уверите се да је прекидач за напајање миксера у положају ИСКЉУЧЕНО.
- Прикључите приложени адаптер за напајање на улаз за напајање миксера.
- Plug the power adapter into a suitable AC power outlet.
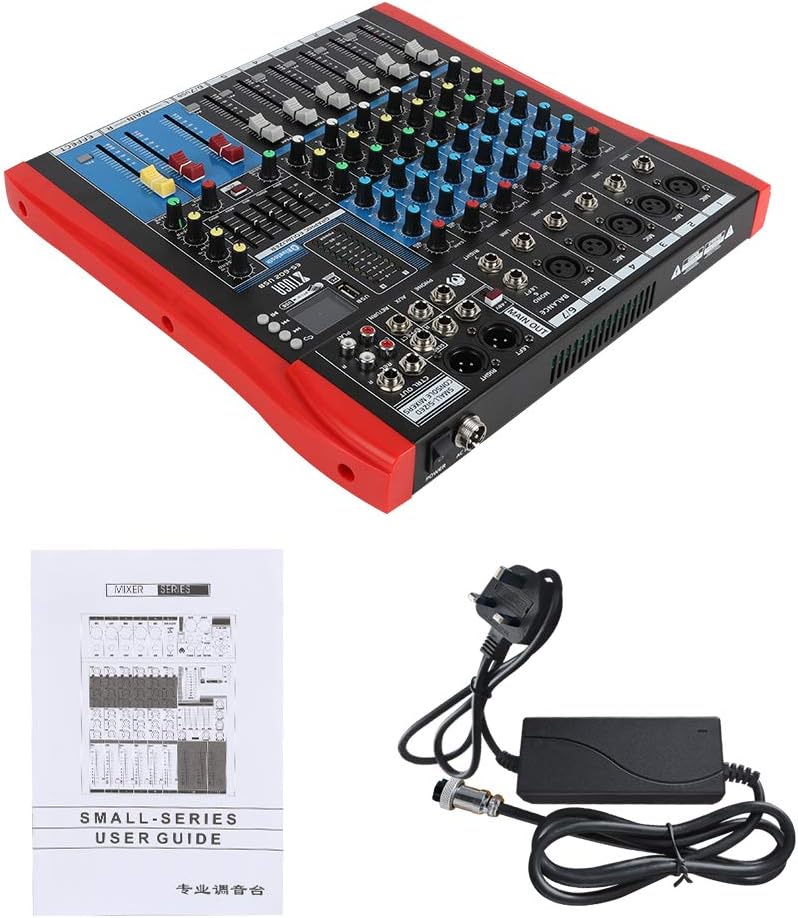
Figure 4: XTUGA ES602 mixer shown with its power adapter and user guide. This illustrates the components included for initial setup.
5.2 Повезивање микрофона и инструмената
- For microphones, connect XLR cables to the МИЦ улаз jacks. If using condenser microphones, activate the +48V PHANTOM Power Switch за одговарајући канал.
- For line-level instruments (keyboards, guitars with preamps, etc.), connect 1/4" TS/TRS cables to the ЛИНЕ улаз јацкс.
- Ensure all channel GAIN knobs are set to their minimum position before connecting.
5.3 Повезивање излазних уређаја
- Connect your main speakers or ampдизалица до MAIN OUT (XLR or 1/4") јацкс.
- For recording, connect an external recording device to the REC OUT (RCA) јацкс.
- Укључите слушалице у ПХОНЕС jack for monitoring.
5.4 Connecting to a Computer for Recording
- Connect a USB cable from the mixer's УСБ порт на ваш рачунар.
- The mixer should be recognized as an audio device by your operating system.
- Select the mixer as the input device in your digital audio workstation (DAW) or recording software.
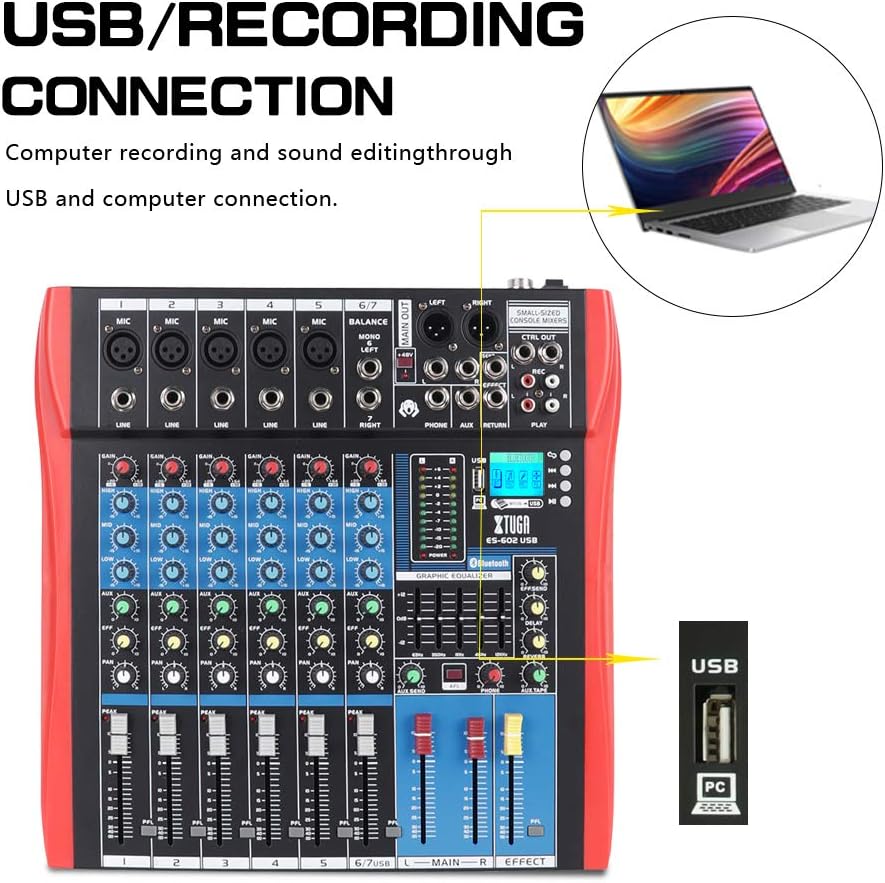
Figure 5: Illustration of the XTUGA ES602 mixer connected to a laptop via USB for recording and sound editing. This highlights the USB input port and its function.
6. Оперативни
This section covers the basic operation of your XTUGA ES602 mixer.
6.1 Укључивање и подешавање почетног нивоа
- After all connections are made, turn on your mixer's power switch.
- Полако подигните MAIN Faders на удобан ниво слушања.
- For each active input channel, gradually increase the ГАИН дугме до ПЕАК ЛЕД flashes only occasionally during the loudest parts of the signal.
- Adjust individual Цханнел Фадерс to balance the mix.
6.2 Коришћење Блуетоотх-а
- Притисните тастер Дугме МОДЕ on the USB/MP3/Bluetooth module until "Bluetooth" appears on the LCD display. The Bluetooth indicator will flash.
- On your mobile device, search for Bluetooth devices and select "XTUGA MIXER" (or similar).
- Once paired, the Bluetooth indicator will become solid. You can now play audio from your device through the mixer.
- Use the module's control buttons for Play/Pause, Next/Previous track.
6.3 USB/MP3 Playback
- Уметните УСБ флеш диск који садржи МП3 аудио fileс инто тхе УСБ порт.
- The mixer should automatically switch to USB mode and begin playback. If not, press the Дугме МОДЕ да изаберете УСБ.
- Use the control buttons to navigate tracks and control playback.
6.4 Снимање
- To USB Drive: In USB/MP3 mode, press the Дугме РЕЦ on the module to start recording the main mix to the connected USB drive. Press again to stop.
- До рачунара: Ensure the mixer is connected to your computer via USB. Open your recording software and select the mixer as the input device. Start recording within your software.
6.5 Коришћење ефеката
- Подесите EFFECT knob on individual channels to send a portion of that channel's signal to the internal effect processor.
- Користите EFFECT Level knob in the master section to control the overall volume of the applied effect.
- Подесите РЕПЕАТ и ДЕЛАИ knobs to fine-tune the characteristics of the digital effect.
7. Одржавање
Правилно одржавање осигурава дуготрајност и оптималне перформансе вашег миксера.
- Чишћење: Use a soft, dry cloth to clean the exterior of the mixer. Do not use abrasive cleaners, solvents, or waxes.
- Заштита од прашине: When not in use, cover the mixer to protect it from dust and debris.
- Складиштење: Чувајте миксер на хладном и сувом месту, даље од директне сунчеве светлости и екстремних температура.
- Управљање кабловима: Avoid bending or crimping cables excessively. Disconnect cables by pulling the plug, not the cable itself.
КСНУМКС. Решавање проблема
If you encounter issues with your mixer, refer to the following common problems and solutions.
- Нема излаза звука:
- Check if the mixer is powered on.
- Осигурајте све MAIN Faders and individual Цханнел Фадерс are raised.
- Verify that output cables are securely connected to your ampлифиер/звучници.
- Проверите јачину звука на вашем ampлифиер/звучници.
- Нема улазног сигнала:
- Ensure microphones/instruments are properly connected to the correct input jacks.
- Проверите да ли је ГАИН дугме for the respective channel is sufficiently turned up.
- If using a condenser microphone, ensure +48В ПХАНТОМ Повер је активиран.
- Test input sources (microphones, instruments) with another device to confirm they are working.
- Изобличен звук:
- Смањите ГАИН дугме for the offending channel if the ПЕАК ЛЕД је стално осветљен.
- Спустите MAIN Faders if the output level meter is consistently in the red.
- Проверите да ли има оштећених каблова.
- Проблеми са Блуетоотх везом:
- Ensure the mixer is in Bluetooth mode (LCD shows "Bluetooth").
- Make sure your mobile device's Bluetooth is enabled and within range.
- Покушајте да раскинете упаривање и поново упарите уређај.
- Репродукција са УСБ-а не ради:
- Ensure the USB drive is properly inserted and contains compatible MP3 files.
- Притисните тастер Дугме МОДЕ to ensure the mixer is in USB mode.
- Покушајте са другим УСБ диском.
9. Спецификације
| Феатуре | Спецификација |
|---|---|
| Број модела | ES602 (also ES802/1202 series) |
| Број канала | 7 |
| Технологија повезивања | Помоћни, Блутут, УСБ |
| Аудио улаз | Auxiliary, USB, XLR |
| Тип излазног конектора | Помоћни, КСЛР |
| Извор напајања | Цордед Елецтриц |
| Тежина артикла | 3.59 кг |
| Димензије производа | 46 к 46 к 14 цм |
| Произвођач | КСТУГА |
| УПЦ | 784124158754 |
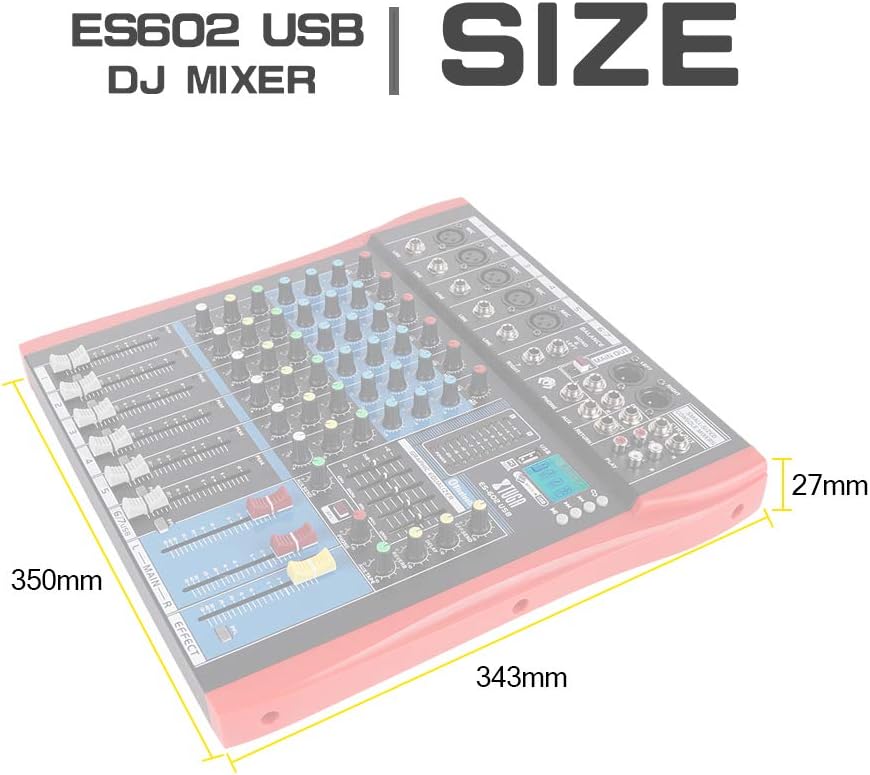
Figure 6: Dimensions of the XTUGA ES602 USB DJ Mixer, showing measurements of 350mm length, 343mm width, and 27mm height.
10. Гаранција и подршка
XTUGA products are designed for reliability and performance. For warranty information and technical support, please refer to the warranty card included with your product or visit the official XTUGA webсајт. Сачувајте рачун као доказ о куповини за евентуалне рекламације по гаранцији.