1. Увод
This instruction manual provides detailed guidance for the installation, operation, and maintenance of your weelye 24V Electric Ride-On Car DIY Wiring and Remote Control Kit. This kit is designed for modifying and upgrading children's electric ride-on vehicles to a 24V system, enhancing performance and control. Please read this manual thoroughly before beginning any installation or operation to ensure safe and correct usage.
Важна напомена: This kit requires a separate 24V battery and does not include gearbox motors. Basic electrical wiring knowledge is recommended for installation.
2. Компоненте комплета
The weelye 24V DIY Modified Wires and Switch Kit includes the following main components:
- Ремоте Цонтрол
- Control Box (Circuit Board)
- Pre-wired Harness
- Прекидач за напајање
- Педала гаса
- Overload Protector (Self-resetting fuse)
- Порт за пуњење
- Прекидач за велику/ниску брзину
- Forward/Stop/Back Switch

Слика 2.1: Готовоview of the weelye 24V DIY Wiring and Remote Control Kit, showing all included components such as the control box, remote, pedal, switches, and wiring harness.

Слика 2.2: Детаљно view of the pre-wired harness, including the power switch, high/low speed switch, forward/stop/back switch, and accelerator pedal connections.

Слика 2.3: The weelye 24V control box (circuit board) with various wire connections, serving as the central processing unit for the ride-on car's electrical system.
3. Подешавање и инсталација
Before installation, ensure the vehicle's power is off and the battery is disconnected. This kit is designed for DIY modification and requires careful attention to wiring connections. Refer to the provided wiring diagrams and ensure all connections are secure.
3.1. Control Box Compatibility Check
To confirm compatibility, open your existing electric ride-on car and locate its control box. If the appearance and connector types of the weelye control box are similar to your original unit, this kit should be compatible. This kit is specifically designed for 24V systems.
3.2. Ожичење
The kit features one-button installation sockets for battery and motor cables, simplifying replacement and maintenance. Connect the components as follows:
- Повежите Контролна кутија то тхе 24В Батерија (not included). Ensure correct positive (+) and negative (-) polarity.
- Повежите Дриве Моторс to the designated motor ports on the Control Box.
- Повежите Педала гаса to its corresponding port.
- Повежите Прекидач за напајање, Прекидач за велику/ниску брзину, и Forward/Stop/Back Switch to the main wiring harness.
- Повежите Overload Protector (Self-resetting fuse) in line with the power circuit as indicated in the wiring diagram.
- Повежите Порт за пуњење to allow for external battery charging.
- If applicable, connect the Мотор за управљање и Music/Light Interface до њихових одговарајућих лука.

Слика 3.1: Close-up of the wiring harness showing connections for the power switch, high/low speed switch, and forward/stop/back switch, along with the self-resetting fuse and charging interface.

Слика 3.2: The weelye remote control, featuring buttons for forward, backward, speed selection, emergency brake, and turning left/right.
4. Упутство за употребу
4.1. Remote Control Frequency Matching (First Use or Battery Replacement)
The remote control must be paired with the control box for proper operation. Follow these steps:
- Инсталирајте батерије: Open the remote control's battery compartment. Install two AAA 1.5V batteries, ensuring correct positive and negative polarity. Close the battery cover. The indicator light will flash three times, confirming correct battery installation.
- Започни упаривање: Press and hold the "Frequency Key" (often labeled "Car Select" or "S" for Speed) on the remote control for approximately 2 seconds. The indicator light on the remote will begin to flash.
- Укључивање возила: Turn on the power supply of the electric ride-on car. The indicator light on the remote control should turn off, indicating successful frequency matching.
- Потврдите операцију: Test the remote control's functions (forward, backward, turning) to ensure proper pairing.
Напомена: If the indicator light on the remote does not turn off (matching unsuccessful), turn off the car's power supply and repeat steps 2 and 3.
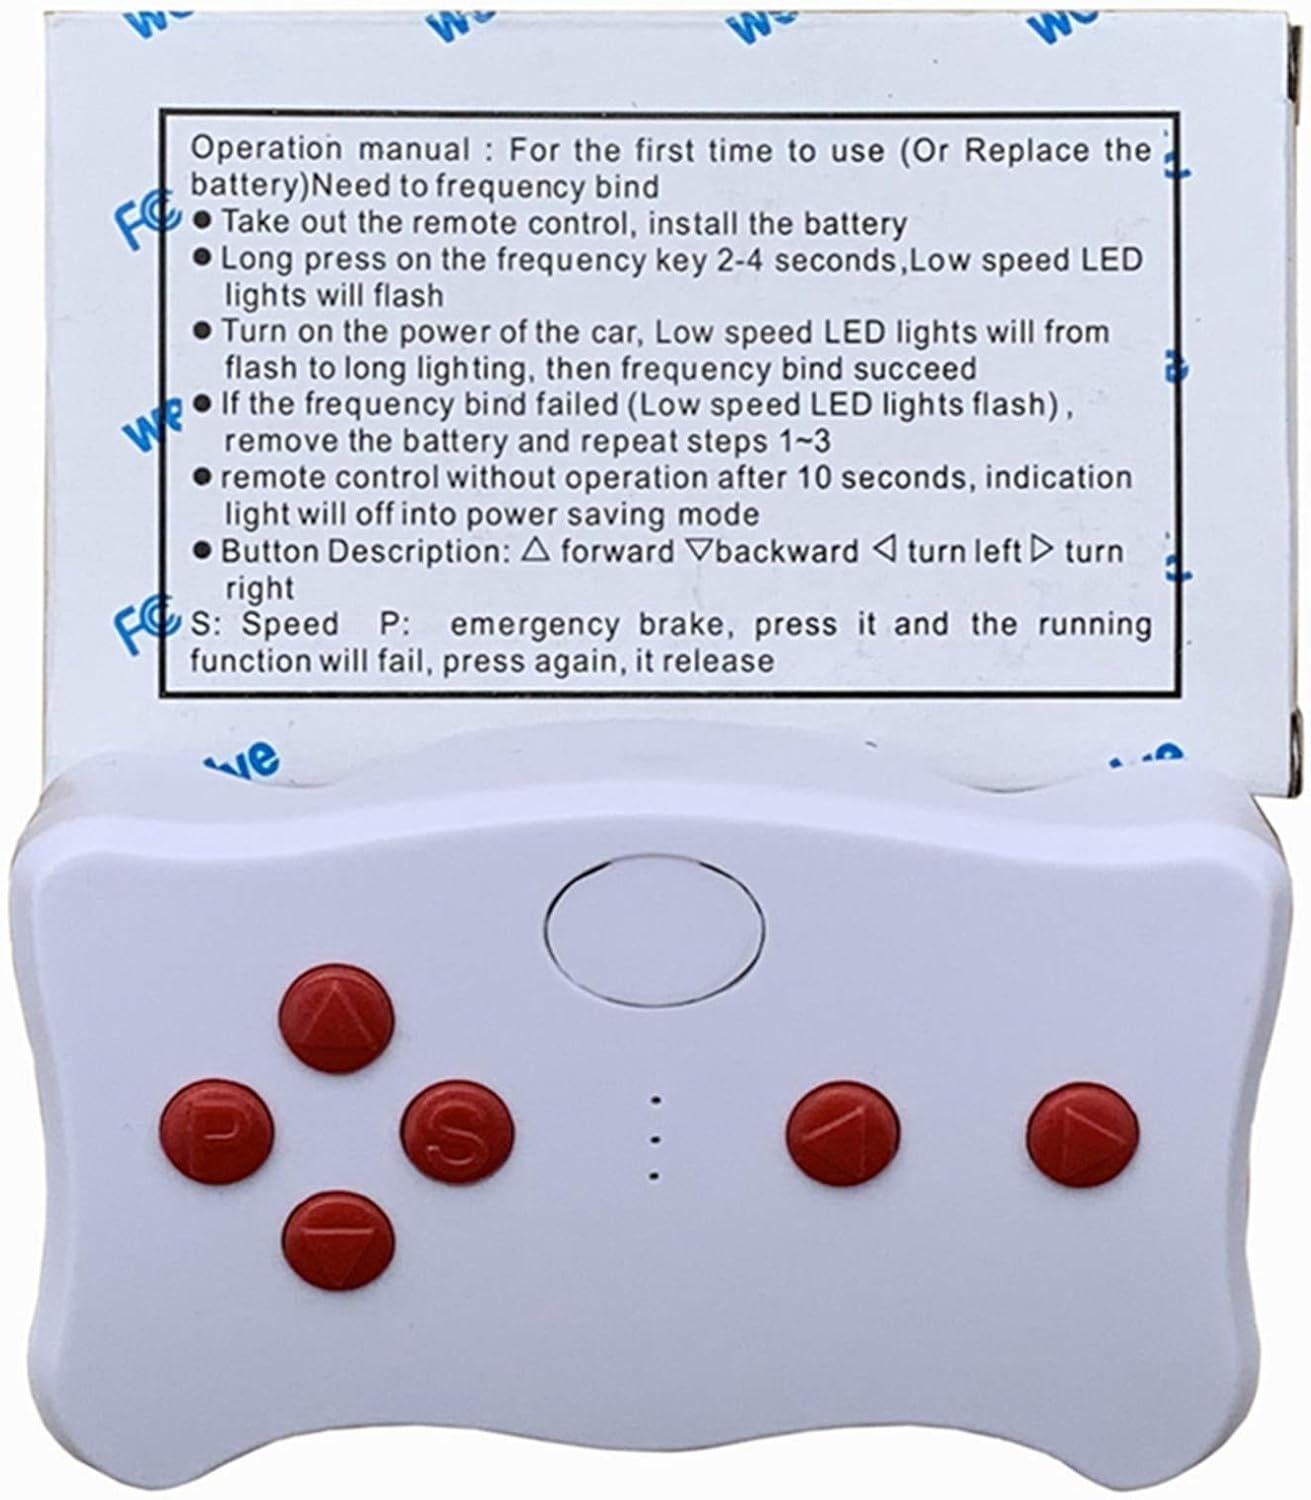
Слика 4.1: The reverse side of the weelye remote control, displaying the frequency matching procedure and button descriptions.
4.2. Remote Control Button Descriptions
- Forward (△): Помера аутомобил напред.
- Backward (▽): Помера аутомобил уназад.
- Turn Left (◁): Turns the car left.
- Turn Right (▷): Turns the car right.
- Speed (S): Cycles through available speed settings (High, Medium, Low).
- Emergency Brake (P): Activates the emergency brake, stopping the car. Press again to release.
If the remote control is left without operation for 10 seconds, the indicator light will turn off, and it will enter power-saving mode.
4.3. Vehicle Operation
- Укључено: Use the main power switch on the vehicle to turn it on.
- Избор брзине: Use the high/low speed switch on the vehicle or the 'S' button on the remote control to select the desired speed.
- Контрола правца: Use the forward/stop/back switch on the vehicle or the directional buttons on the remote control to move the car.
- Папучица гаса: The vehicle's accelerator pedal provides direct control when not using the remote. The control box features a slow-start function for smooth acceleration.
5. Одржавање
- Одржавање батерије: Ensure the 24V battery (not included) is charged according to its manufacturer's instructions. Disconnect the battery when the vehicle is not in use for extended periods.
- Инспекција ожичења: Periodically check all wiring connections for looseness or damage. Secure any loose connections and replace damaged wires immediately.
- Чишћење компоненти: Keep the control box and other components free from dust, dirt, and moisture. Use a dry cloth for cleaning.
- Заштита од преоптерећења: The kit includes a self-resetting fuse (overload protector). If the vehicle stops unexpectedly, check for an overload condition. The fuse will reset automatically once the condition is resolved.
КСНУМКС. Решавање проблема
| Проблем | Могући узрок | Решење |
|---|---|---|
| Возило се не помера. |
|
|
| Даљински управљач не реагује. |
|
|
| Vehicle moves but steering is unresponsive (if applicable). |
|
|
| Vehicle cuts off intermittently. |
|
|
7. Спецификације
| Феатуре | Детаљ |
|---|---|
| Бранд | weelye |
| Број модела | weelye-24V XIANSU |
| Волtage | 24В |
| Фреквенција даљинског управљача | 2.4Г Блуетоотх |
| Посебне карактеристике | Slow Start Function, High/Low Speed Switch, One-button installation sockets for battery/motor cables, Self-resetting fuse |
| Врста материјала | Пластика |
| Тежина артикла | 1.17 фунти (приближно 0.53 кг) |
| Димензије артикла (Д к Ш к В) | 15.24 x 10.16 x 9.91 цм (приближно 6 x 4 x 3.9 цм) |
| Обавезна монтажа | Да |
8. Гаранција и подршка
For warranty information or technical support, please contact weelye customer service through the retailer where the product was purchased. Keep your purchase receipt as proof of purchase.
Произвођач: weelye-24V