1. Производ је готовview
The KUIDAMOS DSO FNIRSI PRO is a portable digital oscilloscope designed for various measurement tasks. It features a 2.4-inch LCD display, a real-time sampling rate of up to 20MS/s, and an analog bandwidth of 5MHz. This device is equipped with a built-in 1200mAh rechargeable lithium battery, offering approximately 3 hours of continuous operation. It supports waveform storage and management, making it suitable for both maintenance and research and development applications.
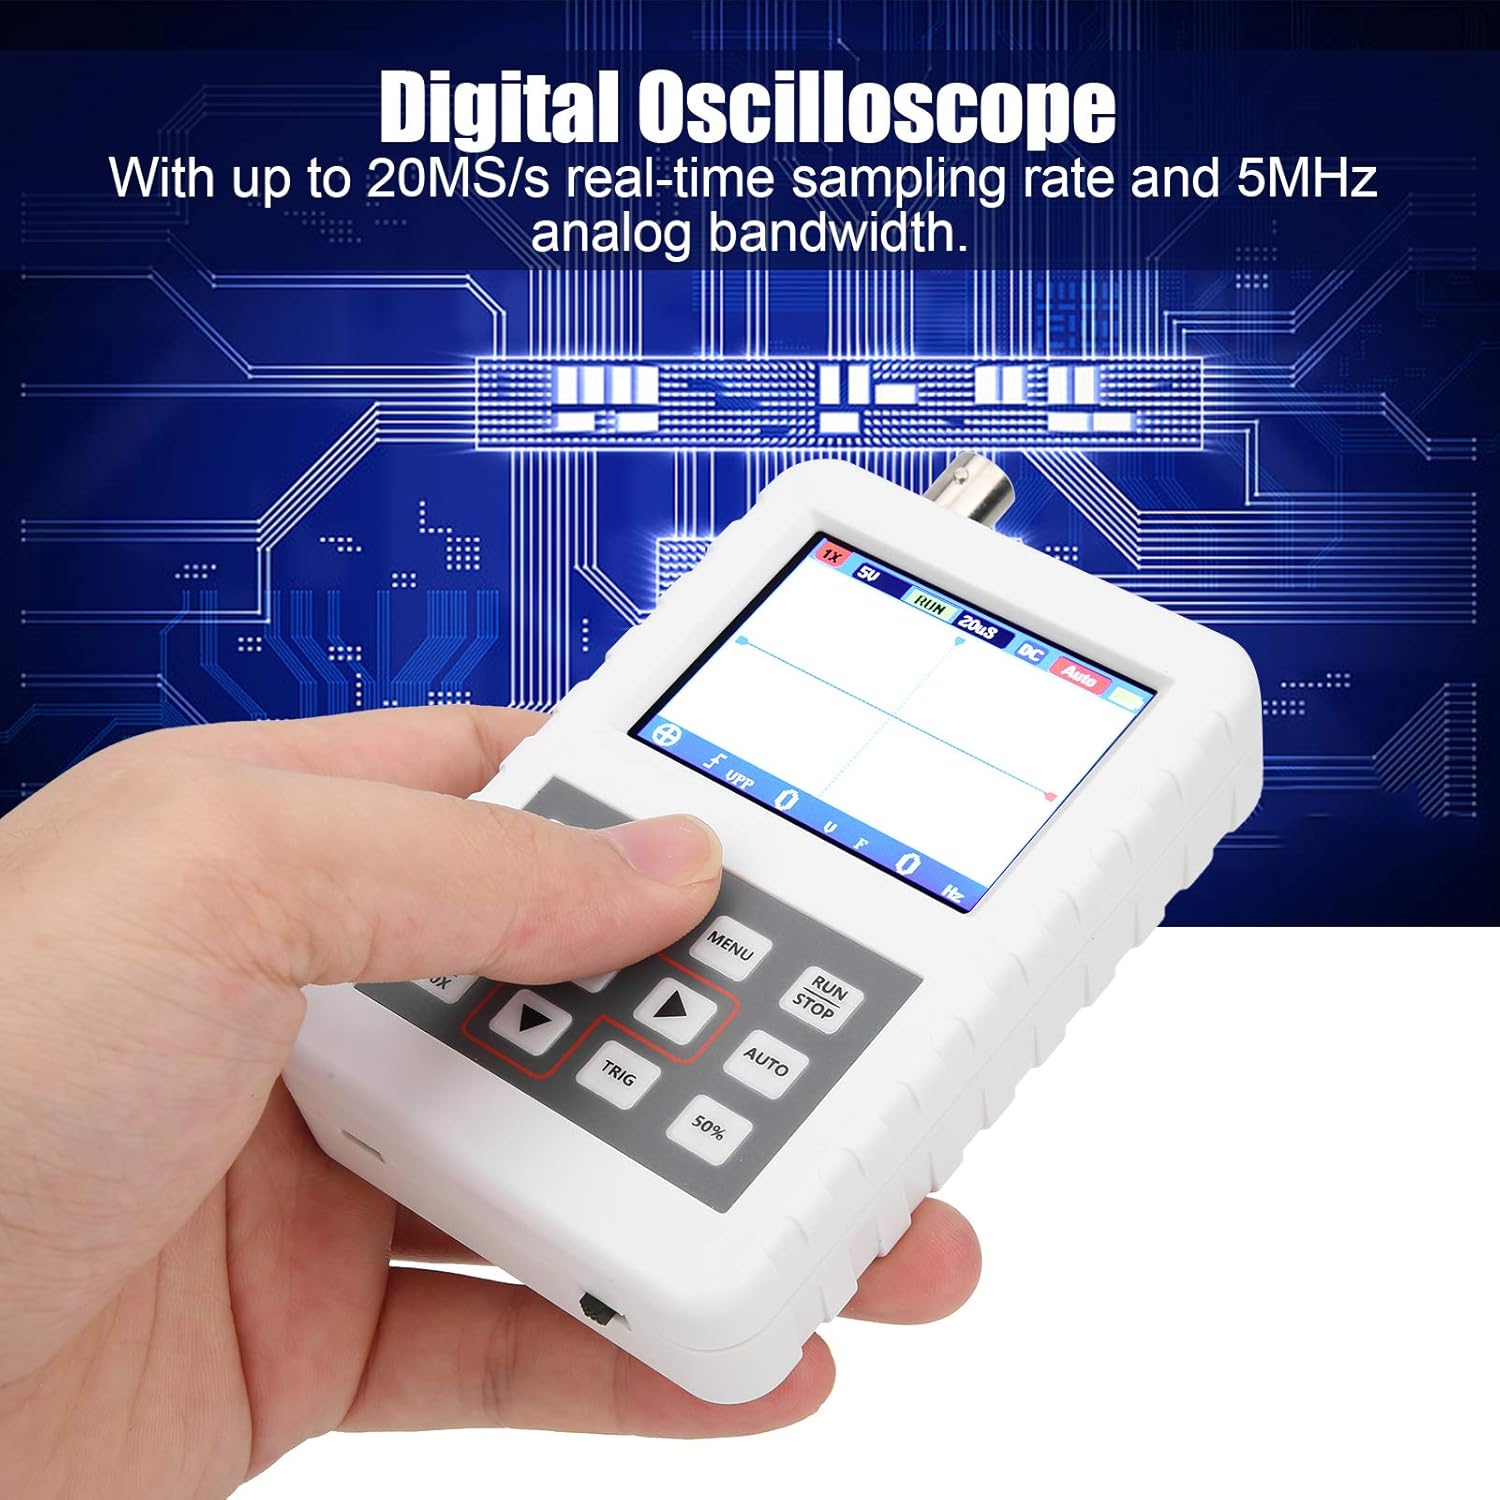
Image 1.1: The DSO FNIRSI PRO Digital Oscilloscope, highlighting its 20MS/s sampбрзина преноса и аналогни пропусни опсег од 5 MHz.

Image 1.2: The oscilloscope's 2.4-inch HD LCD screen with 320 x 240 resolution for clear waveform display.

Слика 1.3: Предња и задња страна views of the DSO FNIRSI PRO, illustrating its physical layout.
2. Садржај пакета
Проверите да ли су све ставке наведене у наставку укључене у ваш пакет:
- 1 x DSO FNIRSI PRO Digital Oscilloscope
- 1 x Matching Probe
- 1 x USB линија за пренос података
- 1 x Упутство за употребу (овај документ)
3. Почетно подешавање
3.1 Пуњење уређаја
Before first use, fully charge the oscilloscope. Connect the provided USB data line to the device's charging port and to a 5V/1A, 2A, 3A, or 4A USB power adapter. The built-in 1200mAh lithium battery can be charged continuously for approximately 3 hours.
3.2 Повезивање сонде
Connect the matching probe to the BNC connector on the top of the oscilloscope. Ensure a secure connection by twisting the probe connector clockwise until it locks into place.
3.3 Укључивање/искључивање
To power on the device, press and hold the power button (usually located on the side or bottom) for a few seconds until the screen illuminates. To power off, press and hold the power button again until the device shuts down.
4. Упутство за употребу
4.1 Контроле и интерфејс
The oscilloscope features a user-friendly interface with several buttons for navigation and function control.

Image 4.1: Operating the DSO FNIRSI PRO, showing the placement of control buttons.
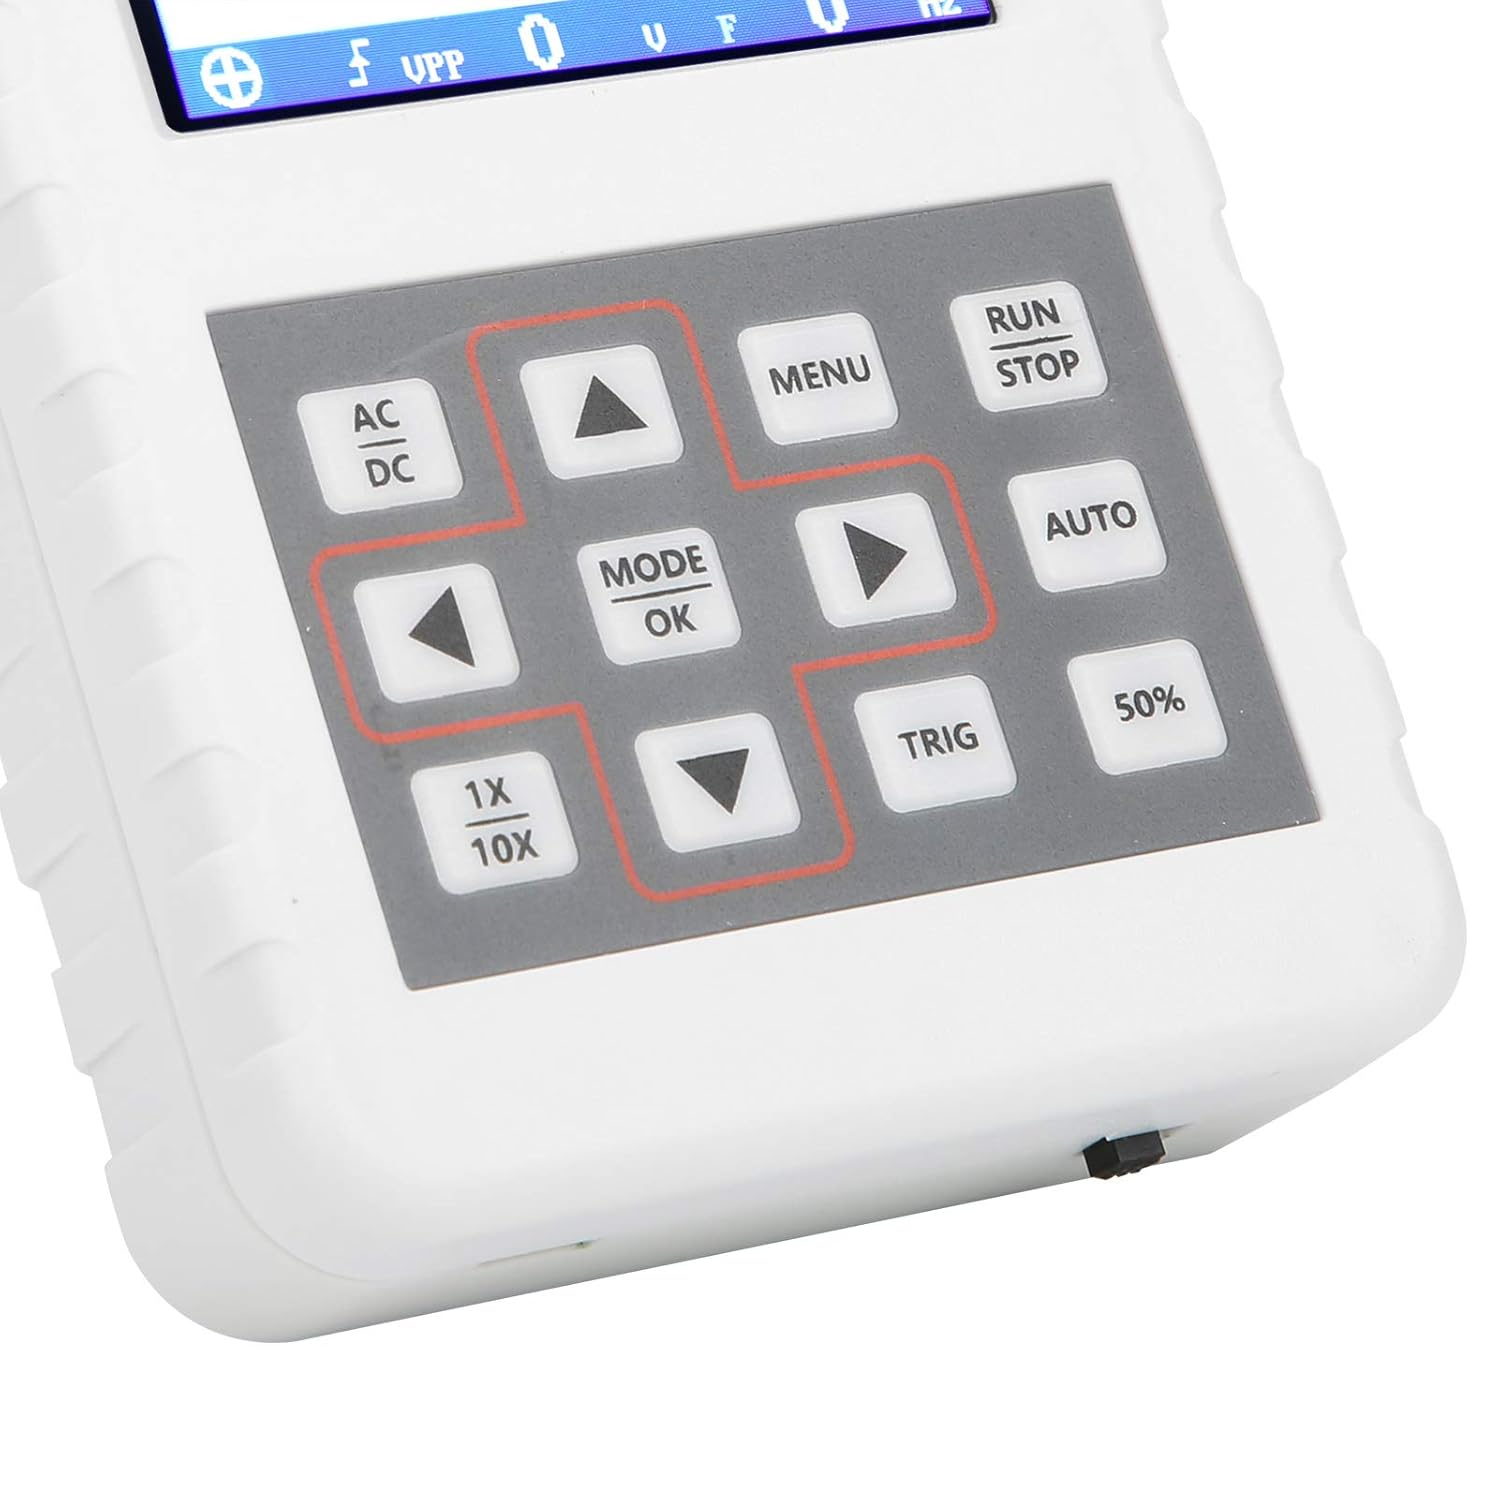
Слика 4.2: Детаљно view of the oscilloscope's control panel.
- МЕНИ: Accesses the main menu for settings and functions.
- РУН/СТОП: Starts or pauses waveform acquisition.
- АУТО: Аутоматски подешава подешавања за оптималан приказ таласног облика.
- ТРИГ: Adjusts trigger level.
- 50%: Sets the trigger level to 50% of the waveform ampлитуде.
- АЦ/ДЦ: Toggles between AC and DC coupling modes.
- 1X/10X: Sets the oscilloscope's input attenuation to match the probe's setting.
- MODE/OK: Confirms selections or changes modes.
- Дугмад са стрелицама (горе, доле, лево, десно): Крећите се кроз меније и подешавајте параметре.
4.2 Probe Attenuation Settings
It is critical to match the probe's attenuation setting with the oscilloscope's input setting to ensure accurate measurements.
- За 1X measurement (0-40V): Set both the physical switch on the probe and the 1Кс/10Кс button on the oscilloscope to the 1X положај.
- За 10X measurement (40-800V): Set both the physical switch on the probe and the 1Кс/10Кс button on the oscilloscope to the 10Кс положај.
4.3 Measurement Modes and Triggering
The oscilloscope supports various trigger modes to stabilize waveform display:
- самац: Captures a single waveform event and then stops.
- нормално: Captures a waveform only when a trigger condition is met.
- Ауто: Continuously acquires waveforms, even without a trigger, but will trigger if a signal is present.
Користите ТРИГ button and arrow keys to adjust the trigger level, which determines the voltage point at which the oscilloscope begins to acquire data.
4.4 Складиштење и управљање таласним обликима
The device includes 16MB of built-in storage, capable of storing up to 500 waveform images. Use the file manager function to browse, view, and manage saved waveforms. This includes viewing detailed information, flipping through images, and deleting unwanted files.

Слика 4.3: Примерamples of sine wave measurements at various frequencies.

Слика 4.4: Примерamples of square, triangular, and sawtooth wave measurements.
5. Нега и одржавање
5.1 Чишћење
Обришите уређај меком, сувом крпом. Не користите абразивна средства за чишћење или раствараче, јер могу оштетити уређај.asinг или екран. Пре чишћења проверите да ли је уређај искључен и одвојен од било ког извора напајања.
5.2 Одржавање батерије
To prolong battery life, avoid fully discharging the battery frequently. If storing the device for an extended period, charge it to approximately 50% and recharge every few months.
5.3 Складиштење
Store the oscilloscope in a cool, dry place, away from direct sunlight, extreme temperatures, and high humidity. Keep it protected from dust and physical impact.
КСНУМКС. Решавање проблема
- Issue: Abnormal measured data.
решење: Check the probe's attenuation switch (1X or 10X) and ensure it matches the setting on the oscilloscope (using the 1Кс/10Кс button). If the probe is set to 10X and the oscilloscope is set to 1X, the device will not be damaged, but the data displayed will be incorrect. - Issue: Device does not power on.
решење: Ensure the battery is sufficiently charged. Connect the device to a power source using the USB data line and allow it to charge for at least 30 minutes before attempting to power it on again. - Issue: Screen is blank or frozen.
решење: Try performing a soft reset by pressing and holding the power button for an extended period (e.g., 10-15 seconds) until the device powers off, then power it back on. If the issue persists, ensure the battery is charged.
7. Техничке спецификације
| Феатуре | Спецификација |
|---|---|
| Модел производа | DSO FNIRSI PRO |
| Материјал производа | АБС |
| Број канала | 1 |
| Величина екрана | Прибл. 6.1 цм / 2.4 ин |
| Резолуција екрана | 320 к 240 |
| Дисплаи Типе | ЛЦД екран |
| Аналог Бандвидтх | 5МХз |
| Максимално С.ampлинг Рате | 20MSps |
| Триггер Моде | Једноструко/Нормално/Аутоматско |
| Складиштење таласних облика | 16MB (up to 500 waveform pictures) |
| Уграђена батерија | Литијумска батерија 1200мАх |
| Време приправности | 3 сата |
| Улаз за пуњење | 5V/1A/2A/3A/4A |
| Произвођач | KUIDAMOS |
| Земља порекла | САД |
| Број дела ставке | KUIDAMOStgaix9hwck |
8. Гаранција и корисничка подршка
За информације о гаранцији, техничку подршку или упите у вези са сервисирањем, погледајте документацију коју сте добили уз куповину или контактирајте директно продавца. Сачувајте рачун као доказ о куповини за евентуалне рекламације у вези са гаранцијом.