МОУНТУП МУ0034
МОУНТУП МУ0034 Упутство за употребу за монтирање на сто за један монитор
Бренд: MOUNTUP | Модел: МУКСНУМКС
1. Увод
This manual provides detailed instructions for the installation, operation, and maintenance of your MOUNTUP MU0034 Single Monitor Desk Mount. Please read this manual thoroughly before installation to ensure correct setup and safe operation. This monitor mount is designed to enhance your workspace ergonomics by providing adjustable positioning for a single monitor.
2. Безбедносне информације
- Ensure all components are present and undamaged before installation. Do not use if any parts are missing or faulty.
- This product is intended for monitors weighing up to 17.6 lbs (8 kg) and screen sizes from 17 to 32 inches. Do not exceed the maximum weight capacity.
- Compatible VESA patterns are 75x75mm and 100x100mm. Verify your monitor's VESA pattern before proceeding.
- Ensure the desk surface is stable and strong enough to support the combined weight of the mount and monitor.
- Tighten all screws firmly, but do not overtighten to avoid stripping threads or damaging components.
- Држите децу и кућне љубимце подаље током инсталације.
- If you have any doubts about the installation process, consult a qualified professional.
3. Садржај пакета
Please verify that all parts are included in your package:
- Склоп ручице монитора
- Деск Цлamp База
- Компоненте основе ушнице
- ВЕСА плоча
- Комплет опреме (шрафови, подлошке, имбус кључеви)
- Упутство за употребу
4. Спецификације
| Феатуре | Спецификација |
|---|---|
| Број модела | МУКСНУМКС |
| Материјал | Полирани алуминијум |
| Компатибилност величине екрана | 17" to 32" (flat or curved) |
| Тежина Капацитет | До 17.6 фунти (8 кг) |
| ВЕСА компатибилност | 75к75мм, 100к100мм |
| Подешавање висине | Up to 11" (16.3" total height adjustment range) |
| Тилт Ранге | +45° до -45° |
| Свивел Ранге | 360° (arm), 180° (monitor plate) |
| Ротација | 360° (landscape to portrait) |
| Max Desk Thickness (C-clamp) | 3.35" |
| Пречник отвора за ушну капу | 0.39" - 3.1" |
5. Подешавање и инсталација
The MOUNTUP MU0034 offers two installation options: C-clamp mounting and Grommet mounting. Choose the method suitable for your desk.
5.1. Ц-Цлamp Монтажа
This method is for desks without existing grommet holes, or if you prefer clamping to the edge of your desk. Ensure your desk thickness is no more than 3.35 inches.
- Причврстите Ц-цлamp: Assemble the C-clamp components to the base of the monitor arm. Position the base on the edge of your desk and tighten the clamp screw until it is secure.
- Причврстите ВЕСА плочу на монитор: Secure the VESA plate to the back of your monitor using the appropriate screws from the hardware kit. Ensure the screws are tightened securely.
- Slide Monitor onto Arm: Carefully slide the monitor (with the attached VESA plate) onto the monitor arm's VESA head. Ensure it clicks into place or is secured with the provided locking mechanism.
- Подесите напетост: Refer to Section 6.1 for adjusting the gas spring tension to match your monitor's weight.

Слика 1: Илустрација C-clamp and Grommet mounting options. The C-clamp is shown securing the mount to the desk edge, while the grommet mount uses a desk hole.
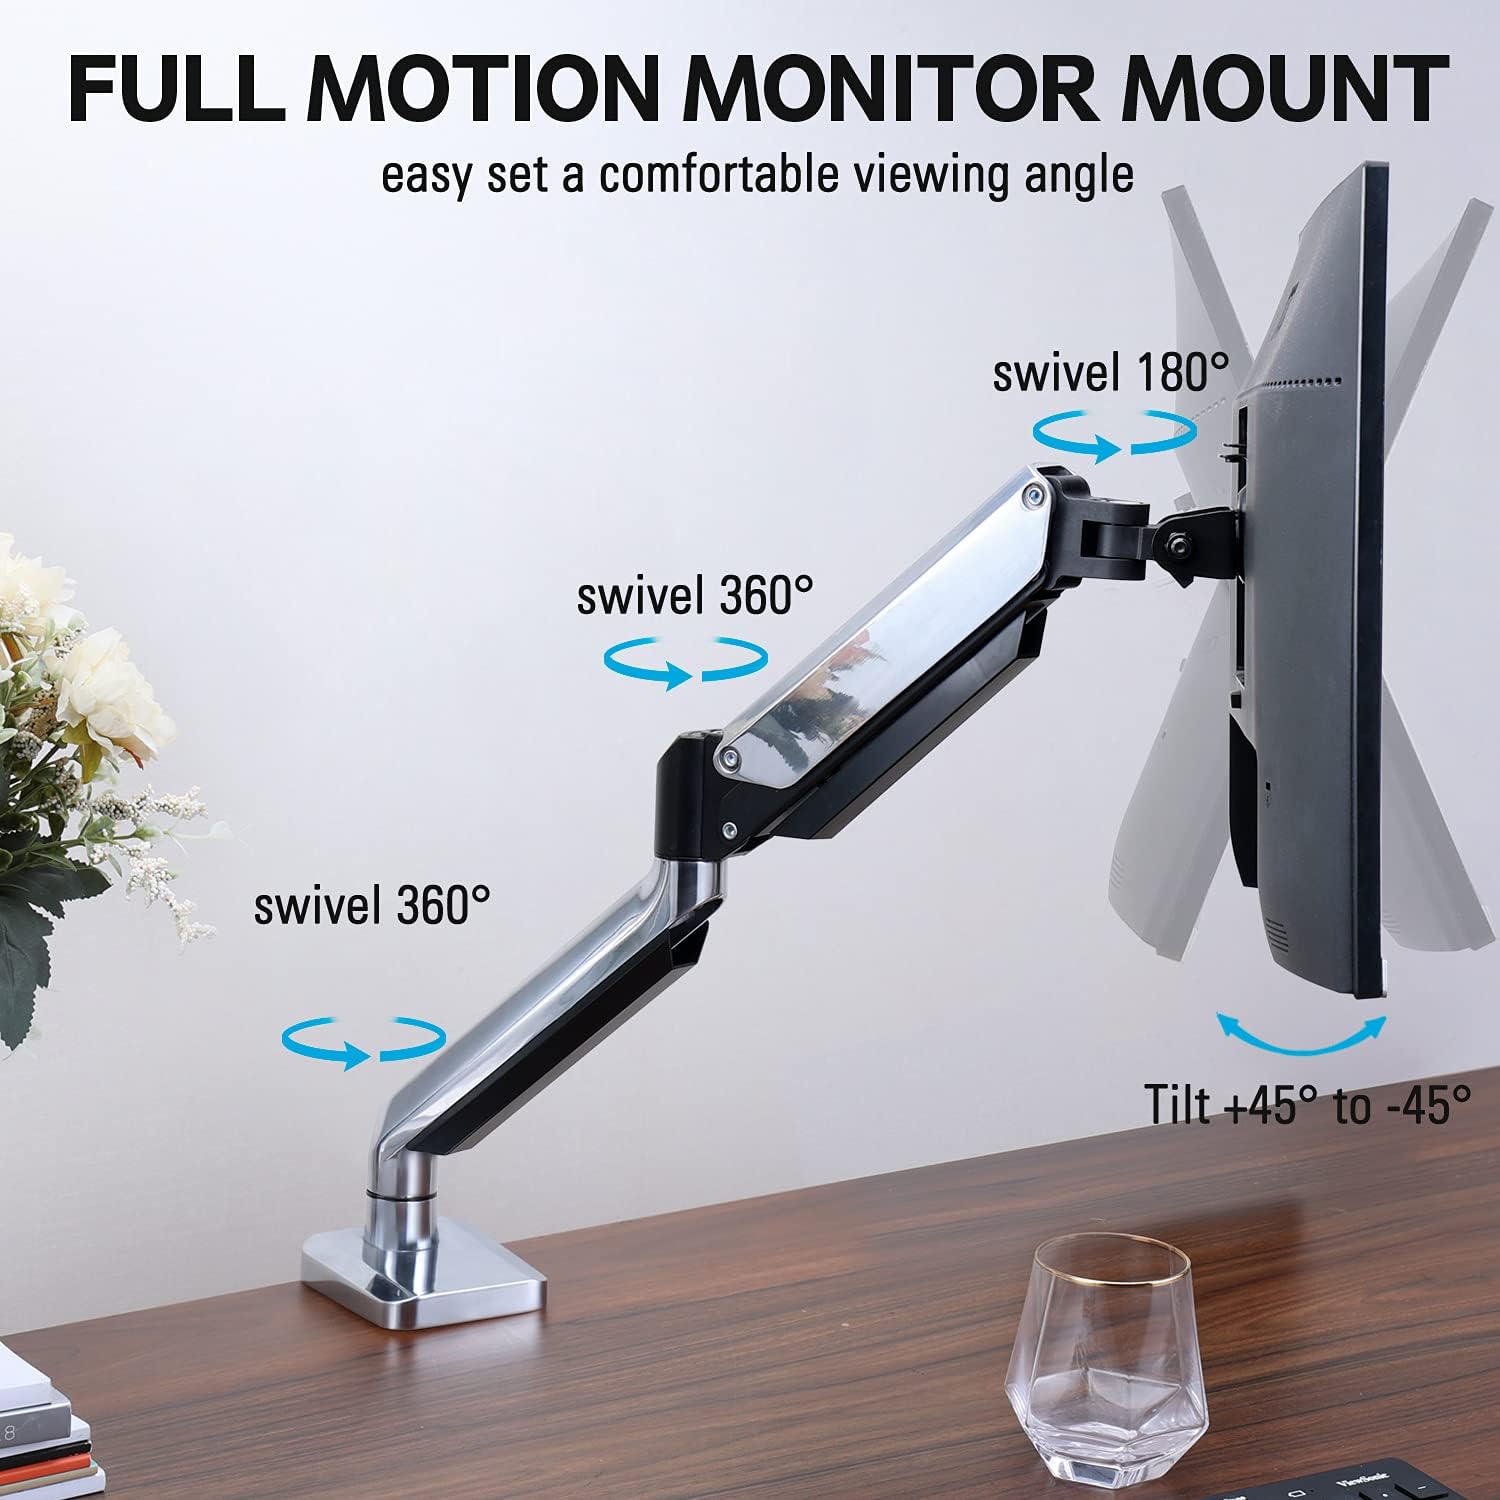
Figure 2: The removable VESA plate being attached to the back of a monitor, then sliding onto the monitor arm for easier installation.
5.2. Монтажа утичнице
This method utilizes an existing hole in your desk. Ensure your desk thickness is no more than 3.35 inches and the grommet hole diameter is between 0.39 and 3.1 inches.
- Assemble Grommet Base: Insert the grommet base components through the desk hole and secure them from underneath the desk using the provided plate and nut.
- Причврстите ВЕСА плочу на монитор: Secure the VESA plate to the back of your monitor using the appropriate screws from the hardware kit. Ensure the screws are tightened securely.
- Slide Monitor onto Arm: Carefully slide the monitor (with the attached VESA plate) onto the monitor arm's VESA head. Ensure it clicks into place or is secured with the provided locking mechanism.
- Подесите напетост: Refer to Section 6.1 for adjusting the gas spring tension to match your monitor's weight.
6. Руковање и подешавања
The MOUNTUP MU0034 monitor arm offers various adjustments for optimal viewин удобност.
6.1. Подешавање затегнутости гасне опруге
The gas spring tension needs to be adjusted to match the weight of your monitor. This ensures the monitor stays in position once adjusted.
- If the monitor drifts down, turn the adjustment screw (usually located on the arm joint) clockwise ("+") to increase tension.
- If the monitor floats up, turn the adjustment screw counter-clockwise ("-") to decrease tension.
- Adjust gradually until the monitor remains stable at any height.
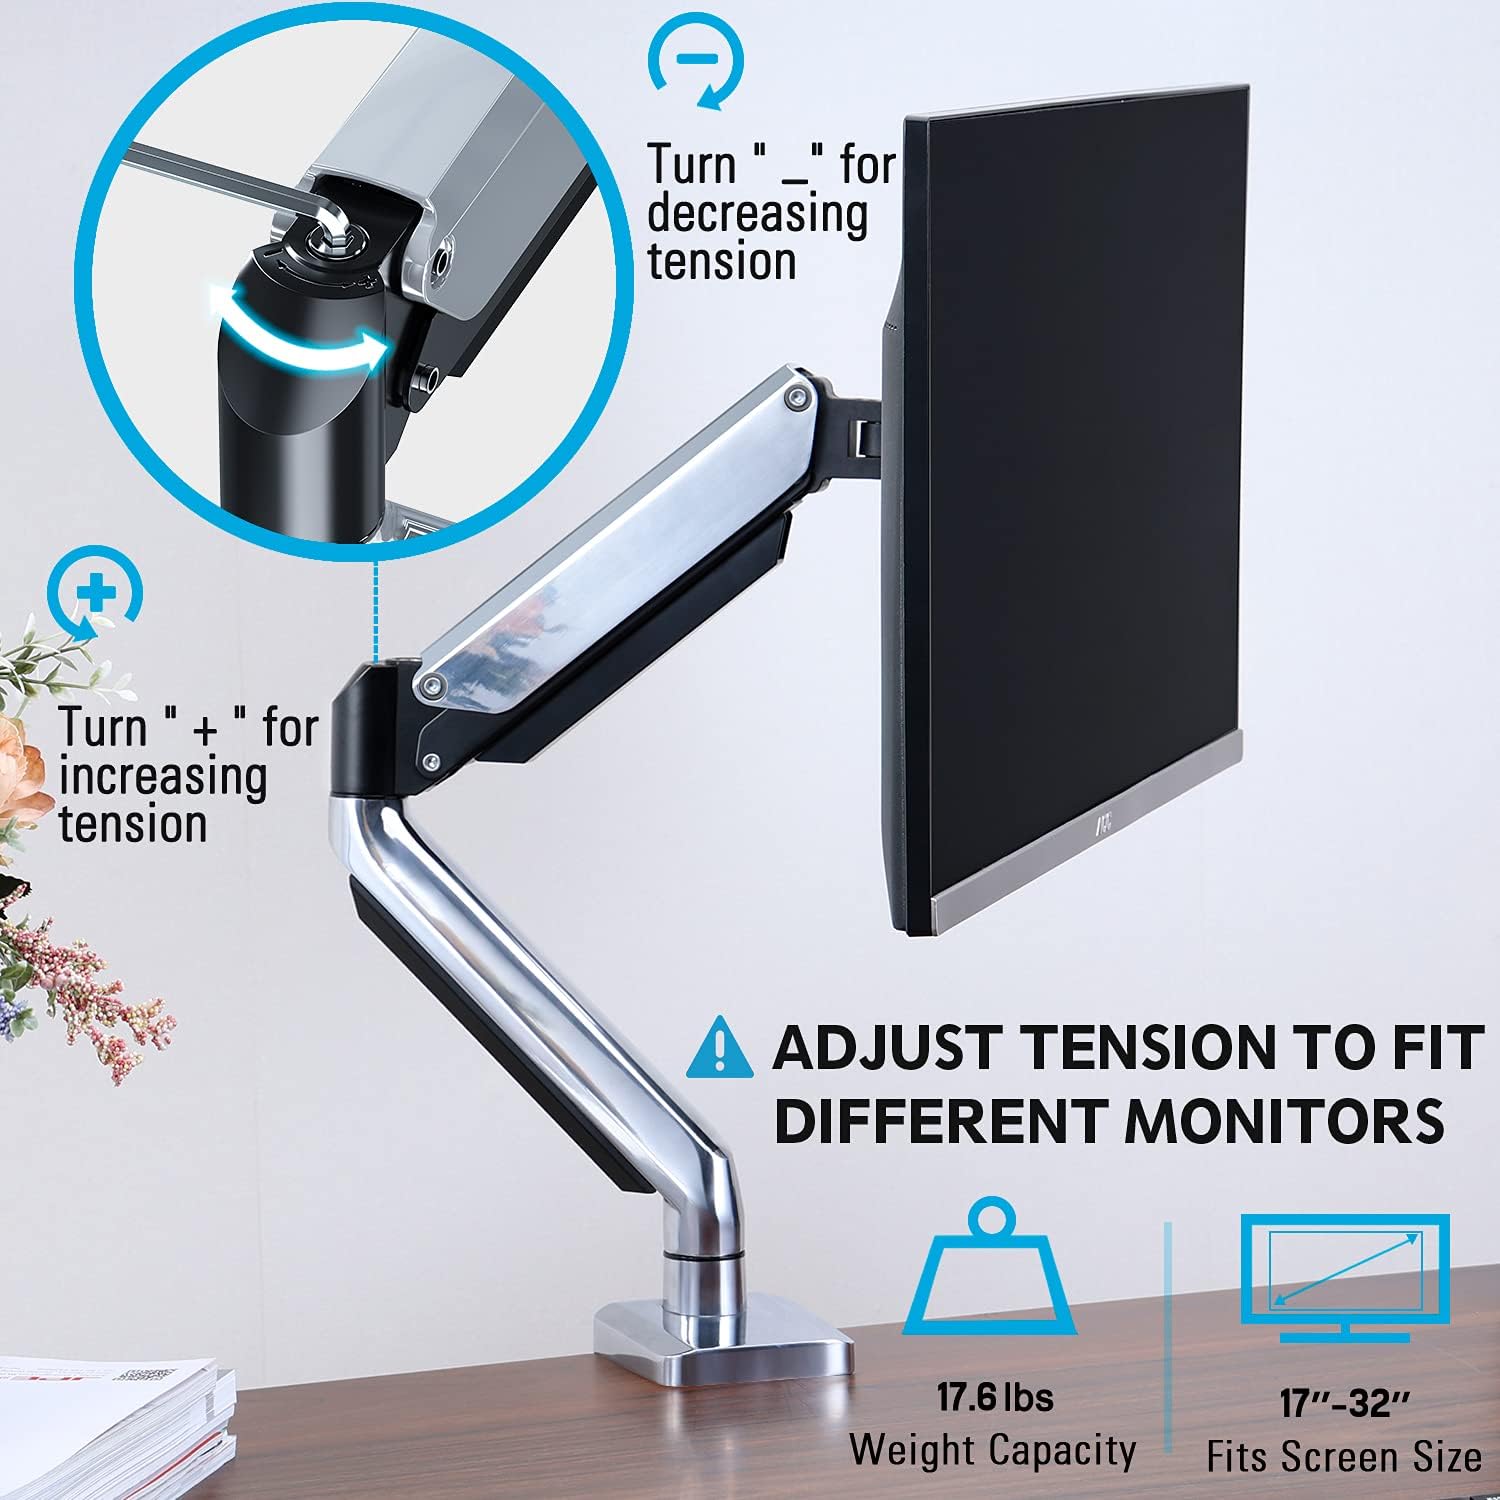
Figure 3: Instructions for adjusting the gas spring tension using an Allen key. Turning clockwise increases tension, counter-clockwise decreases it.
6.2. Подешавање висине
Once the gas spring tension is correctly set, you can easily raise or lower your monitor to your desired ergonomic height. The arm allows for up to 11 inches of vertical adjustment.

Figure 4: Diagram illustrating the maximum height adjustment of 11 inches and maximum extension of 17.5 inches.
6.3. Нагињање, окретање и ротација
The monitor arm provides full motion capabilities:
- Нагиб: Adjust the monitor screen +45° to -45° to reduce glare or find a comfortable viewугао уласка.
- Окретни: The arm can swivel 360° at the base and 360° at the middle joint. The monitor plate itself can swivel 180°. This allows for easy screen sharing or repositioning.
- ротација: Ротирајте монитор за 360° да бисте прелазили између пејзажне и портретне оријентације.

Figure 5: Visual representation of the monitor arm's full motion capabilities, including 360° swivel, 180° swivel at the monitor plate, and +45° to -45° tilt.

Figure 6: An image demonstrating the monitor's ability to rotate 360 degrees, allowing for both landscape and portrait viewинг модес.
7. Менаџмент каблова
The MOUNTUP MU0034 features integrated cable management to keep your workspace tidy.
- Провуците каблове монитора (за напајање, видео итд.) дуж доње стране крака.
- Use the provided cable clips or covers to secure the cables within the arm channels.
- Ensure cables have enough slack to allow for full range of motion without tension.

Figure 7: Illustration of how cables are routed and organized through the integrated channels on the monitor arm, keeping the desk clear.
8. Одржавање
- Редовно проверавајте све завртње и спојеве како бисте били сигурни да су чврсто затегнути.
- Очистите носач меком крпомamp крпу. Избегавајте абразивна средства за чишћење или раствараче.
- Do not lubricate the gas spring mechanism.
КСНУМКС. Решавање проблема
| Проблем | Могући узрок | Решење |
|---|---|---|
| Монитор се увија или не може да остане усправан | Затегнутост гасне опруге је прениска за тежину монитора. | Increase gas spring tension by turning the adjustment screw clockwise ("+"). |
| Monitor floats up or is hard to push down | Затегнутост гасне опруге је превисока за тежину монитора. | Decrease gas spring tension by turning the adjustment screw counter-clockwise ("-"). |
| Monitor is wobbly | Mount not securely fastened to desk or VESA plate not tight. | Проверите и затегните све вијкеamp/grommet screws and VESA plate screws. |
| Difficulty rotating/tilting monitor | Зглобови су превише затегнути. | Loosen the corresponding joint screws slightly (do not remove). |
10. Гаранција и подршка
The MOUNTUP MU0034 Single Monitor Desk Mount is backed by a 3-year support period. For technical assistance, missing parts, or warranty claims, please contact MOUNTUP customer support through their official channels or the retailer where the product was purchased.
Молимо вас да сачувате доказ о куповини ради гаранције.