
CALEX Smart Security (Model 5501000300)
CALEX Smart Mini унутрашња IP камера - упутство за употребу
Model: Smart Security (5501000300)
1. Увод
This manual provides comprehensive instructions for the installation, operation, and maintenance of your CALEX Smart Mini Indoor IP Camera. Please read this manual thoroughly before using the product to ensure proper functionality and safety.
The CALEX Smart Mini Indoor IP Camera is a Wi-Fi surveillance camera offering 1080P Full HD resolution, night vision capabilities, two-way audio communication, and flexible storage options via MicroSD card or cloud.
2. Садржај пакета
Проверите да ли су све ставке присутне у пакету:
- 1 x CALEX Smart Mini Indoor IP Camera
- 1 x Power Adapter (AC 220-240 V, 50/60 Hz input; DC 5 V output)
- 1 к УСБ кабл
- 1 x Упутство за употребу (овај документ)
- Mounting accessories (if applicable, not explicitly listed but common for cameras)

Figure 2.1: CALEX Smart Mini Indoor IP Camera and its retail packaging. The packaging highlights 1080P Full HD, Wi-Fi 2.4 GHz, and compatibility with the Calex Smart app.
3. Производ је готовview
Familiarize yourself with the components of your CALEX Smart Mini Indoor IP Camera.
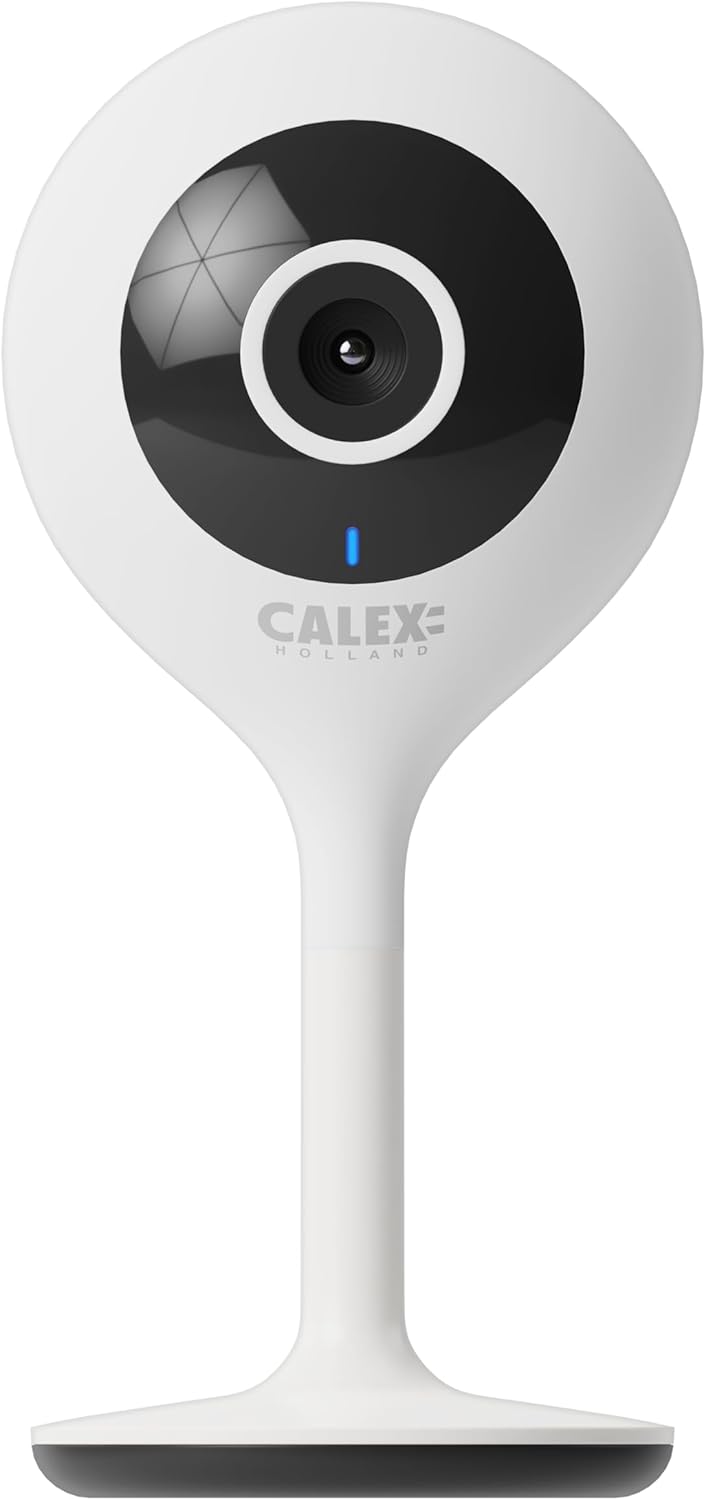
Слика 3.1: Предња страна view of the CALEX Smart Mini Indoor IP Camera. It features a central lens, an indicator light, and the CALEX HOLLAND logo.

Слика 3.2: Задња страна view of the CALEX Smart Mini Indoor IP Camera. This view shows the speaker grille, a reset button, and the MicroSD card slot. The USB power input is located at the base.
Кључне карактеристике:
- Фулл ХД 1080П резолуција: Пружа јасан и детаљан видео записtage.
- Ноћни вид: Equipped with infrared LEDs for clear monitoring in low-light or dark conditions.
- Двосмерни аудио: Уграђени микрофон и звучник за комуникацију.
- Ви-Фи повезивање: Connects to your home Wi-Fi network (2.4 GHz only).
- Локално складиште: Supports MicroSD card for continuous recording or event-triggered recording.
- Цлоуд Стораге: Optional cloud storage service for secure off-site recording.
- Детекција покрета: Alerts and records upon detecting movement.
- Контрола мобилних апликација: Управљајте и view live feed via the Calex Smart app.
- Компатибилност гласовног помоћника: Works with Amazon Alexa and Google Home.
4. Подешавање и инсталација
4.1 Пре него што почнете
- Уверите се да ваша Wi-Fi мрежа користи фреквенцију од 2.4 GHz. Камера не подржава Wi-Fi од 5 GHz.
- Припремите назив ваше Wi-Fi мреже (SSID) и лозинку.
- Download the "Calex Smart" app from your mobile device's app store.
- Place the camera within range of your Wi-Fi router.

Figure 4.1: QR codes for downloading the Calex Smart app. Scan the appropriate QR code for your device (iOS or Android) to download the application.
Download the Calex Smart app here: иОС Апп Сторе | Гоогле Плаи продавница
4.2 Почетни кораци подешавања
- Укључено: Connect the camera to a power outlet using the provided USB cable and power adapter. The camera's indicator light will begin to flash, indicating it is ready for pairing.
- Open Calex Smart App: Launch the Calex Smart app on your smartphone. If you are a new user, register an account. If you already have an account, log in.
- Додај уређај: Tap the "+" icon in the top right corner of the app to add a new device. Select "Security & Video Surveillance" and then "Smart Camera".
- Потврдите статус индикатора: Follow the in-app instructions. Confirm that the indicator light on your camera is flashing rapidly.
- Унесите детаље о Wi-Fi мрежи: Enter your 2.4 GHz Wi-Fi network name and password when prompted.
- Скенирање КР код: The app will generate a QR code. Hold your phone with the QR code approximately 15-20 cm (6-8 inches) in front of the camera lens. The camera will emit a sound when it successfully scans the QR code.
- веза: Tap "I heard a prompt" in the app. The camera will then attempt to connect to your Wi-Fi network. Once connected, the indicator light will turn solid blue.
- Назив уређаја: Once connected, you can name your camera (e.g., "Living Room Camera", "Nursery Camera").


Слика 4.2: Прamples of the Calex Smart app interface. The left image shows a live camera feed with options for screenshot, speaking, and recording. The right image shows a settings screen within the app.
5. Управљање камером
5.1 Уживо View
Open the Calex Smart app and select your camera from the device list to access the live video feed. You can view the feed in portrait or landscape mode.

Слика 5.1: Корисник viewing the live feed from the CALEX Smart Mini Indoor IP Camera on their smartphone.
5.2 Двосмерни аудио
Док је у живо view, tap the microphone icon to speak through the camera's speaker. Tap the speaker icon to listen to audio from the camera's microphone.
5.3 Снимање и репродукција
- Ручно снимање: Tap the "Record" button in the live view interface to start or stop manual recording. Recordings are saved to your phone's gallery.
- Снимак екрана: Tap the "Screenshot" button to capture a still image from the live feed.
- Снимање на MicroSD картицу: Insert a MicroSD card (up to 128GB, not included) into the camera's slot for continuous or event-triggered recording. Ensure the card is formatted within the app settings.
- Цлоуд Стораге: Subscribe to the cloud storage service via the app for secure, off-site storage of event recordings.
- Репродукција: Приступ снимљен фооtage from the "Playback" section within the camera's settings in the app.

Figure 5.2: The Calex Smart app interface displaying options for cloud storage and video playback. This allows users to review забележени догађаји.
5.4 Детекција покрета и упозорења
Configure motion detection sensitivity and alert settings in the app. You will receive push notifications on your smartphone when motion is detected.
5.5 Гласовна контрола (Alexa/Google Home)
To integrate your camera with Amazon Alexa or Google Home, follow the instructions in the respective voice assistant app to enable the "Calex Smart" skill/action. You can then use voice commands to view пренос података са камере на компатибилним паметним екранима.

Figure 5.3: A couple using voice commands with an Amazon Echo device, demonstrating the camera's compatibility with smart home ecosystems like Alexa and Google Home.
6. Одржавање
- Чишћење: Користите меку, суву крпу за чишћење објектива и кућишта камере. Не користите течна средства за чишћење или аеросоле.
- Ажурирања фирмвера: Periodically check the Calex Smart app for available firmware updates for your camera. Keeping the firmware updated ensures optimal performance and security.
- Ресетовање камере: If you experience connectivity issues or need to reconfigure the camera, locate the reset button on the back of the device (refer to Figure 3.2). Use a pin or a straightened paperclip to press and hold the reset button for approximately 5-10 seconds until the indicator light flashes rapidly. This will restore the camera to factory settings.
КСНУМКС. Решавање проблема
| Проблем | Могући узрок | Решење |
|---|---|---|
| Камера не успева да се повеже са Wi-Fi мрежом. | Incorrect Wi-Fi password; 5 GHz Wi-Fi network; camera too far from router; Wi-Fi signal interference. |
|
| No live video feed. | Camera offline; poor internet connection; app issue. |
|
| MicroSD card not recognized. | Card not inserted correctly; card corrupted; unsupported card size/format. |
|
| Двосмерни аудио не ради. | Microphone/speaker muted in app; low volume; app permissions. |
|
8. Спецификације
| Феатуре | Детаљ |
|---|---|
| Назив модела | Смарт Сецурити |
| Број модела | 5501000300 |
| Резолуција | 1080п Фулл ХД |
| Повезивање | Wi-Fi (само 2.4 GHz) |
| Повер Инпут | AC 220-240 Volts, 50/60 Hz |
| Излазна снага (адаптер) | ДЦ 5 волти |
| Потрошња енергије | 5 Ваттс |
| Димензије (Д к Ш к В) | КСНУМКС к КСНУМКС к КСНУМКС цм (КСНУМКС к КСНУМКС к КСНУМКС инча) |
| Тежина | 167 грама (0.37 фунте) |
| Материјал | Пластика |
| Боја | Бела |
| Опције складиштења | MicroSD (up to 128GB), Cloud Storage |
| Посебне карактеристике | Night Vision, Two-Way Audio, Motion Detection, Compatible with Alexa/Google Home |
| Усаге Енвиронмент | Индоор |
9. Гаранција и подршка
CALEX products are designed and manufactured to the highest quality standards. For warranty information and technical support, please refer to the official CALEX webсајт или директно контактирајте њихову корисничку службу.
Произвођач: ЦАЛЕКС
За даљу помоћ, посетите CALEX Official Webсајту.
10. Безбедносне информације
- Do not expose the camera to water or moisture. This product is designed for indoor use only.
- Не покушавајте сами да расклапате или поправљате камеру. Све сервисирање препустите квалификованом особљу.
- Use only the provided power adapter and cable to prevent damage or fire.
- Keep the camera away from direct sunlight, heat sources, and strong magnetic fields.
- Ensure the camera is placed on a stable surface to prevent it from falling.
Ask a question about this manual
Ask about setup, troubleshooting, compatibility, parts, safety, or missing instructions. Manuals+ will review the question and use this page’s manual context to help answer it.