1. Увод
This manual provides detailed instructions for the Movo VSM-5+MH100+ASM5 XLR Condenser Microphone Bundle. This bundle includes the VSM-5 XLR Condenser Microphone, MH-100 Studio Headphones, and ASM-5 Microphone Boom Arm with a pop filter and shock mount. It is designed for high-quality audio recording, podcasting, and live streaming on PC and Mac systems.

Слика 1.1: Готовоview of the Movo XLR Condenser Microphone Bundle, including the microphone, headphones, and boom arm.
Садржај пакета:
- VSM-5 XLR Condenser Microphone
- MH-100 Studio Headphones
- ASM-5 Microphone Boom Arm
- Поп филтер
- Схоцк Моунт
- XLR Audio Cable
- Headphone Cables (3.5mm and 6.35mm adapters)
- Carrying Case (for microphone)
- Гарантни лист
2. Упутства за подешавање
2.1 Boom Arm Assembly and Mounting
- Причврстите цлamp base of the ASM-5 boom arm to a sturdy desk or table edge. Tighten the clamp сигурно.
- Insert the boom arm into the hole on the clamp base. Adjust the arm's position and tension using the knobs on the arm.

Image 2.1: The ASM-5 boom arm securely clamped to a desk, ready for microphone attachment.
2.2 Microphone and Shock Mount Installation
- Зашрафите држач амортизера на крај крака с навојем.
- Carefully insert the VSM-5 microphone into the shock mount. Ensure it is seated firmly within the elastic bands to minimize vibration transfer.

Image 2.2: The VSM-5 microphone secured in its anti-vibration shock mount, attached to the boom arm.
2.3 Pop Filter Attachment
- Attach the pop filter's clamp to the boom arm or a stable part of your desk.
- Position the pop filter approximately 2-3 inches in front of the microphone's capsule.

Image 2.3: The VSM-5 microphone with the pop filter positioned to reduce plosive sounds.
2.4 Повезивање микрофона
- Connect one end of the provided XLR cable to the XLR port at the bottom of the VSM-5 microphone.
- Connect the other end of the XLR cable to your audio interface, mixer, or compatible XLR input device. Ensure your device provides 48V phantom power, as the VSM-5 is a condenser microphone.
2.5 Connecting the Headphones
- Plug the 3.5mm end of the headphone cable into the MH-100 Studio Headphones.
- Connect the other end (3.5mm or 6.35mm adapter) to your audio interface, computer, or monitoring device.
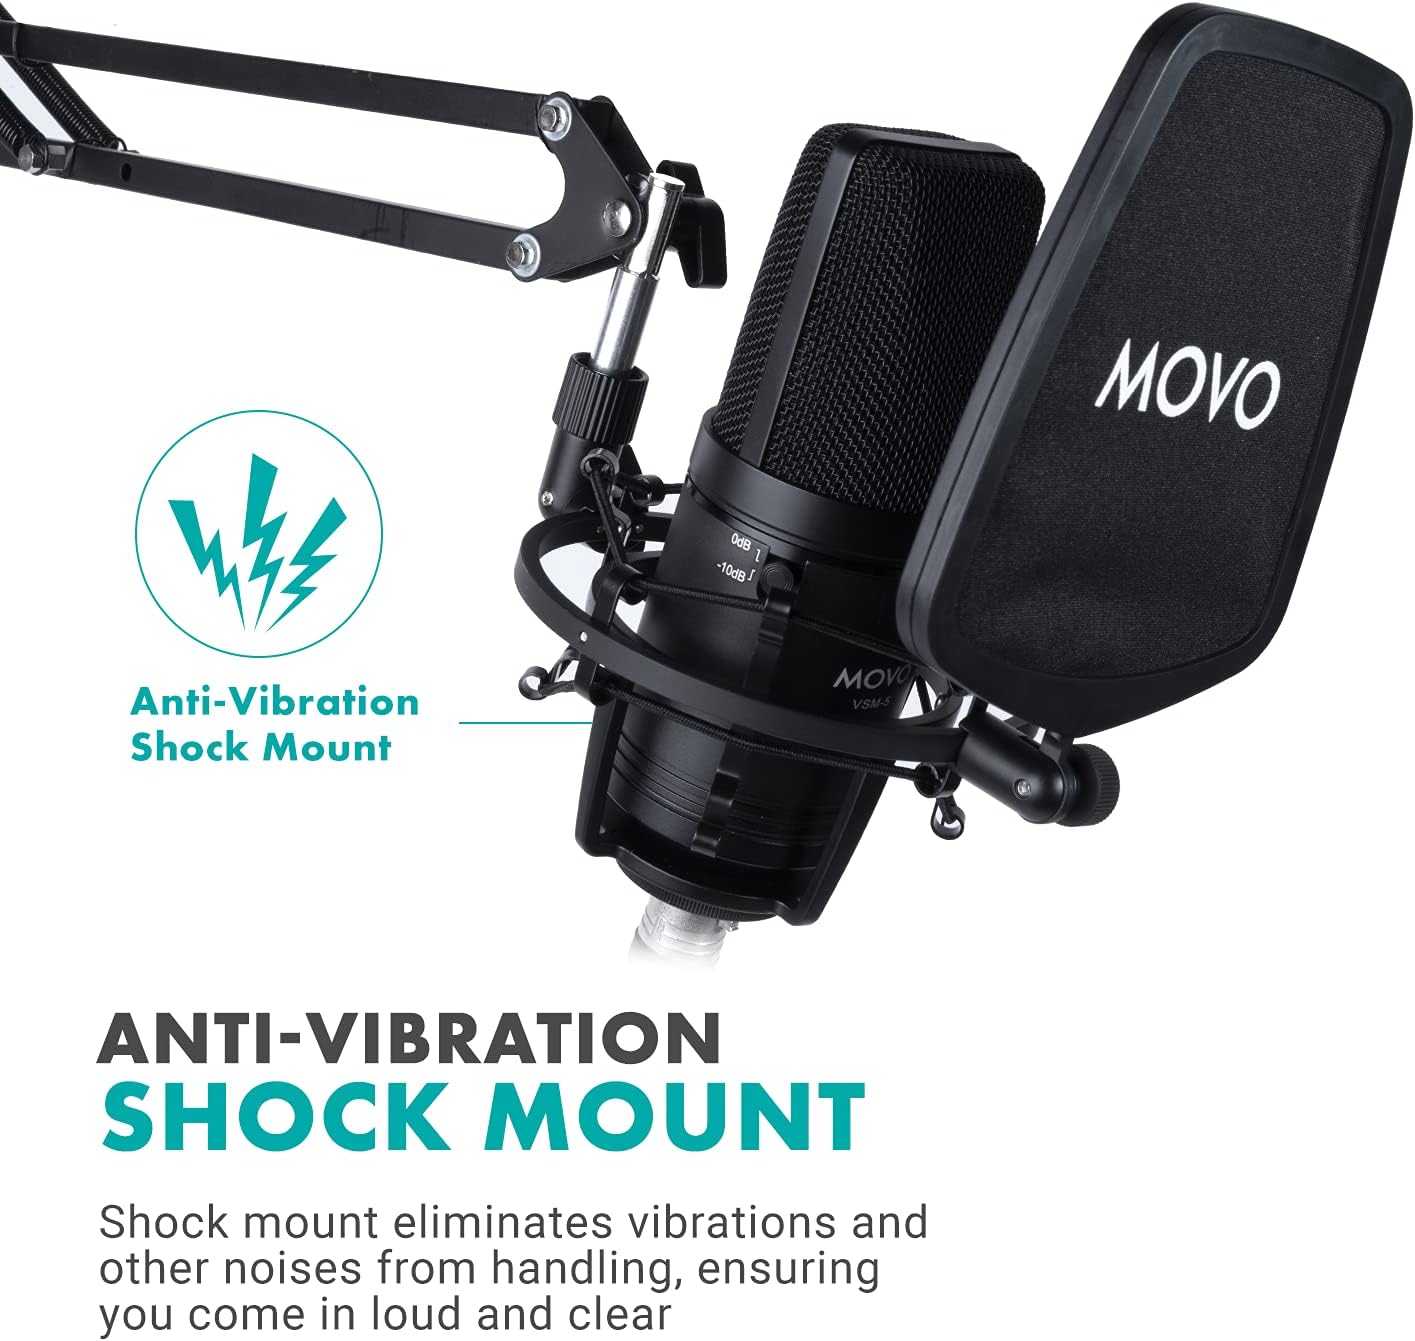
Image 2.4: The MH-100 Studio Headphones showing the 3.5mm and 6.35mm input ports.
3. Упутство за употребу
3.1 VSM-5 Microphone Controls
The VSM-5 microphone features controls to optimize your audio capture:
- Pad Switch (0dB / -10dB): Use the 0dB setting for standard recording. If recording loud sound sources (e.g., loud vocals, instruments), switch to -10dB to prevent distortion.
- Високопропусни филтер: Activate this filter to reduce low-frequency noise such as rumble, air conditioning hum, or proximity effect.

Image 3.1: Close-up of the VSM-5 microphone, highlighting the Pad Switch and High-Pass Filter controls.
3.2 MH-100 Studio Headphones
- Удобно пристајање: Adjust the headband and earcups for a comfortable fit. The earcups feature 30-degree rotation for optimal positioning.
- Share Port Technology: The MH-100 headphones include both 3.5mm and 6.35mm input ports. You can connect another pair of headphones to the unused port to share audio output.

Image 3.2: Illustration of the MH-100 headphones' share port technology, allowing two headphones to connect.
3.3 Optimizing Your Recording Environment
- Положај микрофона: Position the microphone directly in front of the sound source, typically 6-12 inches away, for optimal sound capture.
- Употреба поп филтера: Always use the pop filter to minimize plosive sounds (P's and B's) and protect the microphone capsule from moisture.
- Monitor with Headphones: Use the MH-100 headphones to monitor your audio in real-time, ensuring proper levels and sound quality.
4. Одржавање
Proper maintenance ensures the longevity and performance of your Movo microphone bundle.
- Чишћење: Use a soft, dry cloth to wipe down the microphone, headphones, and boom arm. Avoid using liquid cleaners or solvents. For the pop filter, a gentle wipe with a damp cloth (and ensuring it's dry before use) can remove dust.
- Складиштење: When not in use, store the microphone in its carrying case to protect it from dust and physical damage. Keep all components in a clean, dry environment.
- Нега каблова: Avoid sharp bends or kinks in the XLR and headphone cables. Store them neatly to prevent tangling and damage.
КСНУМКС. Решавање проблема
5.1 No Sound from Microphone
- Проверите везе: Ensure the XLR cable is securely connected to both the microphone and your audio interface/mixer.
- Фантомска снага: Verify that 48V phantom power is enabled on your audio interface or mixer. The VSM-5 requires phantom power to operate.
- Улазни ниво: Check the input gain level on your audio interface/mixer and your computer's sound settings. Increase if too low.
- Подешавања софтвера: Confirm that the correct microphone input device is selected in your recording software or operating system settings.
5.2 Изобличен звук
- Пад прекидач: If recording loud sources, ensure the -10dB pad switch on the VSM-5 microphone is engaged.
- Улазно појачање: Reduce the input gain level on your audio interface/mixer. Overdriving the input can cause distortion.
- Близина: Ensure the microphone is not too close to the sound source, which can cause clipping.
5.3 Headphones Not Working
- Кабловска веза: Ensure the headphone cable is fully inserted into both the MH-100 headphones and your audio device.
- Нивои јачине звука: Check the volume control on your audio device and computer.
- Избор излаза: Verify that the correct audio output device (your headphones) is selected in your computer's sound settings or recording software.
5.4 Excessive Background Noise
- Високопропусни филтер: Activate the high-pass filter on the VSM-5 microphone to reduce low-frequency rumble.
- Окружење: Record in a quiet environment. Minimize sources of ambient noise like fans, air conditioners, or street sounds.
- Кабловске сметње: Ensure XLR cables are not running parallel to power cables, which can introduce hum.
6. Спецификације
| Феатуре | Спецификација |
|---|---|
| Бранд | Мово |
| Број модела | VSM-5+MH100+ASM5 |
| Препоручена употреба | Voice Recording, Streaming |
| Технологија повезивања | КСЛР |
| Тип конектора | 3.5 мм Јацк, КСЛР |
| Посебна карактеристика | Stand (Boom Arm) |
| Компатибилни уређаји | Headphone, Personal Computer |
| Полар Паттерн | Једносмерни (кардиоидни) |
| Аудио Осетљивост | 10 децибела |
| Фактор форме микрофона | Велика дијафрагма |
| Извор напајања | Corded Electric (requires 48V Phantom Power) |
| Однос сигнала и шума | 10 дБ |
| Хардверска платформа | PC |
| Број канала | 1 |
| Аудибле Ноисе | 10 децибела |
| Материјал кућишта | Nylon (Pop Filter) |
| УПЦ | 817711023828 |
7. Гаранција и подршка
7.1 Информације о гаранцији
The Movo VSM-5+MH100+ASM5 XLR Condenser Microphone Bundle is covered by a 1-годишња гаранција from the date of purchase. This warranty covers manufacturing defects and ensures the product performs as intended under normal use. Please retain your proof of purchase for warranty claims.
7.2 Корисничка подршка
For technical assistance, troubleshooting, or warranty inquiries, please contact Movo's US-Based support team. Refer to the warranty card included in your package or visit the official Movo webсајт за најновије контакт информације.
Мово Webсајт: ввв.мовопхото.цом