
1. Увод
Хвала вам на куповиниasing the Cook's Essentials Electric Mandoline Slicer and Dicer. This appliance is designed to simplify food preparation by quickly and efficiently slicing, shredding, and dicing various fruits, vegetables, and cheeses. This manual provides essential information for the safe and effective operation, maintenance, and care of your new electric mandoline slicer.
2. Важна безбедносна упутства
Када користите електричне уређаје, увек треба поштовати основне мере предострожности како бисте смањили ризик од пожара, електричног удара и/или повреда особа, укључујући следеће:
- Пре употребе уређаја прочитајте сва упутства.
- Do not touch moving parts. Keep hands, hair, and clothing, as well as spatulas and other utensils, away from blades during operation to prevent injury and/or damage to the appliance.
- Always use the food pusher when feeding food into the chute. Never use fingers or other utensils.
- Искључите из утичнице када се не користи, пре стављања или скидања делова и пре чишћења.
- Не потапајте базу мотора у воду или друге течности.
- Avoid contact with sharp blades. Handle blades with extreme care.
- Немојте користити ниједан уређај са оштећеним каблом или утикачем, или након што је уређај покварен или је пао или оштећен на било који начин.
- Употреба додатака које произвођач није препоручио или продао може изазвати пожар, струјни удар или повреду.
- Не користите на отвореном.
- Не дозволите да кабл виси преко ивице стола или пулта, нити да додирује вруће површине.
- Овај уређај је само за употребу у домаћинству.
3. Списак делова
The Cook's Essentials Electric Mandoline Slicer and Dicer includes the following components:
- Electric Mandoline Slicer Base
- Food Chute with Food Pusher
- 2-Quart Storage Container
- Seven (7) Interchangeable Blades:
- Thick Slice Blade
- Extra-Thick Slice Blade
- Thin Slice Blade
- Shred/Grate Blade
- Cube Blade
- Јулиенне Бладе
- Fine-Julienne Blade
- Четка за чишћење
- Cube Insert Cleaner

Слика 3.1: Готовоview of the Cook's Essentials Electric Mandoline Slicer and Dicer with its various components, including the main unit, collection container, and several blades.
4. Подешавање
- Распакујте компоненте: Carefully remove all parts from the packaging. Retain packaging for future storage or transport.
- Очистите пре прве употребе: Wash all removable parts (blades, food pusher, chute, storage container) in warm, soapy water. Rinse thoroughly and dry completely. Wipe the motor base with a damp тканина.
- Позиционирајте базу: Place the electric mandoline slicer base on a clean, dry, and stable surface. Ensure the suction feet are firmly attached to the countertop for stability during operation.
- Attach Storage Container: Slide the 2-quart storage container into position beneath the slicing mechanism until it clicks securely into place. This container will collect the processed food.
- Insert Desired Blade: Select the appropriate blade for your desired cut. Carefully insert the blade into the designated slot on the top of the unit. Ensure it is seated firmly and correctly. Refer to Section 5 for blade selection.
- Attach Food Chute: Place the food chute onto the top of the unit, aligning it with the blade and securing it in place.
- Прикључите напајање: Plug the power cord into a standard electrical outlet. The appliance is now ready for use.
5. Упутство за употребу
5.1 Blade Selection and Insertion
The mandoline slicer comes with seven distinct blades, each designed for a specific type of cut. Always handle blades by their plastic edges to avoid injury.
- Thick Slice Blade: For thicker slices of vegetables like potatoes or onions.
- Extra-Thick Slice Blade: For very thick slices, suitable for hearty vegetables.
- Thin Slice Blade: For delicate, thin slices of cucumbers, carrots, or radishes.
- Shred/Grate Blade: For shredding cheese, cabbage, or grating carrots.
- Cube Blade: For uniform cubes of vegetables like potatoes, onions, or bell peppers.
- Julienne Blade: For thin, matchstick-like strips of vegetables.
- Fine-Julienne Blade: For very fine, delicate matchstick strips.
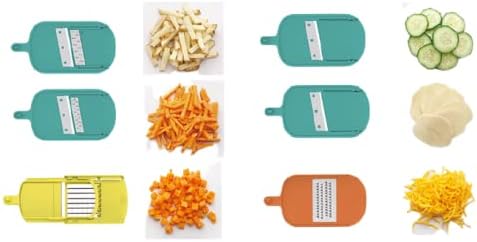
Image 5.1: Illustration of the different blade types and the resulting cuts, including slices, shreds, and cubes.
5.2 Припрема хране
- Wash and peel fruits or vegetables as required.
- Cut food items into pieces that fit comfortably into the feeding chute. Do not force large pieces into the chute.
- For best results, ensure food items are firm. Softer items may require chilling.
5.3 Slicing and Dicing Process
- With the desired blade and food chute in place, and the appliance plugged in, place the prepared food item into the feeding chute.
- Place the food pusher on top of the food item in the chute.
- Press and hold the power button located on the side of the unit. The powerful 150W motor will activate, moving the sliding carriage back and forth.
- Gently apply downward pressure on the food pusher to guide the food through the blade. Do not apply excessive force.
- Continue until all food is processed. The sliced or diced food will collect in the 2-quart storage container below.
- Отпустите дугме за напајање да бисте зауставили уређај.
- Unplug the appliance from the power outlet before removing the container or changing blades.
6. Чишћење и одржавање
Proper cleaning and maintenance will ensure the longevity and optimal performance of your electric mandoline slicer.
- Искључите: Увек се уверите да је уређај искључен из електричне утичнице пре чишћења.
- раставити: Carefully remove the food pusher, food chute, blade, and storage container from the motor base.
- Очистите уклоњиве делове: Wash the food pusher, food chute, blades, and storage container in warm, soapy water. Use the provided cleaning brush to remove any food residue from the blades and crevices. For the cube blade, use the cube insert cleaner to dislodge trapped food. Rinse thoroughly and dry immediately to prevent rust on metal blades.
- Чиста база мотора: Обришите спољашњост основе мотора огласомamp крпом. Никада не урањајте базу мотора у воду или било коју другу течност.
- Складиштење: Once all parts are clean and dry, reassemble the unit or store the blades safely in their protective covers. Store the appliance in a dry, safe place away from children.
КСНУМКС. Решавање проблема
| Проблем | Могући узрок | Решење |
|---|---|---|
| Уређај се не укључује. | Није укључено у струју; проблем са утичницом; оштећен кабл/утикач. | Ensure appliance is securely plugged in. Check power outlet with another device. Inspect cord and plug for damage; do not use if damaged. |
| Food is not slicing/dicing evenly. | Incorrect blade selection; food not properly prepared; dull blade. | Ensure the correct blade is used for the desired cut. Cut food to fit chute and apply even pressure. Blades are sharp, but if performance degrades, contact customer support. |
| Food gets stuck in the chute or blade. | Overfilling chute; food too soft; residue buildup. | Do not overfill the chute. Chill softer foods before processing. Clean blades and chute thoroughly after each use. |
| Уређај прекомерно вибрира. | Unstable surface; suction feet not engaged. | Ensure the appliance is on a flat, stable surface. Press down on the unit to engage the suction feet firmly to the countertop. |
8. Спецификације
- Број модела: К-45550
- Снага мотора: 150В
- Dimensions (Mandoline): Approximately 13" (H) x 14.5" (L) x 6.25" (W)
- Тежина: Approximately 5 lbs, 4 oz
- Дужина кабла: 41 инча
- Storage Container Capacity: 2 кварти
- Материјал сечива: Метал
- Режим рада: Electric, Push-button
9. Гаранција и подршка
For warranty information or product support, please refer to the documentation included with your purchase or contact Cook's Essentials customer service directly. Keep your purchase receipt as proof of purchase for any warranty claims.