
1. Производ је готовview
Thank you for choosing the Arlux Lighting Onyx R2 Round Recessed LED Spot Light. This product is designed for indoor use, providing efficient and modern illumination. This manual provides essential information for the safe installation, operation, and maintenance of your new LED spot light.
Безбедносне информације
- Пажљиво прочитајте сва упутства пре инсталације и употребе.
- Инсталацију мора обавити квалификовани електричар у складу са локалним електричним прописима и прописима.
- Ensure the power supply is disconnected at the main circuit breaker before installation, maintenance, or cleaning.
- Не модификујте производ ни на који начин. Неовлашћене модификације могу поништити гаранцију и представљати безбедносни ризик.
- Овај производ је намењен само за употребу у затвореном простору. Не излагати влази или екстремним температурама.
- Do not look directly into the LED light source when it is illuminated, as this may cause eye strain or damage.
- Држите материјале за паковање ван домашаја деце.
2. Садржај пакета
Пре него што наставите са инсталацијом, проверите да ли су све компоненте присутне и неоштећене.
- 1 x Arlux Lighting Onyx R2 Round Recessed LED Spot Light
- 1 x LED Driver (Power Supply)
- Монтажни хардвер

Image 2.1: The Arlux Lighting Onyx R2 Recessed LED Spot Light shown with its separate LED driver (power supply) and connecting cable.
3. Спецификације
| Бранд | Arlux Lighting |
| Модел | Onyx R2 |
| Тип | Recessed LED Spot Light |
| Облик | Роунд |
| Потрошња енергије | 18 Ваттс |
| Луминоус Флук | 1550 лумена |
| Температура боје | 4000 Келвина (неутрално бела) |
| Материјал | Алуминијум |
| Боја | Бела |
| Тежина артикла | 390 грама |
| Врста инсталације | Плафонски носач (уградни) |
| Извор напајања | Цордед Елецтриц |
| Специфичне употребе | Ceiling illumination for indoor spaces |
4. Подешавање и инсталација
4.1 Контролна листа пре инсталације
- Потребни алати: Drill, hole saw (appropriate diameter for recess), wire strippers, screwdriver, voltagе тестер.
- Напајање: Ensure the electrical circuit is compatible with the spot light's power requirements (18W).
- Ceiling Space: Verify sufficient clearance above the ceiling for the fixture and driver.
- Безбедност на првом месту: Always turn off the main power supply at the circuit breaker before starting any electrical work.
4.2 Кораци инсталације
- Припремите плафон: Using an appropriate hole saw, cut a circular opening in the ceiling at the desired installation location. Refer to the product specifications for the exact cutout diameter (typically around Ø200-210mm for a Ø225mm fixture).
- Connect the Driver: Connect the AC input wires from your household electrical supply to the input terminals of the LED driver. Ensure correct polarity (Live, Neutral, Earth) as indicated on the driver. Secure connections firmly.
- Connect the Spot Light: Plug the DC output cable from the LED driver into the corresponding input port on the back of the Onyx R2 spot light. This connection is typically a simple plug-and-play connector.
- Insert the Spot Light: Gently push the spring clips on the sides of the spot light upwards and insert the fixture into the prepared ceiling opening. The spring clips will hold the light securely in place.
- Коначна провера: Ensure the spot light is flush with the ceiling surface and securely mounted.
- Врати снагу: Turn the main power supply back on at the circuit breaker.
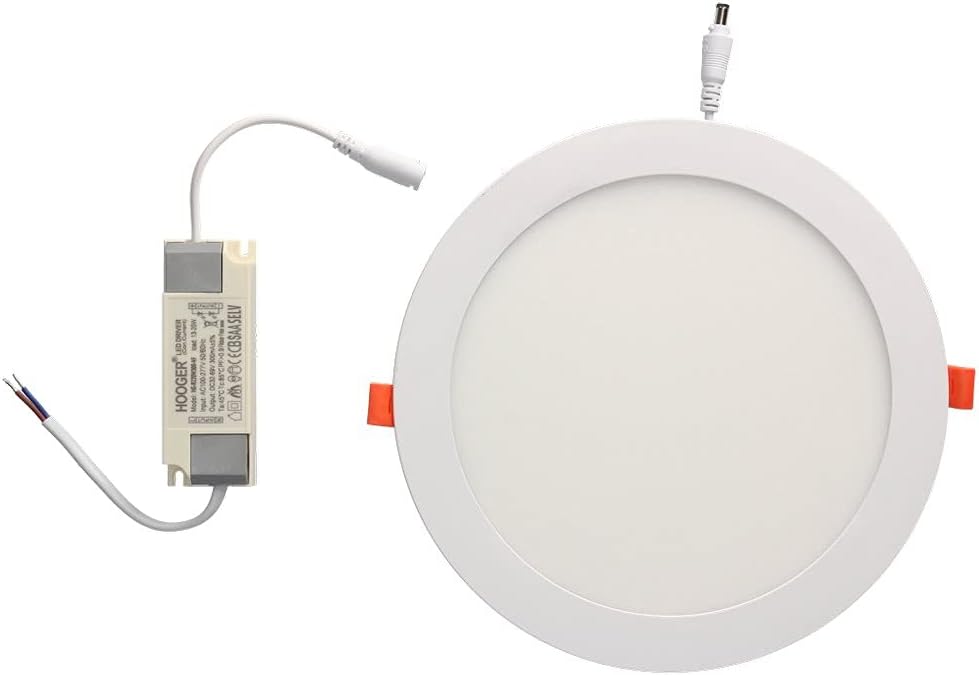
Image 4.1: The Arlux Lighting Onyx R2 Recessed LED Spot Light shown installed flush within a ceiling, providing ambient lighting.
5. Упутство за употребу
The Arlux Lighting Onyx R2 Recessed LED Spot Light operates immediately upon receiving power. It is typically controlled by a standard wall switch connected to the electrical circuit.
- Укључивање/искључивање: Користите зидни прекидач повезан са расветним телом да бисте укључили или искључили светло.
- Затамњење: This model is not specified as dimmable. Attempting to use it with a non-compatible dimmer switch may cause damage or malfunction.
6. Одржавање
The Arlux Lighting Onyx R2 LED Spot Light requires minimal maintenance.
- Чишћење: Ensure the power is off before cleaning. Wipe the surface of the light with a soft, dry, or slightly damp крпа. Не користите абразивна средства за чишћење, раствараче или јаке хемикалије, јер могу оштетити завршну обраду или електричне компоненте.
- Трајност ЛЕД диоде: LED lights have a long lifespan and do not require bulb replacement. If the light stops functioning, refer to the troubleshooting section.
КСНУМКС. Решавање проблема
If you encounter issues with your Arlux Lighting Onyx R2 LED Spot Light, please consult the following table before contacting support.
| Проблем | Могући узрок | Решење |
|---|---|---|
| Светло се не пали | Нема напајања Слаба веза ожичења Неисправан ЛЕД драјвер Faulty light fixture | Проверите осигурач и зидни прекидач. Проверите да ли су сви прикључци ожичења безбедни (прво искључите напајање). Test the driver if possible, or replace it. If driver is functional, the fixture may be faulty; contact support. |
| Светло трепери | Нестабилно напајање Лабаво ожичење Incompatible dimmer switch (if used) | Ensure stable power. Check for loose connections. Remove dimmer switch if not compatible, or replace with a compatible LED dimmer. |
| Светло је слабо | Неисправно напајање Волtagе дроп | Ensure the correct LED driver is used. Consult an electrician to check for voltage issues in your electrical system. |
8. Гаранција и подршка
Information regarding specific warranty terms for the Arlux Lighting Onyx R2 Round Recessed LED Spot Light is not available in the provided product details. For warranty inquiries or technical support, please contact your retailer or the manufacturer directly.
Spare parts availability information is also not available. Please contact your point of purchase for assistance with replacement components.