1. Увод
Welcome to the user manual for your new Cheerlux C50 Projector. This guide provides essential information on setting up, operating, maintaining, and troubleshooting your device. Please read this manual thoroughly before using the projector to ensure optimal performance and safety. Keep this manual for future reference.
2. Безбедносна упутства
To prevent fire, electric shock, or injury, please observe the following safety precautions:
- Do not block the ventilation openings. Ensure adequate space around the projector for proper airflow.
- Не излажите пројектор киши или влази. Избегавајте стављање предмета напуњених течношћу, као што су вазе, на пројектор.
- Не отварајте пројектор casinг. Сва сервисирања препустите квалификованом сервисном особљу.
- Користите само адаптер за напајање који се испоручује са пројектором.
- Избегавајте да гледате директно у сочиво пројектора када је лamp је укључено, јер јако светло може оштетити ваше очи.
- Поставите пројектор на стабилну, равну површину како бисте спречили његов пад.
- Unplug the projector from the power outlet during lightning storms or when unused for long periods.
3. Садржај пакета
Молимо вас да проверите да ли су сви предмети присутни и у добром стању:
- Цхеерлук Ц50 пројектор
- Ремоте Цонтрол
- Повер Цабле
- ХДМИ кабл
- АВ кабл
- Упутство за употребу
4. Производ је готовview
Familiarize yourself with the components and ports of your Cheerlux C50 Projector.

This image displays the Cheerlux C50 Projector from a front-top angle, highlighting its lens, focus ring, and control panel buttons on the top surface. The projector features a white and grey casing.
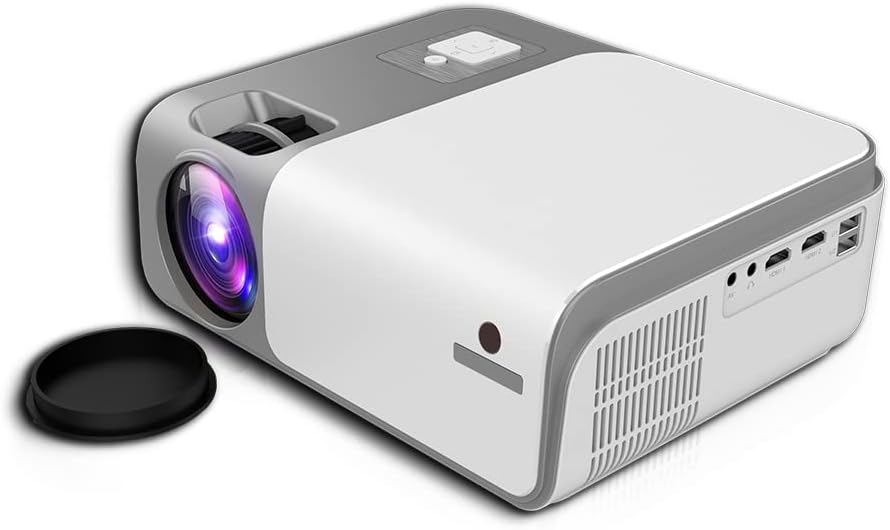
This image shows the rear and side of the Cheerlux C50 Projector, revealing various input/output ports such as HDMI, USB, and AV, along with ventilation grilles. A lens cap is visible next to the lens.
4.1. Предњи панел
- Пројекционо сочиво: Емитује слику.
- Прстен за фокусирање: Подешава оштрину слике.
4.2. Горња плоча
- Контролна дугмад: Power, Menu, Source, Navigation (Up/Down/Left/Right), OK.
4.3. Задња плоча
- Улазна снага: Повезује се са каблом за напајање.
- HDMI портови (x2): Connect to HDMI-enabled devices (laptops, gaming consoles, Blu-ray players).
- USB портови (x2): Повежите УСБ дискове за репродукцију медија.
- AV порт: Connect to older devices using an AV cable.
- Аудио излаз (3.5 мм): Повежите екстерне звучнике или слушалице.
- ИЦ пријемник: За сигнале даљинског управљања.
5. Подешавање
5.1. Прикључак за напајање
- Прикључите кабл за напајање на улазни порт за напајање пројектора.
- Укључите други крај кабла за напајање у зидну утичницу.
- Индикаторска лампица напајања на пројектору ће се упалити.
КСНУМКС. Постављање
Position the projector on a stable, flat surface. The ideal projection distance for the Cheerlux C50 is between 1.5 to 6 meters, depending on the desired screen size. Ensure the projector is centered with your projection screen or wall.
5.3. Фокус и корекција Кеистоне
- Подешавање фокуса: Turn the focus ring on the front of the projector until the projected image appears sharp and clear.
- Keystone Correction (4P): If the projected image appears trapezoidal (wider at the top or bottom), use the 4P keystone correction function. This can typically be accessed via the projector's menu or dedicated buttons on the remote control. Adjust each of the four corners independently to achieve a perfectly rectangular image.
6. Оперативни
6.1. Укључивање/искључивање
- Укључено: Press the power button on the projector or the remote control. The projector will start up, and the lamp ће осветлити.
- Искључивање: Press the power button again. Confirm shutdown if prompted. Allow the projector to cool down before unplugging it.
6.2. Улазни извори
Connect your desired device to the projector using the appropriate cable (HDMI, AV, USB). Then, press the 'Source' button on the projector or remote control to select the corresponding input source.
- ДВИ: For high-definition video and audio from laptops, game consoles, etc.
- УСБ: За репродукцију медија files (photos, videos, music) directly from a USB flash drive.
- АВ: For standard definition video and audio from older devices like DVD players.
6.3. Wireless Connectivity (WiFi & Bluetooth)
The Cheerlux C50 Projector features built-in WiFi and Bluetooth for enhanced connectivity.
- ВиФи конекција: Navigate to the 'Settings' menu, select 'Network' or 'WiFi Settings'. Choose your desired WiFi network from the list and enter the password.
- Блуетоотх веза: In the 'Settings' menu, select 'Bluetooth'. Turn on Bluetooth and pair with your Bluetooth-enabled speakers or headphones.
6.4. Пресликавање екрана
The projector supports wireless screen mirroring from compatible smartphones and tablets.

This image illustrates the Cheerlux C50 Projector wirelessly connected to a smartphone. The phone's screen, displaying a movie scene, is being mirrored to the projector, indicated by a Wi-Fi signal icon between the devices.
- Ensure both your projector and mobile device are connected to the same WiFi network.
- On the projector, select the 'Screen Mirroring' or 'Wireless Display' option from the main menu.
- On your mobile device, activate its screen mirroring feature (e.g., 'Smart View' for Samsung, 'Screen Mirroring' for Android, 'AirPlay' for iOS).
- Select the projector's name from the list of available devices on your phone.
- The mobile device's screen content will now be projected.
6.5. Мену Навигатион
Use the navigation buttons (Up, Down, Left, Right) and 'OK' button on the projector or remote control to browse through the on-screen menu. The 'Menu' button typically opens the main settings, and the 'Return' or 'Exit' button closes menus.
7. Одржавање
7.1. Чишћење
- Објектив: Користите меку крпу без влакана, посебно дизајнирану за оптичка сочива. Не користите абразивна средства за чишћење.
- Casing: Обришите спољашњост пројектора меком, сувом крпом. За тврдокорну прљавштину, благо дampу крпу са водом.
- Ventilation Vents: Periodically clean the vents with a soft brush or compressed air to prevent dust buildup, which can affect cooling.
7.2. Складиштење
When not in use for extended periods, store the projector in a cool, dry place, away from direct sunlight and extreme temperatures. Cover the lens with its cap to protect it from dust and scratches.
КСНУМКС. Решавање проблема
Ако наиђете на проблеме са пројектором, погледајте следеће уобичајене проблеме и решења:
| Проблем | Могући узрок | Решење |
|---|---|---|
| Нема пројектоване слике | Power cable loose, incorrect input source, device not connected. | Check power connection, select correct input source, ensure source device is on and connected. |
| Слика је мутна | Focus not adjusted, projector too close/far. | Adjust the focus ring. Reposition the projector within the recommended distance. |
| Слика је трапезоидног облика | Пројектор није нормалан у односу на платно. | Use the 4P keystone correction function in the menu. |
| Нема звука | Volume too low, external speakers not connected, source device muted. | Increase projector volume, check external speaker connection, unmute source device. |
| Даљински управљач не ради | Batteries dead, obstruction, not pointing at IR receiver. | Replace batteries, remove obstructions, point remote directly at the projector's IR receiver. |
9. Спецификације
Technical specifications for the Cheerlux C50 Projector:
| Феатуре | Спецификација |
|---|---|
| Бранд Наме | Generic (Cheerlux C50) |
| Технологија повезивања | Ви-Фи, Блуетоотх |
| Нативе Ресолутион | 1920 к 1080 |
| Осветљеност | 4000 лумена |
| Форм Фацтор | Портабле |
| Тип монтаже | Таблетоп Моунт |
| Тип контролера | Ремоте Цонтрол |
| Максимална удаљеност бацања | 6 метара |
| Ватtage | 3 вати |
| Посебне карактеристике | Built In Wi Fi, Portable, Wireless, 4P Keystone Correction |
10. Гаранција и подршка
The Cheerlux C50 Projector comes with a standard manufacturer's warranty. Please refer to the warranty card included in your package for specific terms and conditions, including warranty period and coverage details. For technical support, service, or further inquiries, please contact your retailer or the manufacturer's customer service department.
Сачувајте рачун као доказ о куповини за потребе гаранције.