
Халоview БТ7
Халоview Упутство за употребу BT7 бежичног система за камеру за вожњу уназад у камперу
1. Увод
This manual provides comprehensive instructions for the Haloview BT7 Wireless RV Backup Camera System. This system is designed to enhance safety and convenience for various vehicles, including RVs, travel trailers, trucks, campers, vans, and pickups. It features a 7-inch monitor, a 1080P Full HD camera with DVR recording capabilities, and full-color night vision.

Figure 1.1: Haloview BT7 Wireless RV Backup Camera System components.
2. Производ је готовview
2.1 Садржај пакета
Тхе Халоview BT7 system typically includes the following items:
- BT7 Monitor (7-inch LCD digital monitor)
- BTC128 Camera (Wireless FHD 1080P camera)
- Заптивка
- Center mount bracket
- Camera conversion cable
- BMW connector adaptor
- Паиринг Цабле
- Cigarette Lighter power adapter
- Sun Shield for monitor

Figure 2.1: Included components of the Haloview BT7 system.
2.2 Кључне карактеристике
- 7-inch LCD Digital Monitor: High-resolution display with built-in DVR for real-time recording and video playback.
- Снимање видеа у 1080P FHD резолуцији: Seamless recording at 30fps.
- Виде Волtagе Улаз: Supports 10-32V power supply.
- Подршка за више камера: Capable of supporting up to 4 wireless cameras.
- Широко Viewугао угла: 120° camera lens for broad coverage.
- Проширени бежични домет: Line of sight range up to 984 feet (300 meters).
- Мала латенција: New-generation wireless technology minimizes lag and interference.
- Компатибилност возила: Suitable for vehicles up to 65ft, including RVs, travel trailers, trucks, campers, vans, pickups, tractors, fifth wheels, and motorhomes.
- Формати снимања: Supports 4-channel composite and single-channel recording in AVI format.
- Full-Color Dim-Light Night Vision: Powerful image sensors provide full-color images in low-light conditions.
- Night Vision Fill Lights: Can be activated/deactivated remotely via the monitor.
- IP69K Waterproof Camera: Durable and resistant to high-pressure, high-temperature water jets.
- Ultra-High Brightness Display: Ensures clear visibility even in bright daylight.
- 6-Layer Optical Lenses: High-definition optical lenses for superior image clarity.

Figure 2.2: The camera features an IP69K waterproof rating for durability.

Figure 2.3: The camera provides full-color images in dim-light conditions.

Figure 2.4: The camera utilizes 6-layer ultra high definition optical lenses.
3. Подешавање
3.1 Инсталација камере
- Локација монтаже: Choose a central location at the rear of your vehicle for optimal viewing. For Furrion pre-wired RVs, utilize the existing wiring and mounting points with the provided adapter cable.
- Сигурна монтажа: Use the gasket and mounting bracket to securely attach the camera. Ensure the camera is angled correctly for your desired field of view.
- Прикључак за напајање: Connect the camera to a 10-32V power source. For pre-wired systems, connect the camera conversion cable to the existing Furrion cable connector. Ensure proper polarity.
3.2 Инсталација монитора
- Монтажа: Attach the monitor to a suitable location in your vehicle's cabin using the center mount bracket. Ensure it does not obstruct your view током вожње.
- Прикључак за напајање: Plug the cigarette lighter power adapter into your vehicle's 12V accessory outlet and connect it to the monitor.
3.3 Упаривање система
The camera and monitor are typically pre-paired from the factory. If pairing is lost or you are adding additional cameras, follow these steps:
- Power on the monitor and camera.
- Access the monitor's menu and navigate to the pairing option.
- Follow the on-screen prompts to initiate pairing. You may need to use the provided pairing cable or press a button on the camera (refer to specific camera instructions if available).
- Once paired, the camera's video feed will appear on the monitor.

Figure 3.1: Wireless transmission range and compatible vehicle types.
4. Упутство за употребу
4.1 Контроле монитора
The monitor features several buttons for navigation and control:
- 'S' Button: Selects channels or confirms selections.
- Дугмад „+“ / „-“: Adjusts settings, navigates menus, or zooms.
- Дугме „М“: Улази у главни мени.
- Дугме за напајање: Укључује/искључује монитор.
4.2 Video Recording (DVR)
The monitor has a built-in DVR function. Insert a Micro-SD/TF card (not included) into the designated slot on the monitor to enable recording.
- Резолуција снимања: Records in 1080P at 30fps.
- Режими снимања: Supports 4-channel composite and single-channel recording.
- Репродукција: Access recorded videos through the monitor's menu.

Figure 4.1: Monitor with Micro-SD/TF card slot for DVR functionality.
4.3 Ноћни вид
The camera is equipped with Full-Color Dim-Light Night Vision, providing clear, colored images even in low-light conditions. Integrated fill lights can be remotely controlled via the monitor to enhance visibility in extremely dark environments.
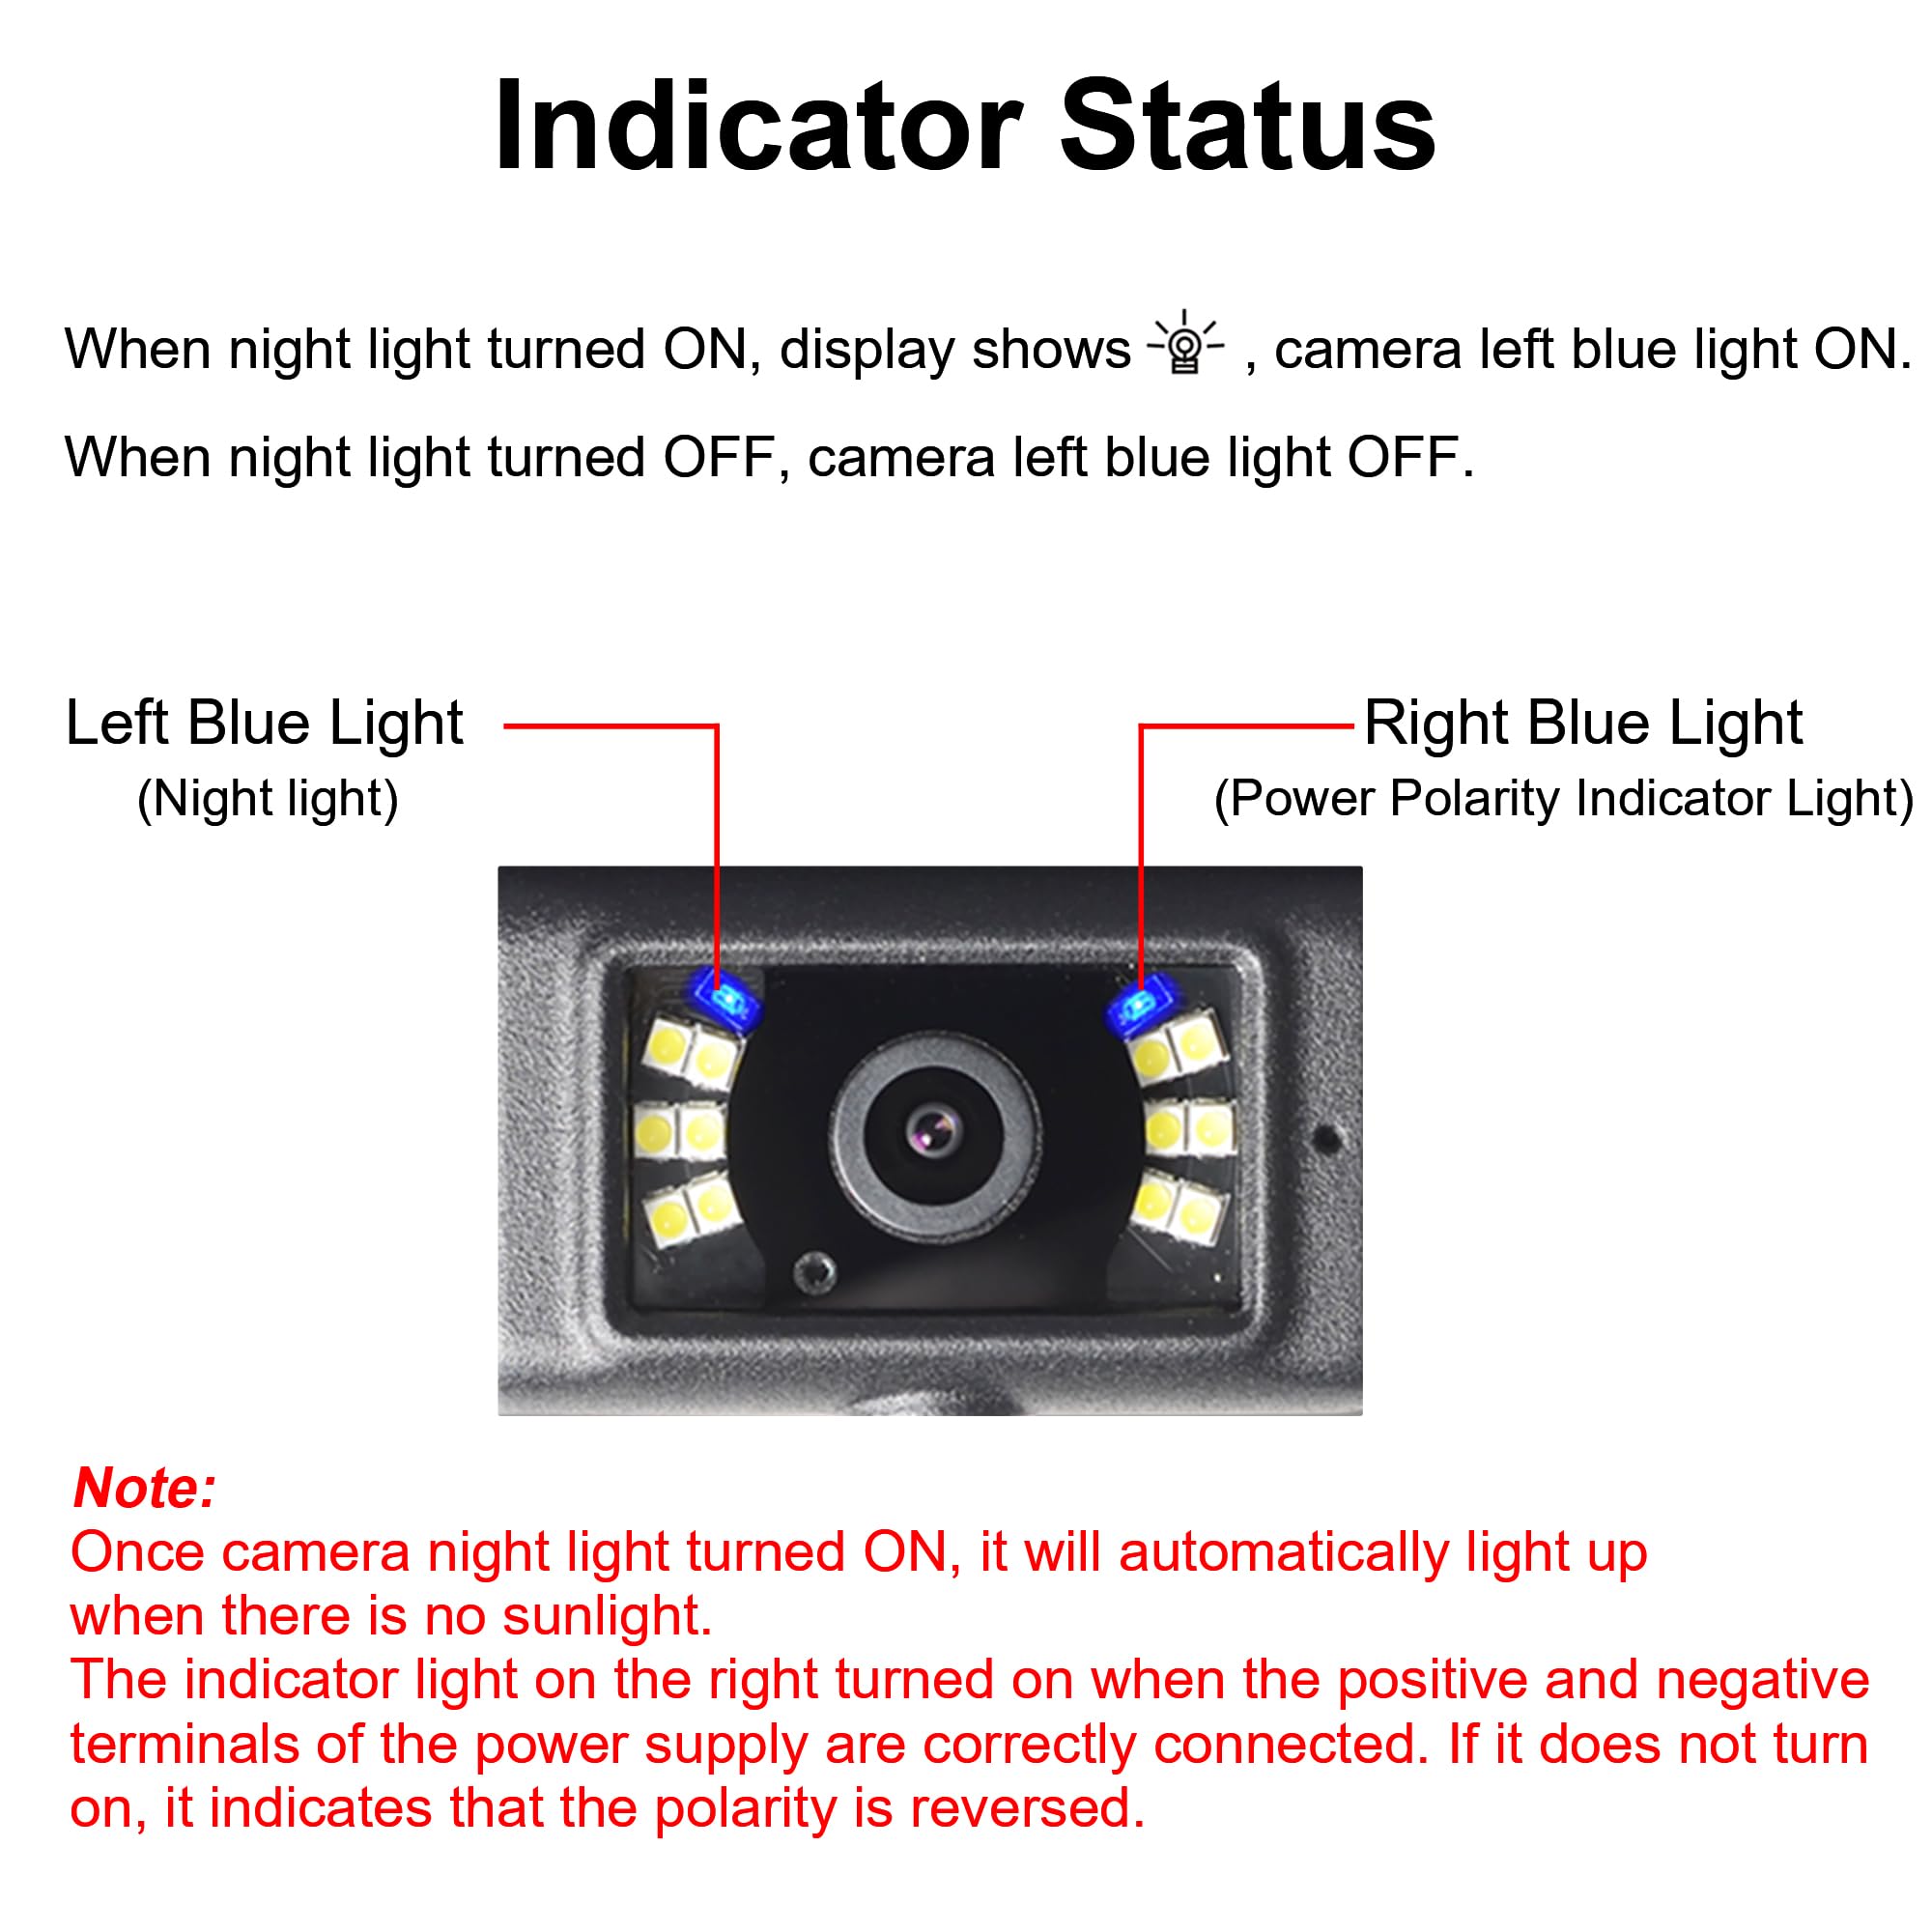
Figure 4.2: Camera indicator status for night light and power polarity.
4.4 Подешавања екрана
- Преокрет слике: Adjust the image orientation (horizontal/vertical flip) through the monitor settings to match your mounting preference.
- Паркинг линије: Enable and customize parking assist lines for easier maneuvering.
- Сплит режим: If multiple cameras are connected, the monitor supports various split-screen views to display feeds simultaneously.

Figure 4.3: Monitor image flip options.

Figure 4.4: Adjustable parking assist lines on the monitor.

Figure 4.5: Split mode options for multi-camera viewинг.
5. Одржавање
- Чишћење: Редовно чистите сочиво камере и екран монитора меком,amp тканина. Избегавајте абразивна средства за чишћење.
- Инспекција каблова: Periodically check all cables and connections for wear, damage, or loose fittings.
- Ажурирања фирмвера: Check the Haloview website for any available firmware updates for optimal performance.
- Складиштење: When not in use for extended periods, store the system in a cool, dry place.
КСНУМКС. Решавање проблема
| Проблем | Могући узрок | Решење |
|---|---|---|
| No signal on monitor | Camera not powered, camera not paired, signal interference, damaged cable. | Check power connections to camera and monitor. Re-pair the camera (refer to Section 3.3). Ensure no large metallic objects are blocking the signal path. Inspect cables for damage. |
| Лош квалитет слике | Dirty lens, low light, signal interference. | Clean the camera lens. Ensure adequate lighting or activate night vision fill lights. Reduce sources of wireless interference. |
| Монитор се не укључује | Нема струје, неисправан адаптер за напајање. | Check the cigarette lighter connection. Ensure the vehicle's accessory outlet is active. Try a different power source if available. |
| Снимање не ради | No Micro-SD/TF card, card full, card error. | Insert a compatible Micro-SD/TF card. Format the card via the monitor menu. Replace the card if it is faulty. |
7. Спецификације
| Феатуре | Детаљ |
|---|---|
| Димензије производа | 11.02 к 9.06 к 4.33 инча |
| Тежина артикла | 3.41 фунти |
| Дисплаи Тецхнологи | ЛЦД |
| Друге функције екрана | Бежични |
| Шта је у кутији | A camera and a monitor (and accessories listed in Section 2.1) |
| Произвођач | Халоview |
| Величина екрана | 7 инча |
| Компатибилни уређаји | Халоview система |
| Врста инсталације | Сурфаце Моунт |
| Волtage | 10-32 волти |
| Технологија оптичког сензора | ЦМОС |
| Ленс Типе | Широко viewугао уласка |
| Реал Англе оф View | 120 степени |
| Тип конектора | DC |
8. Гаранција и подршка
For warranty information, technical support, or service inquiries, please contact Haloview customer support directly. Refer to the official Haloview webвеб-сајт или вашу документацију о куповини за најновије контакт податке и услове гаранције.
Халоview Званична продавница: Visit the Haloview Продавница на Амазону
Повезани документи - БТ7
 |
Халоview Byte Tango 7 TPMS BT7 User Manual Упутство за употребу за Haloview Byte Tango 7 TPMS (BT7 TPMS), a 2.4G digital 1080P 7-inch touch screen tire pressure monitoring and backup camera system. Learn about installation, operation, features, and troubleshooting. |
 |
Халоview Бајт Танго систем BT7 Touch / BT6 Touch Упутство за употребу Упутство за употребу за Haloview Бајт Танго систем, који покрива моделе BT7 Touch и BT6 Touch. Детаљи о карактеристикама, спецификацијама, инсталацији, раду и решавању проблема за овај 2.4G дигитални 1080P систем са екраном осетљивим на додир. |
 |
Халоview Бајт Танго систем BT7 Солар / BT6 Солар Упутство за употребу Свеобухватно корисничко упутство за Haloview Byte Tango System, featuring a 2.4G Digital 1080P Touch Screen System with BT7 Solar and BT6 Solar models. Includes installation, operation, features, specifications, and troubleshooting. |
 |
Халоview M7108 7" LCD бежични монитор, упутство за употребу Упутство за употребу за Haloview М7108 2.4Г дигитални 720П ЛЦД бежични монитор, који покрива карактеристике, спецификације, рад, инсталацију, функције менија и решавање проблема. |
 |
Халоview M5111 2.4G дигитални 720P 5" LCD бежични монитор - упутство за употребу Упутство за употребу за Haloview M5111, 2.4G дигитални 720P 5-инчни бежични систем за монитор. Укључује инсталацију, рад, карактеристике, спецификације и решавање проблема. |
 |
Халоview Упутство за употребу система камере за вожњу уназад BTC128/BTC129 Упутство за употребу за Haloview Системи камера за вожњу уназад BTC128 и BTC129, који покривају производ прекоview, инсталација, ожичење и спецификације за камп-приколице и возила. |
Ask a question about this manual
Ask about setup, troubleshooting, compatibility, parts, safety, or missing instructions. Manuals+ will review the question and use this page’s manual context to help answer it.