SCULPFUN S30 Pro
Упутство за употребу ласерског гравера SCULPFUN S30 Pro
Model: S30 Pro | Brand: SCULPFUN
1. Безбедносне информације
УПОЗОРЕЊЕ: Laser engravers produce a high-power laser beam that can cause severe injury, blindness, or fire if not used properly. Always follow these safety guidelines:
- Заштита очију: Always wear certified laser safety goggles (OD 6+) when operating the machine. Never look directly at the laser beam.
- Опасност од пожара: Do not leave the machine running unattended. Keep a fire extinguisher nearby. Ensure proper ventilation to prevent smoke and fumes accumulation.
- Компатибилност материјала: Only engrave or cut materials approved for laser processing. Avoid highly reflective, flammable, or PVC-containing materials.
- Радна област: Operate in a well-ventilated area. Keep the work area clear of flammable objects and debris.
- Деца и кућни љубимци: Keep children and pets away from the laser engraver during operation.
- Хитно заустављање: Упознајте се са положајем и радом дугмета за хитно заустављање.
- Напајање: Use only the provided power adapter. Ensure the power supply is stable and grounded.
2. Производ је готовview
The SCULPFUN S30 Pro is a 10W optical power laser engraver designed for precision engraving and cutting. It features an automatic air assist system, a replaceable protective lens, and an expandable engraving area, making it suitable for various creative and industrial applications.
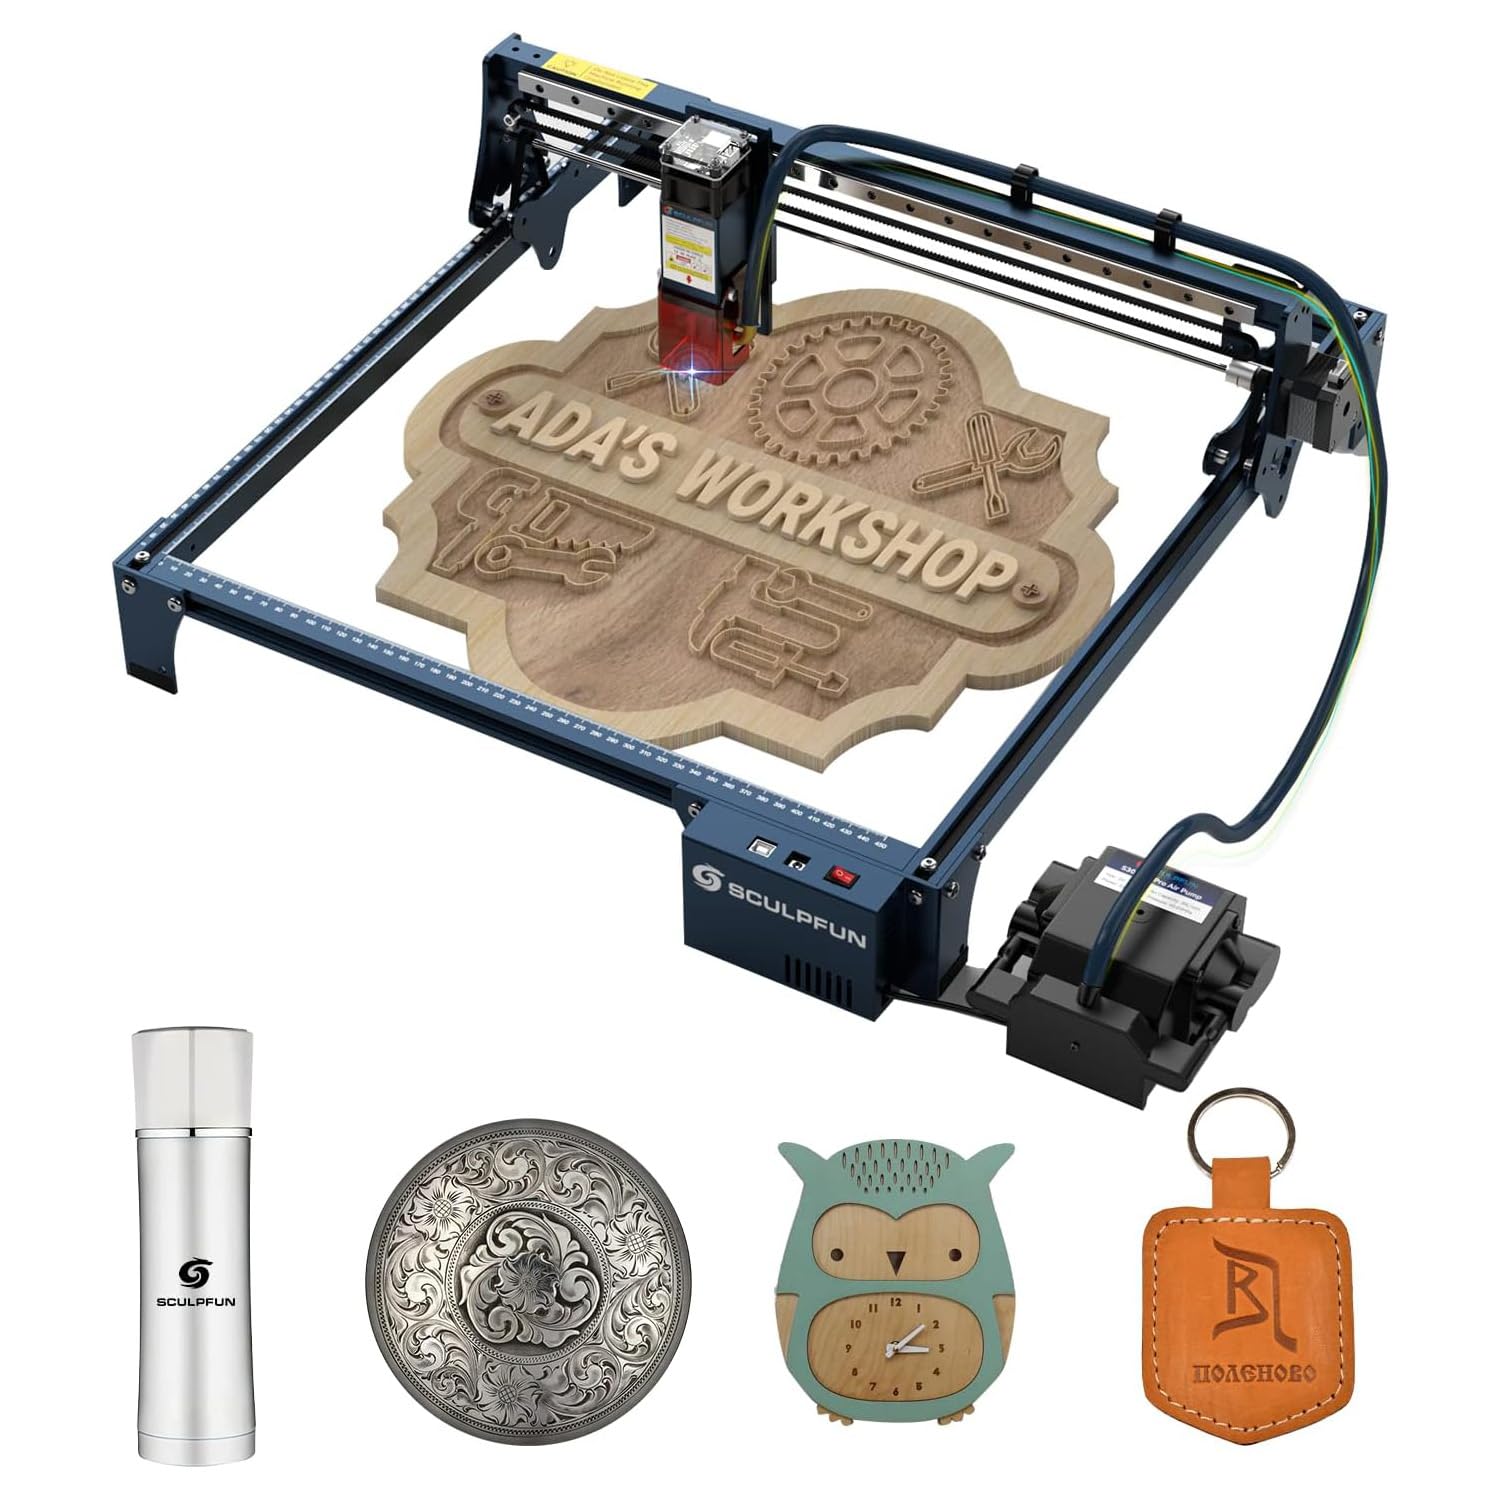
Figure 2.1: Fully assembled SCULPFUN S30 Pro Laser Engraver.
Кључне карактеристике:
- 10W Ultra-thin Laser Output: Utilizes advanced laser shaping technology for a fine 0.08x0.06mm laser focus, enabling powerful and precise engraving and cutting. Capable of cutting 10mm Balsa wood or 6mm plywood in a single pass.
- Automatic Air Assist System: Equipped with a 32-bit motherboard and a full air assist kit, including a high-pressure air assist nozzle and a control-type air pump. This system intelligently controls air assist via LightBurn software (M8 button), switching it on for cutting and off for engraving, ensuring clean results without manual intervention.
- Expandable Engraving Area: Innovative XY axis expandable design allows the original 370x360mm engraving area to be expanded to 900x370mm with a Y-axis expansion kit, or up to 900x890mm with an XY-axis expansion kit (kits sold separately) for large-scale projects.
- Industrial-grade Cutting Accuracy: Features a solid and high-precision linear slide rail X-axis, achieving industrial-grade engraving accuracy without the wavy patterns common in ordinary machines. The high-strength aluminum alloy frame ensures durability and stability.
- Replaceable Protective Lens: The laser module incorporates a replaceable lens design, significantly extending the laser's lifespan. A damaged or worn lens can be easily replaced to restore cutting power. An extra lens is included.
- Limit Switch Device: Includes an XY limit switch for homing and positioning functions, useful for repeated positioning tasks. Users can choose to install it based on their needs.
3. Садржај пакета
Carefully unpack the box and verify that all items listed below are present and undamaged. If any items are missing or damaged, please contact customer support.

Слика 3.1: Завршеноview of the SCULPFUN S30 Pro package contents.
- Laser Module (10W Optical Power)
- Automatic Air Assist Pump
- Адаптер за напајање и кабл
- УСБ кабл
- X-axis and Y-axis Frame Components
- Limit Switches (2 pcs)
- Transmission Belts (2 pcs)
- Tool Kit (wrenches, screwdrivers, cable ties)
- Ласерске заштитне наочаре
- Test Materials (wood, metal plate)
- Упутство за употребу
- Spare Lens and Cleaning Kit
4. Подешавање и монтажа
Follow the steps below to assemble your SCULPFUN S30 Pro Laser Engraver. Refer to the video for visual guidance.
Video 4.1: Detailed assembly instructions for the SCULPFUN S30 series laser engraver.
4.1 Склапање оквира
- Распакујте компоненте: Carefully remove all frame components from the packaging. Identify the left, front, and right beams.
- Attach Corner Brackets: Secure the corner brackets to the frame beams using the provided screws. Ensure screws are tightened evenly to prevent misalignment.
- Assemble Gantry and Back Beam: Connect the gantry (X-axis assembly) to the side beams and then attach the back beam.
- Adjust Eccentric Nuts: The X-axis has eccentric nuts that control the tightness of the movement. Use a 10mm wrench to adjust these nuts. Turning the eccentric nut downwards loosens the axis, while turning it upwards tightens it. Adjust both sides to allow smooth movement without excessive looseness or sticking.

Figure 4.1.1: Initial frame assembly, showing the left, front, and right beams.
4.2 Belt Installation
- Route the Belt: Carefully route the transmission belt around the pulleys on the X-axis and Y-axis.
- Secure Belt Ends: Use the T-shaped nuts and screws to secure the ends of the belt. Ensure the belt is taut but not overly tight to allow smooth movement.
4.3 Limit Switch Installation (Optional)
The limit switches provide homing and precise positioning. Install them if needed for your workflow.
- Attach Switches: Mount the limit switches to the designated positions on the frame using the provided screws.
- Повежите ожичење: Connect the limit switch wires to the main control board. Ensure correct polarity and secure connections.

Figure 4.3.1: Limit switch components and their attachment points.
4.4 Laser Module and Air Assist Installation
- Монтирајте ласерски модул: Attach the laser module to the gantry. Secure it with the hand screws.
- Connect Air Assist: Connect the air assist hose from the air pump to the laser module's nozzle. Secure the air pump near the main control board.
- Управљање кабловима: Use cable ties to neatly organize all wires and hoses, ensuring they do not interfere with the laser's movement. Avoid overtightening the air assist hose to prevent blockage.

Figure 4.4.1: Automatic air assist system integrated with the laser module.
5. Упутство за употребу
The SCULPFUN S30 Pro is compatible with LightBurn software for controlling engraving and cutting operations. Ensure your software version is at least 1.0.0 to utilize all features, especially the automatic air assist.
5.1 Software Setup (LightBurn)
- Повежите уређај: Connect the laser engraver to your computer via USB.
- Додај уређај: In LightBurn, use the "Device Discovery Wizard" to find your SCULPFUN S30 Pro. If automatic discovery fails, manually add a GRBL device with the correct work area dimensions (e.g., 400x410mm for standard S30).
- Enable Air Assist (M8): Go to "Device Settings" and ensure "Air Assist" is set to use the M8 mode. This allows LightBurn to control the air pump automatically.
- Enable Limit Switches (Optional): If you installed limit switches, enable "Hard Limits" and "Homing Cycle" in "Machine Settings" within LightBurn. Remember to write these settings to the controller.
5.2 Фокусирање ласера
Прецизно фокусирање је кључно за оптималне резултате гравирања и сечења.
- Материјал места: Position your material on the honeycomb panel.
- Use Focus Bar: Place the provided metal focus bar between the laser module and the material surface.
- Adjust Laser Height: Loosen the thumb screws on the laser module and slide it up or down until the focus bar just touches the material surface. Tighten the thumb screws.
5.3 Engraving and Cutting
- Дизајн оптерећења: Import or create your design in LightBurn.
- Подесите параметре: Configure layer settings (speed, power, passes) for engraving and cutting. For cutting, enable air assist. For engraving, disable air assist to prevent blurring.
- Преview Радна област: Use the "Frame" function in LightBurn to preview the laser's path on your material. Adjust material position or design as needed.
- Покрени посао: Click "Start" to begin the engraving or cutting process. Monitor the machine closely during operation.

Figure 5.3.1: Visual comparison of engraving quality with and without automatic air assist. Air assist helps achieve cleaner cuts and prevents burnt edges.
6. Одржавање
Редовно одржавање осигурава дуготрајност и оптималне перформансе вашег ласерског гравера.
6.1 Laser Lens Cleaning and Replacement
Over time, the laser lens can accumulate dust and debris, affecting laser performance. Clean or replace the lens as needed.
- Искључивање: Always power off the machine before performing any maintenance.
- Уклоните млазницу: Carefully unscrew the air assist nozzle from the laser module.
- Уклоните сочиво: Use the provided tweezers to gently remove the protective lens from its housing.
- Чиста сочива: Use a soft, lint-free cloth and lens cleaning solution (e.g., isopropyl alcohol) to gently wipe the lens. Avoid touching the lens with bare hands.
- Replace Lens: If the lens is scratched or cannot be cleaned, replace it with a new one from the spare kit. Ensure the lens is correctly oriented and seated.
- Поново саставите: Reinstall the lens, then screw the air assist nozzle back into place.

Figure 6.1.1: The replaceable lens design and included tools for maintenance.
6.2 Генерално чишћење
- Чисте шине: Regularly wipe down the linear guide rails with a clean cloth to remove dust and debris.
- Проверите каишеве: Inspect transmission belts for wear or damage. Ensure they are properly tensioned.
- Чисти остатке: Remove any accumulated debris from the work area and honeycomb panel.
КСНУМКС. Решавање проблема
If you encounter issues with your SCULPFUN S30 Pro, refer to the common problems and solutions below.
| Проблем | Могући узрок | Решење |
|---|---|---|
| Ласер не ради или је излаз слаб | Loose connection, dirty lens, incorrect power settings, damaged laser module. | Check all cable connections. Clean or replace the laser lens. Verify power settings in LightBurn. Contact support if the module is damaged. |
| Машина се не помера или се креће неправилно | Loose belts, eccentric nuts too tight/loose, cable interference, software connection issue. | Check belt tension. Adjust eccentric nuts for smooth movement. Ensure cables are clear. Reconnect USB and restart LightBurn. |
| Air assist not working | Hose blockage, pump not connected, M8 setting disabled in software. | Check air hose for kinks or blockages. Ensure air pump is connected and powered. Verify M8 air assist setting in LightBurn. |
| Engraving/cutting quality is poor (burnt edges, blurry) | Incorrect focus, wrong speed/power settings, air assist settings, material issues. | Re-focus the laser. Adjust speed and power settings. Ensure air assist is ON for cutting and OFF for engraving. Test on scrap material. |
8. Спецификације
- Димензије производа: 22.05 к 20.08 к 10.43 инча
- Број модела ставке: SCULPFUN S30 Pro
- Тежина артикла: 15.27 фунти
- Класа ласера: IV
- Ласерски излаз: 10000mW (10W Optical Power)
- Engraving Area (Standard): Approximately 370x360mm
- Expandable Engraving Area: Up to 900x890mm (with optional expansion kits)
- матична плоча: 32-bit with air assist control
- Повезивање: УСБ
- Произвођач: СЦУЛПФУН
- Датум прве доступности: 23. септембра 2022. године
9. Гаранција и подршка
For warranty information, technical support, or to purchase replacement parts and expansion kits, please visit the official SCULPFUN webсајту или контактирајте свог продавца.
Always refer to the latest version of the user manual available on the manufacturer's webсајт за најажурније информације.
Ask a question about this manual
Ask about setup, troubleshooting, compatibility, parts, safety, or missing instructions. Manuals+ will review the question and use this page’s manual context to help answer it.