1. Увод
This manual provides essential information and instructions for the safe and efficient use of your Blackview BV7200 Rugged Smartphone. The BV7200 is designed for durability and performance in challenging environments, featuring advanced water and dust resistance, a powerful processor, and a high-capacity battery.
Кључне карактеристике укључују:
- IP68 & IP69K Certification: Advanced water and dust resistance for outdoor and demanding conditions.
- Процесор MediaTek Helio G85: Ensures smooth performance for gaming, multitasking, and general use.
- 50MP Dual Camera: Capture high-quality photos, even in low-light conditions.
- 5180мАх батерија: Long-lasting power with 18W fast charging support.
- 6.1-inch HD+ Display: Durable screen with Corning Gorilla Glass 3, optimized for comfortable viewинг.
- Режим рукавице: Allows screen operation even when wearing gloves.

Слика: Прекоview of the Blackview BV7200 Rugged Smartphone, highlighting its MediaTek Helio G85 processor, 50MP camera, IP68/IP69K ratings, 5180mAh battery, 6.1-inch display, and Glove Mode.
2. Подешавање
2.1. Инсталација SIM картице и MicroSD картице
To install your SIM card(s) and/or MicroSD card:
- Пронађите лежиште за СИМ картицу са стране уређаја.
- Користите приложени алат за избацивање СИМ картице да бисте отворили лежиште.
- Carefully place your Nano-SIM card(s) and/or MicroSD card into the designated slots, ensuring correct orientation.
- Лагано гурните лежиште назад у уређај док не кликне на своје место.
2.2. Почетно пуњење и укључивање
Пре прве употребе, препоручује се да потпуно напуните уређај.
- Connect the USB Type-C cable to the charging port at the bottom of the phone. Ensure the port cap is securely opened before inserting the cable and closed after charging to maintain water resistance.
- Повежите други крај кабла са компатибилним адаптером за напајање и укључите га у зидну утичницу.
- Once sufficiently charged, press and hold the Power button (usually on the right side) for a few seconds until the Blackview појављује се лого.
- Пратите упутства на екрану да бисте завршили почетно подешавање, укључујући избор језика, Wi-Fi везу и подешавање Google налога.
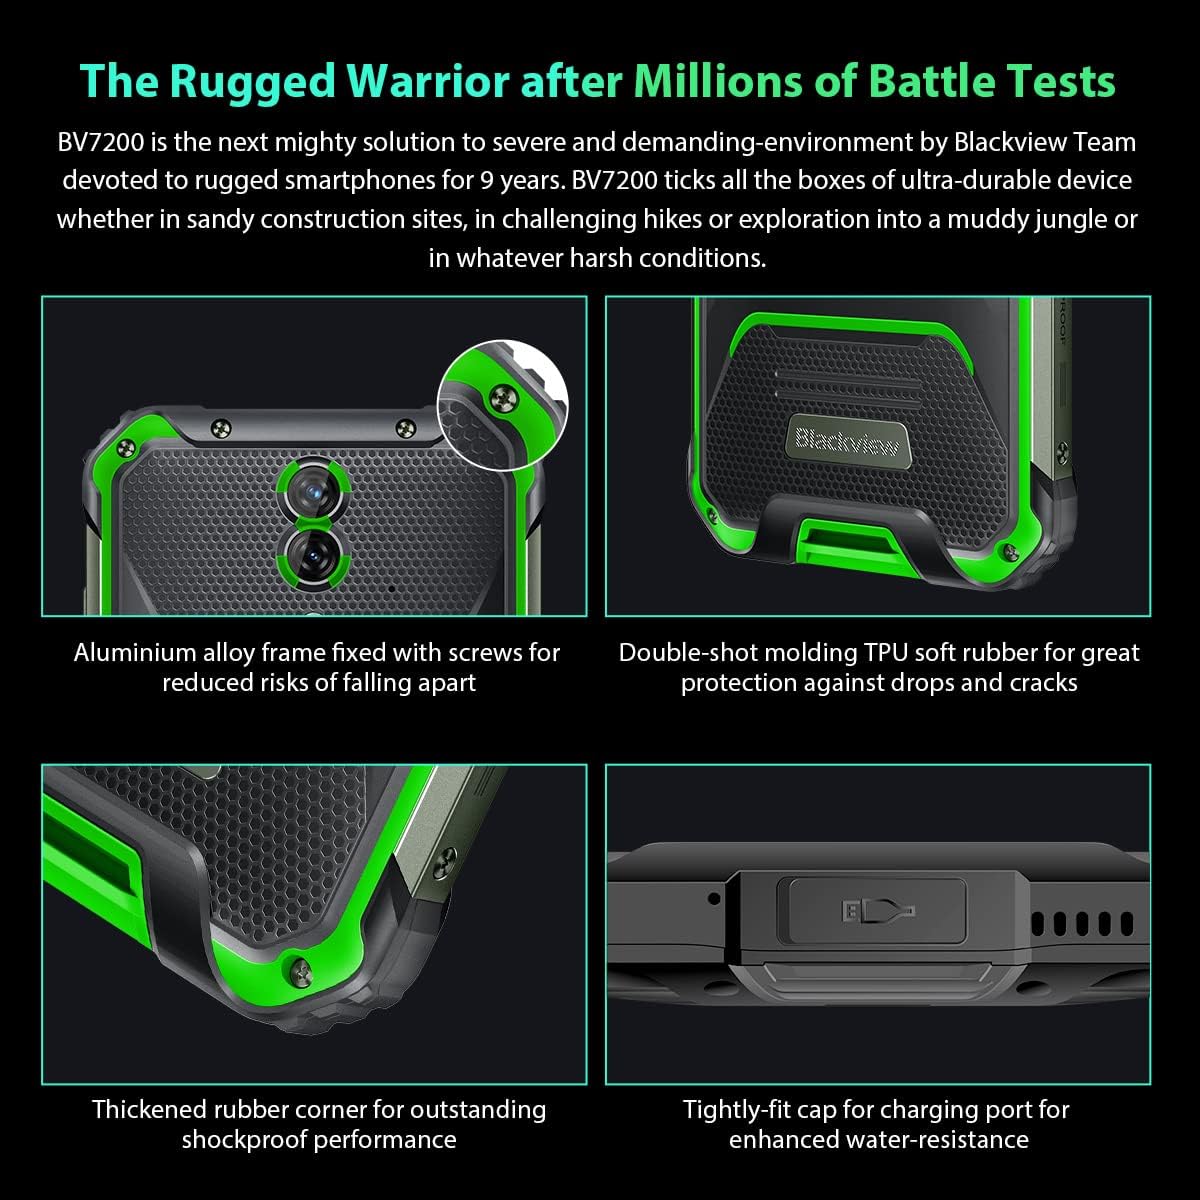
Слика: Крупни план views of the Blackview BV7200's rugged construction, including aluminum alloy frame, double-shot molding TPU rubber, thickened rubber corners, and the tightly-fit cap for the charging port, emphasizing its durability and water resistance.
3. Упутство за употребу
3.1. Основна навигација
Тхе Блацкview BV7200 operates on Doke OS 3.0, based on Android 12. Use touch gestures for navigation:
- Додирните: Изаберите ставку или отворите апликацију.
- Превуците: Померајте се кроз екране или листе.
- Прстохват: Увећајте или умањите слике и web странице.
- Дуго притисните: Приступите контекстуалним менијима или преместите иконе апликација.
3.2. Употреба камере
The BV7200 features a 50MP main rear camera and an 8MP ultra-wide/macro rear camera.
- Отворите апликацију Камера са почетног екрана или из фиоке апликација.
- Select your desired mode (Photo, Video, Portrait, Pro, etc.).
- Tap the screen to focus on a specific area.
- Притисните дугме затварача да бисте снимили фотографију или покренули/зауставили снимање видеа.

Image: Diagram illustrating the Blackview BV7200's 50MP Samsung ISOCELL JN1 main rear camera, 8MP ultra-wide and ultra-macro rear camera, and rear flash, highlighting its photographic capabilities.
3.3. Glove Mode
The BV7200 supports Glove Mode, allowing you to operate the touchscreen while wearing gloves.
- To activate/deactivate Glove Mode, navigate to Settings > Smart Assistant > Glove Mode.
- Ensure this mode is enabled when using gloves for optimal touch responsiveness.

Image: Collage demonstrating the Blackview BV7200's Glove Mode in various scenarios, showing users operating the phone while wearing different types of gloves, emphasizing its utility in cold or industrial environments.
3.4. Water and Dust Resistance (IP68 & IP69K)
The BV7200 is certified IP68 and IP69K, making it resistant to water immersion and high-pressure water jets. This allows for use in aquatic sports or dusty environments.
- Always ensure all port caps (charging port, SIM tray) are securely closed before exposing the device to water or dust.
- Rinse the phone with clean water after exposure to saltwater or chemicals.
- Do not charge the phone if the charging port is wet. Allow it to dry completely.
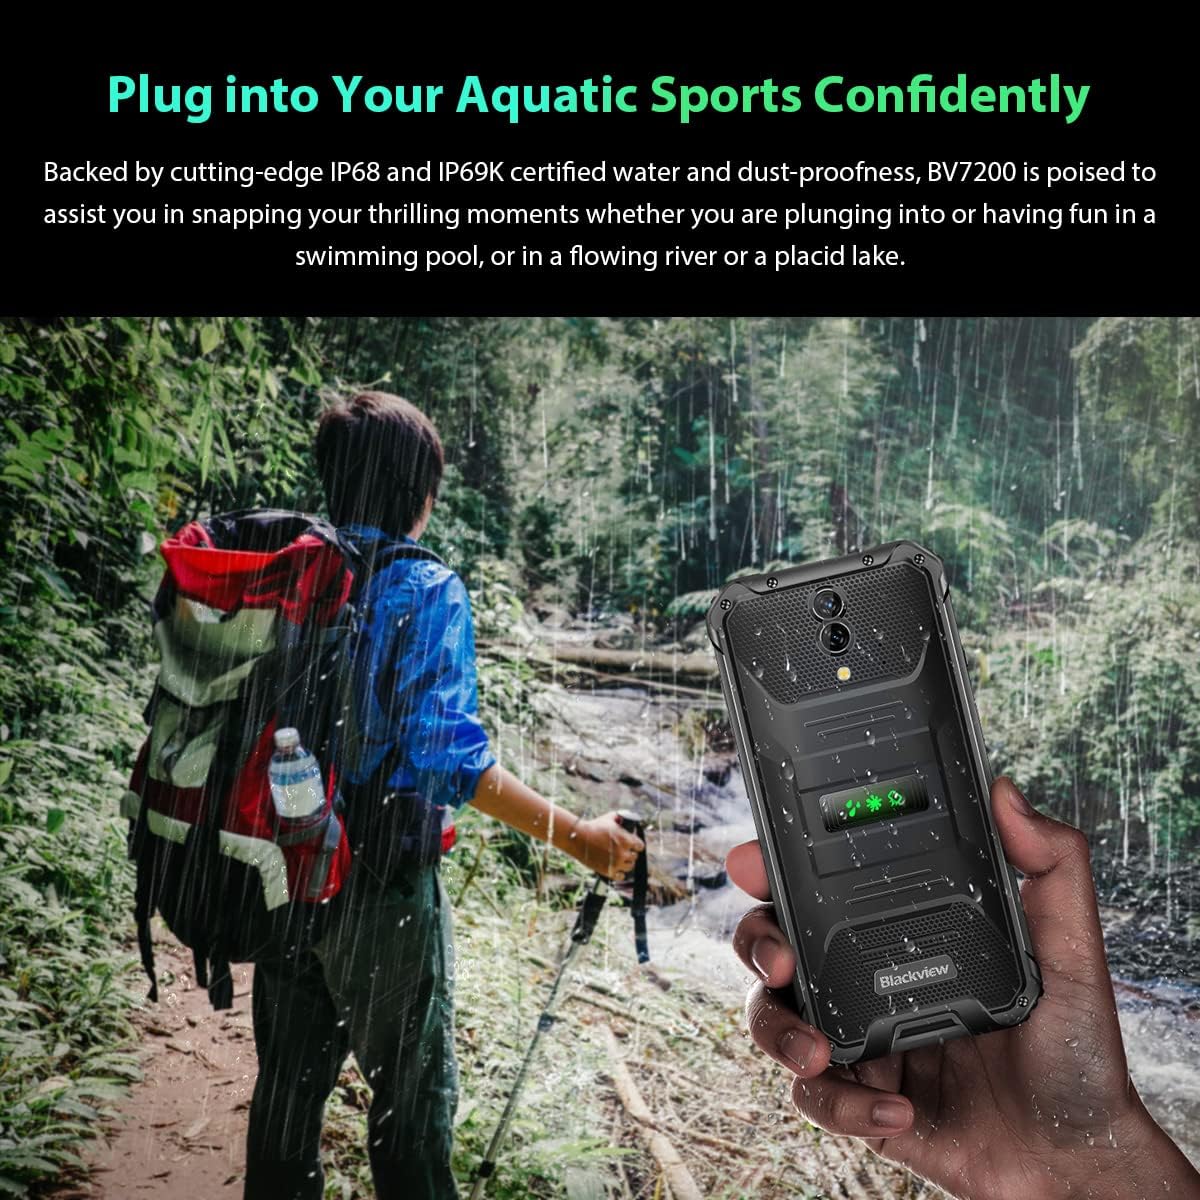
Image: A person holding the Blackview BV7200 near a stream or waterfall, illustrating its water resistance and suitability for outdoor and aquatic activities.
3.5. Управљање батеријом
The 5180mAh battery provides extended usage. The device supports 18W fast charging.
- Користите оригинални пуњач и кабл за оптималну брзину пуњења и безбедност.
- The battery is designed to withstand temperatures down to -10°C.
- To prolong battery life, avoid extreme temperatures and fully discharging the battery regularly.
3.6. Проширење меморије
The BV7200 features 6GB of RAM with an additional 4GB virtual memory expansion, totaling 10GB, for enhanced multitasking and performance.

Image: Graphic illustrating the memory expansion feature of the Blackview BV7200, showing 6GB of physical RAM and an additional 4GB of virtual RAM, combining for a total of 10GB for improved performance.
4. Одржавање
4.1. Чишћење уређаја
To clean your Blackview BV7200:
- Обришите екран и кућиште меком крпом која не оставља влакна.
- За тврдокорну прљавштину користите мало дamp крпу са благим сапуном, а затим обришите на суво.
- Не користите јаке хемикалије, раствараче или абразивна средства за чишћење.
- Ensure all port caps are closed before cleaning with liquids.
4.2. Ажурирања софтвера
Редовно проверавајте и инсталирајте ажурирања софтвера како бисте осигурали оптималне перформансе, безбедност и приступ новим функцијама.
- Иди на Подешавања > Систем > Ажурирање система да проверите доступна ажурирања.
- Ensure your device has sufficient battery and a stable Wi-Fi connection before starting an update.
КСНУМКС. Решавање проблема
5.1. Уобичајени проблеми и решења
- Уређај се не укључује: Уверите се да је батерија напуњена. Повежите је са пуњачем најмање 15 минута, а затим покушајте поново да је укључите.
- Екран не реагује: Restart the device by holding the Power button for about 10-15 seconds. If the issue persists, try a factory reset (data will be lost).
- Connectivity issues (Wi-Fi/Bluetooth/Mobile Data):
- Toggle Wi-Fi/Bluetooth/Mobile Data off and on.
- Поново покрените уређај.
- Check router/network settings.
- For mobile data, ensure SIM card is correctly inserted and activated.
- Рушење апликација: Обришите кеш меморију и податке апликације (Подешавања > Апликације > [Назив апликације] > Меморија > Обриши кеш/Обриши податке). If the problem continues, uninstall and reinstall the app.
5.2. Фацтори Ресет
Фабричко враћање ће обрисати све податке са вашег телефона и вратити га на оригинална фабричка подешавања. Направите резервну копију важних података пре него што наставите.
- Иди на Подешавања > Систем > Опције ресетовања > Обриши све податке (ресетовање на фабричка подешавања).
- Confirm your decision. The device will restart and perform the reset.
6. Спецификације
Below are the technical specifications for the Blackview BV7200:
| Феатуре | Спецификација |
|---|---|
| Бранд | Црноview |
| Величина РАМ-а | 6 GB (expandable to 10GB with virtual RAM) |
| ЦПУ модел | МедиаТек Хелио Г85 |
| Капацитет складиштења | 128 GB (expandable up to 1TB with TF card) |
| Величина екрана | 6.1 инча |
| Резолуција | 720 x 1560 HD+ |
| Целлулар Тецхнологи | 4G |
| Бежична мрежна технологија | GSM, LTE, Wi-Fi |
| Капацитет батерије | 5180 мАх |
| Оперативни систем | Android 12 (Doke OS 3.0) |
| Отпорност на воду/прашину | ИП68, ИП69К |

Слика: Детаљна view of the MediaTek Helio G85 processor, highlighting its specifications including RAM, ROM, GPU, and expandable storage, emphasizing its strong performance capabilities.

Image: Graphic detailing the Blackview BV7200's 6.1-inch HD+ display specifications, including resolution (720x1560), screen-to-body ratio (83%), brightness (380cd/cm2), and PPI (283), emphasizing its visual quality and durability with Corning Gorilla Glass 3.
7. Гаранција и подршка
For warranty information and technical support, please refer to the warranty card included with your product or visit the official Blackview webсајт. Сачувајте доказ о куповини за потребе гаранције.
For further assistance, you may contact Blackview customer service through their official channels.