
1. Увод
Welcome to the instruction manual for the Supermicro X13SEM-TF motherboard. This document provides essential information for the proper installation, configuration, and maintenance of your motherboard. Please read this manual thoroughly before proceeding with any installation or operation.
The Supermicro X13SEM-TF is designed to support Intel Xeon SPR-SP CPUs with up to 56 cores and 350W TDP, featuring EBGPCH and 8-channel DDR5 memory support.
2. Производ је готовview
Below is an image of the Supermicro X13SEM-TF motherboard, highlighting its key components.
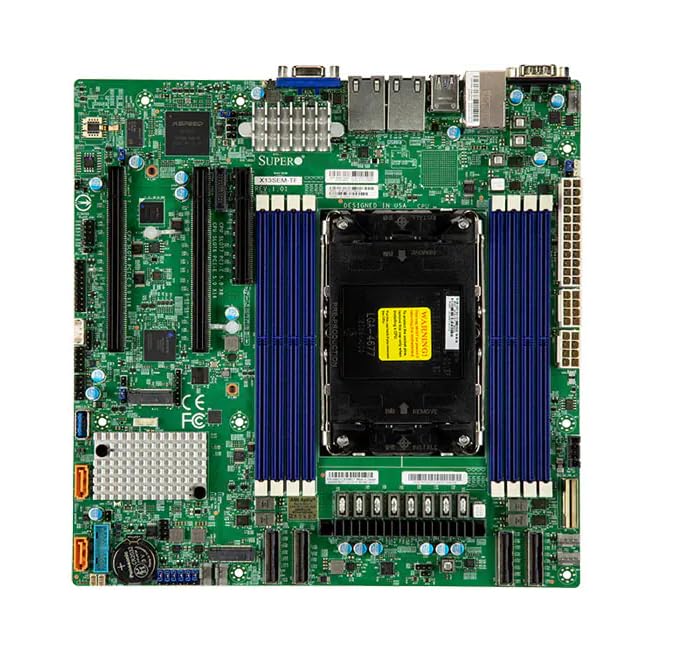
Image Description: This image displays the Supermicro X13SEM-TF motherboard. Key visible components include the large LGA 4677 CPU socket at the center, surrounded by eight DDR5 DIMM slots (blue). Various PCIe slots, SATA ports, USB headers, and power connectors are distributed across the green PCB. The rear I/O panel features USB ports, Ethernet ports, and a VGA port. Heatsinks are visible over the VRM and chipset areas.
3. Безбедносне информације
Always observe standard electrostatic discharge (ESD) precautions when handling the motherboard.
- Искључите све изворе напајања пре инсталације или одржавања.
- Носите антистатичку наруквицу.
- Avoid touching components directly unless necessary.
- Ensure proper ventilation within the system chassis.
- Refer to professional assistance if unsure about any procedure.
4. Подешавање и инсталација
4.1. Садржај пакета
Проверите да ли су све компоненте присутне у пакету:
- Supermicro X13SEM-TF Motherboard
- И/О штит (ако није интегрисан)
- САТА каблови
- Кориснички приручник (овај документ)
- ЦД/УСБ са драјверима (или упутства за преузимање)
4.2. Инсталација матичне плоче
- Припремите шасију: Ensure the computer chassis is ready for motherboard installation. Install standoffs in the appropriate locations.
- Инсталирајте И/О штит: If provided separately, install the I/O shield into the chassis opening.
- Монтирајте матичну плочу: Carefully place the motherboard into the chassis, aligning it with the standoffs and I/O shield. Secure it with screws.
- Инсталирајте процесор:
- Отворите полугу за процесорски утичницу.
- Align the CPU (Intel Xeon SPR-SP) with the socket, matching the triangular markers.
- Пажљиво поставите процесор у подножје. Немојте га силом уметнути.
- Затворите полугу утичнице да бисте осигурали процесор.
- Инсталирање хладњака процесора: Attach the compatible CPU cooler according to its manufacturer's instructions. Ensure proper thermal paste application.
- Инсталирана меморија (RAM):
- Отворите клипове на DDR5 DIMM слотовима.
- Align the memory modules with the slots, ensuring the notch matches.
- Press down firmly on both ends until the clips snap into place. Refer to the motherboard layout for optimal memory population.
- Прикључите напајање:
- Connect the 24-pin ATX main power connector.
- Connect the 8-pin (or 4+4-pin) CPU power connector(s).
- Повежите уређаје за складиштење: Connect SATA data and power cables to your storage drives (HDDs/SSDs) and the motherboard's SATA ports.
- Повежите конекторе на предњем панелу: Connect the power switch, reset switch, HDD LED, power LED, and front panel USB/audio headers to their respective pins on the motherboard. Refer to the motherboard diagram for correct pin assignments.
- Инсталирајте картице за проширење: Insert any necessary PCIe expansion cards (e.g., graphics cards, network cards) into the appropriate PCIe slots and secure them.
5. Упутство за употребу
5.1. Прво укључивање
After completing all connections, connect the power supply to an electrical outlet and power on the system.
The system should boot to the BIOS/UEFI interface or an installed operating system.
5.2. Конфигурација BIOS-а/UEFI-ја
To enter the BIOS/UEFI setup, press the designated key (usually ДЕЛ or F2) during startup.
Configure boot order, system time, and other necessary settings. Save changes before exiting.
5.3. Инсталација драјвера
Install all necessary drivers for the motherboard chipset, network, audio, and any other integrated components. Drivers can be found on the Supermicro website or the provided driver media.
6. Одржавање
Редовно одржавање осигурава оптималне перформансе и дуготрајност ваше матичне плоче.
- Уклањање прашине: Периодично чистите прашину са матичне плоче и компоненти помоћу компримованог ваздуха. Уверите се да је систем искључен из струје.
- Ажурирања BIOS-а/UEFI-ја: Проверите Супермицро website for BIOS/UEFI updates. Update only if necessary and follow the provided instructions carefully.
- Ажурирања драјвера: Keep drivers updated for optimal compatibility and performance.
- Физички преглед: Periodically inspect the motherboard for any signs of damage, loose connections, or bulging capacitors.
КСНУМКС. Решавање проблема
7.1. Нема снаге
- Проверите све прикључке за напајање (24-пински ATX, 8-пински CPU).
- Уверите се да је напајање укључено.
- Тестирајте напајање помоћу другог система или тестера напајања.
- Проверите везу прекидача за напајање на предњој плочи.
7.2. Нема дисплеја
- Уверите се да је монитор повезан и укључен.
- Check if the graphics card (if dedicated) is properly seated and powered.
- Покушајте да поново инсталирате РАМ модуле.
- If using integrated graphics, ensure the CPU supports it and the display cable is connected to the motherboard's video output.
7.3. Нестабилност система / Падови система
- Проверите температуру процесора и графичке картице.
- Verify RAM is correctly installed and compatible.
- Покрените алате за дијагностику меморије.
- Уверите се да су сви драјвери инсталирани и ажурирани.
- Check for loose cables or components.
8. Спецификације
| Феатуре | Детаљ |
|---|---|
| Модел | Supermicro X13SEM-TF (MBD-X13SEM-TF-B) |
| Подршка за ЦПУ | Intel Xeon SPR-SP, up to 56 cores, 350W TDP |
| ЦПУ Соцкет | ЛГА 4677 |
| Чипсет | EBGPCH |
| Меморија | 8-channel DDR5 DIMM slots |
| Димензије (ДкШкВ) | 16 к 12 к 5 инча |
| Тежина | 2.86 фунти |
| Произвођач | СуперМицро |
| Датум првог доступног | 20. јануара 2023. године |
9. Гаранција и подршка
9.1. Информације о гаранцији
For detailed warranty information, please refer to the official Supermicro webсајт или гарантни лист који је испоручен уз ваш производ.
9.2. Техничка подршка
If you encounter issues that cannot be resolved using this manual, please contact Supermicro technical support.
Visit the official Supermicro website for support resources, driver downloads, and contact information: www.supermicro.com/support