
1. Увод
This manual provides instructions for the installation, operation, and maintenance of your NETGEAR GS305P 5-Port PoE Gigabit Ethernet Unmanaged Switch. This device is designed to expand your network connectivity with both standard Gigabit Ethernet and Power over Ethernet (PoE+) capabilities, ideal for small office or home network environments.
2. Садржај пакета
Проверите да ли ваш пакет садржи следеће ставке:
- NETGEAR GS305P 5-Port PoE Gigabit Ethernet Unmanaged Switch (GS305Pv3)
- Адаптер за напајање
- Валлмоунт Кит
- Водич за брзу инсталацију

Image: The NETGEAR GS305P switch, power adapter, and power cord as typically found in the package.
3. Производ је готовview
The NETGEAR GS305P is an unmanaged switch featuring 5 Gigabit Ethernet ports, with 4 of these ports supporting PoE+ (Power over Ethernet Plus). It provides a total power budget of 63W for connected PoE devices. The switch is designed for plug-and-play operation, requiring no software installation or configuration.
Видео: Оверview of the NETGEAR 5-Port PoE Switch, demonstrating its features and ease of use.
Предња плоча

Image: Front panel of the GS305P switch, highlighting the 5 Gigabit Ethernet ports and LED indicators for power, PoE Max, link/activity, and PoE fault.
- ЛЕД за напајање: Означава статус напајања.
- ПоЕ Мак ЛЕД: Illuminates when PoE power consumption is near maximum capacity.
- Link/Activity LEDs (Ports 1-5): Green for 1000Mbps link, Yellow for 10/100Mbps link. Blinks to indicate activity.
- ЛЕД диоде за статус PoE (портови 1-4): Green for PoE powered, Yellow for PoE fault.
- Етхернет портови (1-5): RJ-45 ports for network connections. Ports 1-4 support PoE+.
4. Подешавање и инсталација
The NETGEAR GS305P switch is designed for simple plug-and-play installation. No software configuration is required.
4.1 Повезивање прекидача
- Connect the power adapter to the switch's power input and then plug the power adapter into an electrical outlet. The Power LED on the switch will illuminate.
- Connect your router or modem to any of the 5 Gigabit Ethernet ports on the switch using an Ethernet cable.
- Connect your network devices (computers, printers, network storage) to the remaining Gigabit Ethernet ports. For PoE-powered devices (e.g., IP cameras, wireless access points), connect them to ports 1-4.

Image: A diagram illustrating the plug-and-play nature of the unmanaged switch, connecting various devices like WiFi Access Points, IP Cameras, Computers, and NAS.
4.2 Опције монтаже
The GS305P switch can be placed on a desktop or mounted on a wall. A wallmount kit is included for secure installation.
- Положај на радној површини: Ensure the switch is placed on a flat, stable surface with adequate ventilation.
- Zidni nosač: Use the provided wallmount kit to secure the switch to a wall. Refer to the quick installation guide for detailed steps on wall mounting.
5. Руковање прекидачем
Once connected, the switch operates automatically. The LEDs provide visual feedback on the network status.
- Укључено: The Power LED will be green when the switch is receiving power.
- Network Activity: The Link/Activity LEDs will light up when a device is connected and blink to indicate data transmission.
- ПоЕ напајање: For PoE-powered devices, the PoE Status LED will be green when power is being supplied. If a PoE fault occurs, the LED will turn yellow.
- Тиха операција: The fanless design ensures quiet operation, making it suitable for noise-sensitive environments.
6. Одржавање
Да бисте осигурали оптималне перформансе и дуготрајност вашег прекидача, следите ове смернице за одржавање:
- Чишћење: Користите меку, суву крпу за чишћење спољашњости прекидача. Не користите течна или аеросолна средства за чишћење.
- вентилација: Уверите се да отвори за вентилацију нису блокирани како бисте спречили прегревање.
- Окружење: Operate the switch within its specified temperature and humidity ranges. Avoid direct sunlight or extreme temperatures.
- Управљање кабловима: Држите мрежне каблове уредно како бисте спречили оптерећење портова и побољшали проток ваздуха.
КСНУМКС. Решавање проблема
If you encounter issues with your NETGEAR GS305P switch, refer to the following common troubleshooting steps:
- Нема напајања: Ensure the power adapter is securely connected to the switch and a working electrical outlet. Check the Power LED.
- Нема линка/активности: Verify that Ethernet cables are properly connected to both the switch and the connected device. Try a different cable or port. Check the Link/Activity LED.
- PoE уређај се не укључује: Ensure the device is PoE-compatible and connected to one of the PoE+ ports (1-4). Check the PoE Status LED for the port; a yellow light indicates a fault. Verify the total power budget (63W) is not exceeded by all connected PoE devices.
- Мала брзина мреже: Ensure all connected devices and cables support Gigabit Ethernet for optimal performance. Check for excessive network traffic.
8. Спецификације
Key technical specifications for the NETGEAR GS305P switch:
| Феатуре | Опис |
|---|---|
| Модел | GS305P (GS305Pv3) |
| Број портова | 5 Гигабит Етхернет портова |
| ПоЕ+ портови | 4 (Ports 1-4) |
| Укупан буџет ПоЕ напајања | 63В |
| Брзина преноса података | 1000 Mbps (гигабит) |
| Тип прекидача | Унманагед |
| Материјал кућишта | Метал |
| Димензије (Д к Ш к В) | 9.5" x 6.7" x 3.4" (approximate, from product data) |
| Волtage | 240 Volts (Power adapter input) |
| Оперативно окружење | Designed for indoor use in U.S. & CA. |
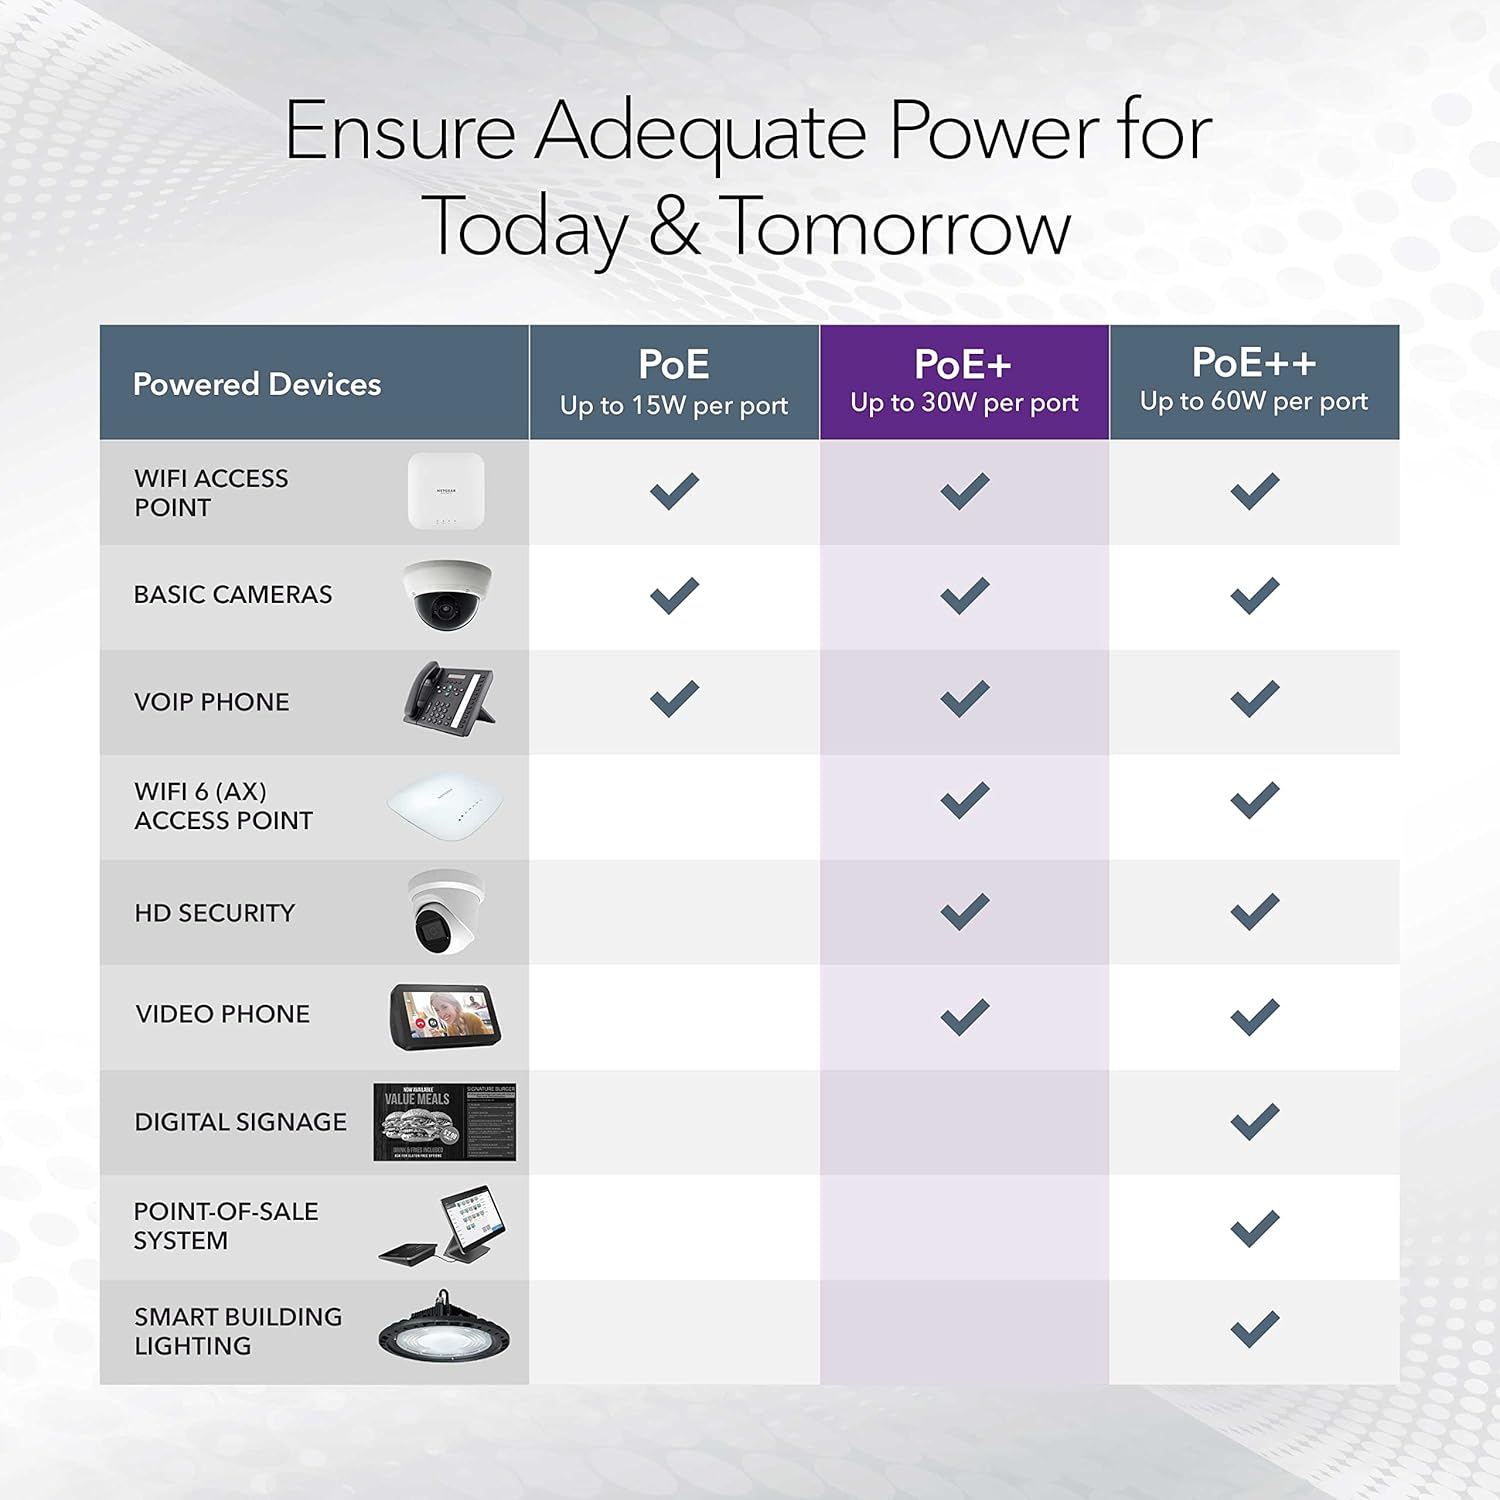
Image: A table illustrating the power capabilities of PoE, PoE+, and PoE++ for different powered devices.
9. Гаранција и подршка
9.1 Информације о гаранцији
The NETGEAR GS305P switch comes with an industry-leading 3-годишња ограничена гаранција на хардвер. Please retain your proof of purchase for warranty claims. For full warranty terms and conditions, refer to the official NETGEAR webсајт или документацију која је приложена уз ваш производ.
9.2 Техничка подршка
For technical assistance, product registration, or to access additional resources, visit the official NETGEAR support website. You can find FAQs, firmware updates, and community forums there.
Подршка за НЕТГЕАР Webсајт: ввв.нетгеар.цом/суппорт