
1. Увод
Thank you for choosing the SUTTO 36V 250W E-Bike Hub Motor Conversion Kit. This kit is designed to transform your standard bicycle into an electric bicycle, offering enhanced riding experience with pedal assistance or full electric power. This manual provides essential information for the safe installation, operation, and maintenance of your conversion kit. Please read it thoroughly before installation and use.
2. Безбедносне информације
Your safety is paramount. Please observe the following safety guidelines:
- Увек носите кацигу и одговарајућу заштитну опрему када возите свој електрични бицикл.
- Ensure all components are securely installed and tightened before each ride.
- Regularly check brakes, tires, and electrical connections.
- Do not operate the e-bike in adverse weather conditions (heavy rain, snow, ice) if not designed for such use. The display has an IP65 waterproof rating, but other components may vary.
- Familiarize yourself with local regulations regarding e-bike use, speed limits, and power output.
- Keep hands and clothing away from moving parts, especially the motor and freewheel.
- Disconnect the battery before performing any maintenance or adjustments.
- Do not modify the motor or controller. Unauthorized modifications can lead to malfunction and void the warranty.
3. Садржај пакета
The SUTTO E-Bike Conversion Kit includes the following components. Please verify all items are present upon unboxing:
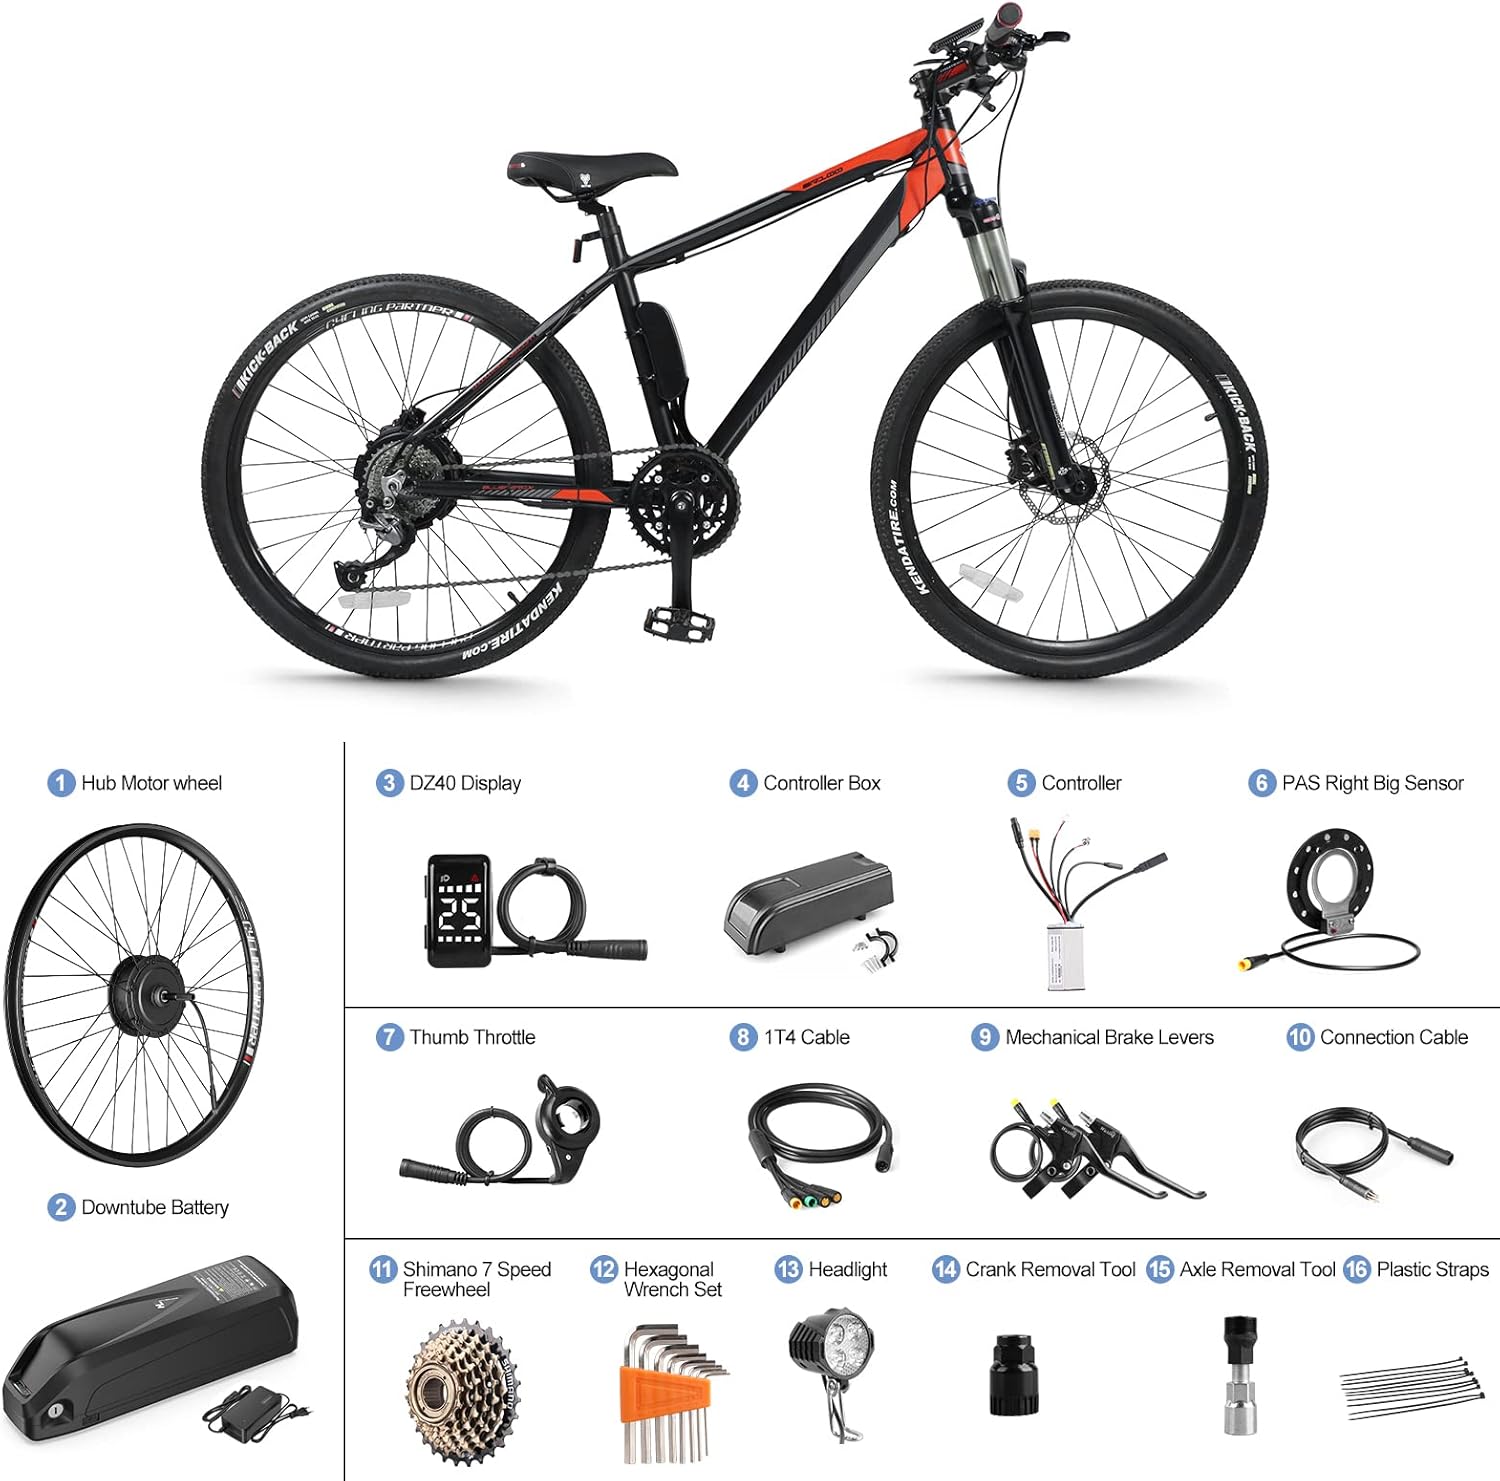
Figure 3.1: All included components for the SUTTO E-Bike Conversion Kit.
- Hub Motor Wheel (1)
- Downtube Battery (Optional, shown in image, check your specific kit variant) (2)
- DZ40 Display (3)
- Controller Box (4)
- Контролор (5)
- PAS Right Big Sensor (6)
- Thumb Throttle (7)
- 1T4 Cable (8)
- Mechanical Brake Levers (9)
- Connection Cable (10)
- Shimano 7 Speed Freewheel (11)
- Hexagonal Wrench Set (12)
- Headlight (13)
- Crank Removal Tool (14)
- Axle Removal Tool (15)
- Plastic Straps (16)
- Installation Manual (Book)
4. Подешавање и инсталација
This section guides you through the installation process. Professional installation is recommended if you are unfamiliar with bicycle mechanics.
4.1 Провере пре инсталације
- Тип кочнице: This kit is designed exclusively for bicycles with disc brakes only.
- Rear Dropout Width: Measure the rear dropout width of your bicycle frame. It must be between 130mm and 140mm for proper motor installation. The motor mounting width is 138mm.
- Величина точка: Ensure the conversion kit's wheel size matches your bicycle's tire size. The corresponding size is typically marked on the outer tire. This kit is compatible with 26", 27.5", 700C (28"), and 29" wheels.

Figure 4.1: Rear dropout width and wheel compatibility.
4.2 Кораци инсталације компоненти
- Припремите точак: The hub motor is pre-mounted in the rim. Transfer your original bicycle tire and inner tube onto the new hub motor wheel. Ensure the tire is seated correctly and inflated to the recommended pressure.
- Install Freewheel: Attach the Shimano 7-speed freewheel to the hub motor.
- Mount Hub Motor Wheel: Install the hub motor wheel into the rear dropout of your bicycle frame, ensuring the axle is properly seated and secured with the provided nuts.
- Install Brake Levers: Remove your original brake levers and install the new mechanical brake levers (9). These levers include a cut-off switch for safety.
- Install Thumb Throttle: Mount the thumb throttle (7) on your handlebar in a comfortable position.
- Install DZ40 Display: Mount the DZ40 LCD display (3) on your handlebar.
- Инсталирајте PAS сензор: Use the crank removal tool (14) and axle removal tool (15) to remove your bicycle's crank arm and bottom bracket. Install the PAS Right Big Sensor (6) on the right side of the bottom bracket, ensuring it is correctly aligned with the pedal cadence. Reinstall the crank arm.
- Mount Controller and Controller Box: Secure the controller (5) inside the controller box (4). Mount the controller box to your bicycle frame in a suitable location, often near the seat tube or downtube.
- Инсталирајте фарове: Mount the headlight (13) on your bicycle.
- Ожичење: Carefully connect all components to the controller using the 1T4 cable (8) and other connection cables (10). Refer to the wiring diagram below for correct connections. Use plastic straps (16) to neatly secure all cables along the frame.
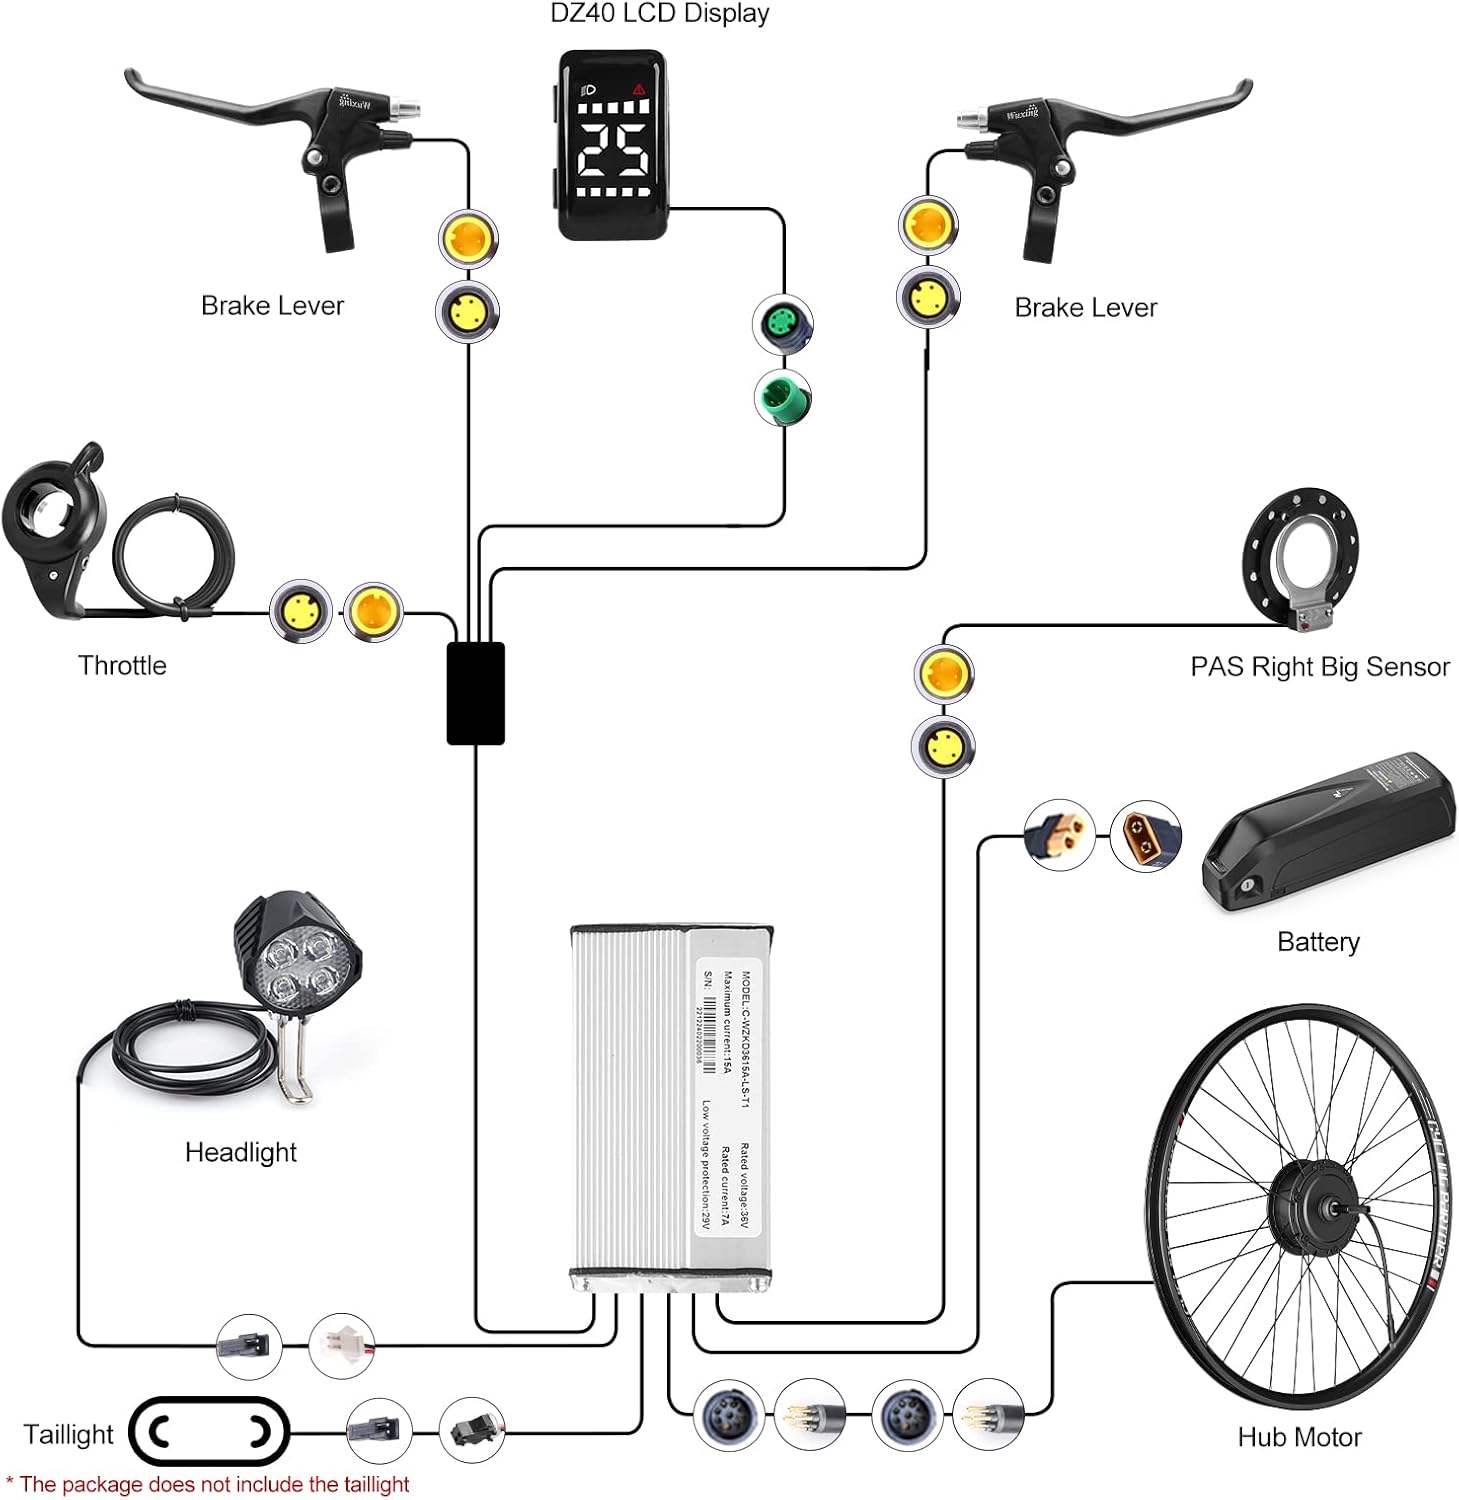
Figure 4.2: Wiring Diagram.

Figure 4.3: Controller and Connector Details.
Детаљи конектора:
- 1T4 EU-BUS Connector: 8-пин женски
- Battery Connector (XT60): Red -- Positive "+", Black -- Negative "-"
- Headlight Connector (White): Red -- Positive "+", Black -- Negative "-"
- Taillight Connector (Black): Red -- Positive "+", Black -- Negative "-"
- PAS Sensor Connector: 3-пин женски
- Hub Motor Connector: 9-пин женски
4.3 Battery Installation (If applicable)
If your kit includes a downtube battery, install it securely onto the frame mount. Ensure the battery is locked into place to prevent accidental detachment during riding. Connect the battery cable to the controller's battery connector (XT60).

Figure 4.4: Battery specifications and dimensions.
5. Упутство за употребу
Once installed, your e-bike conversion kit offers various modes of operation.
5.1 DZ40 LCD Display
The DZ40 LCD display provides essential information and control over your e-bike's functions.

Figure 5.1: DZ40 LCD Uart Display.
- ПАС ниво: The display shows the current Pedal Assist System (PAS) level, typically from 0 to 5. Adjust this level using the buttons on the display to control the motor's assistance.
- Приказ информација: The display shows speed, battery level, and other relevant riding data.
- водоотпоран: The display has an IP65 waterproof rating, suitable for outdoor use.
5.2 Режими рада
The SUTTO E-Bike Conversion Kit supports three primary operating modes:

Figure 5.2: Operating Modes and Key Specifications.
- 1. Electric Bike Mode: Use the thumb throttle to engage the motor and propel the bicycle without pedaling. The maximum speed is approximately 25-32 km/h.
- 2. Pedal Assisted Mode (PAS): The PAS sensor detects your pedaling and provides motor assistance based on the selected PAS level on the DZ40 display. This mode enhances your pedaling effort.
- 3. Walk Assisted Mode: This mode provides low-speed motor assistance, useful when pushing the bicycle uphill or through crowded areas. Consult your display manual for activation.
5.3 Brake Lever Function
The mechanical brake levers are equipped with safety cut-off switches. When either brake lever is engaged, power to the motor is immediately cut, ensuring safe stopping and preventing accidental acceleration.
6. Одржавање
Regular maintenance ensures the longevity and safe operation of your e-bike conversion kit.
- Чишћење: Clean the motor, controller, and display with a damp крпа. Избегавајте директно коришћење млазева воде под високим притиском на електричним компонентама.
- Електричне везе: Периодично проверавајте све електричне спојеве на чврстоћу и корозију. Уверите се да каблови нису пригњечени или оштећени.
- кочнице: Regularly inspect brake pads and rotors for wear. Adjust or replace as necessary to maintain effective braking.
- гуме: Maintain correct tire pressure. Check for punctures or excessive wear.
- Слободан ход: Keep the freewheel clean and lubricated for smooth operation.
- Одржавање батерије: If your kit includes a battery, follow the manufacturer's guidelines for charging, storage, and temperature. Avoid fully discharging the battery.
- Опште одржавање бицикала: Continue to perform regular maintenance on your bicycle's mechanical components (chain, gears, bearings, etc.) as you would with a standard bike.
КСНУМКС. Решавање проблема
Овај одељак се бави уобичајеним проблемима на које можете наићи.
- No Power to Motor:
- Проверите ниво напуњености батерије.
- Ensure all electrical connections are secure, especially the battery and motor connectors.
- Verify the display is powered on.
- Check if brake levers are slightly engaged, cutting power.
- PAS Not Working:
- Ensure the PAS sensor is correctly installed and aligned.
- Check the PAS sensor cable connection to the controller.
- Verify the PAS level on the display is set above 0.
- Гас не реагује:
- Check the throttle cable connection.
- Ensure brake levers are not engaged.
- Екран се не укључује:
- Check battery connection and charge.
- Inspect the display cable for damage and ensure it's securely connected.
- Необични звуци из мотора:
- Одмах престаните са вожњом.
- Check for loose components or obstructions.
- Контактирајте корисничку подршку ако се проблем настави.
For issues not covered here, please consult the detailed installation book included with your kit or contact customer support.
8. Спецификације
| Феатуре | Спецификација |
|---|---|
| Бранд | Varstrom (SUTTO sub-brand) |
| Тип мотора | 36V 250W Brushless Gearless Hub Motor |
| Максимални обртни момент | 45 Нм |
| Мак Спеед | 25 - 32 км/х |
| Компатибилне величине точкова | 26", 27.5", 700C (28"), 29" |
| Компатибилност кочница | Disc Brake Only |
| Rear Dropout Width | 130 - 140 mm (Motor width: 138 mm) |
| Дисплаи | DZ40 LCD Uart Display (IP65 Waterproof) |
| Нивои ПАС-а | 5 нивоа |
| Фреевхеел | Shimano 7-Speed Freewheel |
| Controller Rated Voltage | 36В |
| Controller Rated Current | 7A |
| Controller Max. Current | 15А |
| Controller Low Voltagе Заштита | 29В |
| Величина контролера | 90 мм к 50 мм к 30 мм (3.54" к 1.97" к 1.18") |
| Главни материјал | Алуминијум |
| Item Weight (Motor) | 3.9 кг |
9. Гаранција и подршка
SUTTO (Varstrom) is committed to customer satisfaction and product quality.
- гаранција: The hub motor is covered by a one-year warranty. All other components included in the kit are subject to a 6-month warranty.
- Захтеви у вези са гаранцијом: In case of a defect or malfunction within the warranty period, please contact your retailer or Varstrom customer support with your proof of purchase.
- Подршка: For technical assistance, troubleshooting, or any questions regarding your SUTTO E-Bike Conversion Kit, please refer to the contact information provided by your retailer or on the official Varstrom webсајту.