1. Увод
This manual provides detailed instructions for the installation, operation, and maintenance of your darkFlash Aquarius Mesh Computer Case. Please read this manual thoroughly before beginning installation to ensure proper setup and safe use of your new computer chassis.
2. Безбедносне информације
Увек се придржавајте следећих мера предострожности:
- Disconnect all power sources before installing or removing any components.
- Носите антистатичку наруквицу како бисте спречили оштећење компоненти услед електростатичког пражњења (ESD).
- Пажљиво рукујте компонентама како бисте избегли физичка оштећења.
- Држите мале делове и алате даље од деце.
- Ensure proper ventilation around the computer case.
3. Садржај пакета
Проверите да ли су све ставке присутне у вашем пакету:
- darkFlash Aquarius Mesh Computer Case
- Кутија са додатном опремом (шрафови, одстојници, кабловске везице итд.)
- Кориснички приручник (овај документ)
4. Подешавање и инсталација
Follow these steps for proper component installation.
4.1. Припрема случаја
Before installing components, remove the side panels. The Aquarius Mesh case typically features a tempered glass side panel and a solid metal panel.
- Locate the thumbscrews on the rear of the case securing the side panels.
- Unscrew the thumbscrews and carefully slide the panels backward, then lift them off.

Слика 1: Предња и бочна страна view of the darkFlash Aquarius Mesh case. Note the mesh front panel and tempered glass side panel.

Слика 2: Задња страна view of the darkFlash Aquarius Mesh case, showing expansion slots and rear fan mount.
4.2. Инсталација матичне плоче
The Aquarius Mesh supports ATX, Micro-ATX, and Mini-ITX motherboards.
- Инсталирајте И/О штит у изрез на задњој страни кућишта.
- Align your motherboard with the pre-installed standoffs. Ensure the I/O ports align with the I/O shield.
- Secure the motherboard with the appropriate screws from the accessory box.
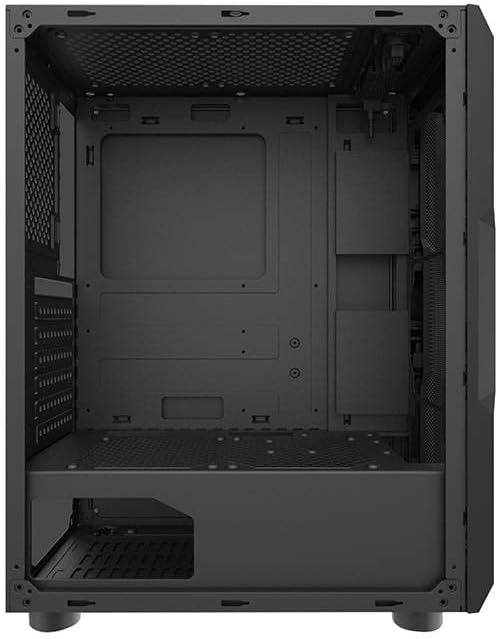
Слика 3: Унутрашњост view of the darkFlash Aquarius Mesh case, highlighting the motherboard tray and cable routing options.
4.3. Инсталација јединице за напајање (PSU)
The PSU mounts at the bottom rear of the case.
- Slide the PSU into its designated compartment from the rear of the case.
- Align the screw holes and secure the PSU with screws.
4.4. Инсталација уређаја за складиштење података
The case provides mounting options for 3.5-inch HDDs and 2.5-inch SSDs.
- 3.5" HDD-ови: Locate the drive cage usually beneath the PSU shroud or behind the motherboard tray. Slide the HDD into the bay and secure it with screws.
- 2.5" SSD дискови: Mount SSDs to dedicated brackets behind the motherboard tray or on the PSU shroud. Secure with screws.

Слика 4: Задњи ентеријер view of the darkFlash Aquarius Mesh case, showing the motherboard cutout and potential SSD mounting points.
4.5. Expansion Card Installation (e.g., GPU)
- Уклоните потребне поклопце слотова за проширење са задње стране кућишта.
- Insert the expansion card into the appropriate PCIe slot on the motherboard.
- Secure the card with the provided screws or retention clips.
4.6. Менаџмент каблова
Користите изрезе за усмеравање каблова и тачке за везивање иза лежишта матичне плоче да бисте организовали каблове. Ово побољшава проток ваздуха и естетику.
4.7. Reassembling the Case
Once all components are installed and cables are managed:
- Carefully reattach the side panels, ensuring they slide into place correctly.
- Secure the side panels with the thumbscrews.
5. Упутство за употребу
After assembly, connect your peripherals and power cable.
- Connect your monitor, keyboard, mouse, and other peripherals to the motherboard's I/O ports.
- Повежите кабл за напајање са напајањем и зидном утичницом.
- Press the power button located on the top panel of the case to start your computer.

Слика 5: Врх view of the darkFlash Aquarius Mesh case, showing the front I/O panel with power button, reset button, USB ports, and audio jacks.
6. Одржавање
Regular maintenance helps ensure optimal performance and longevity of your computer components.
- Филтери за прашину: The Aquarius Mesh case features removable dust filters (e.g., on the front, top, and bottom). Regularly remove and clean these filters with water and mild soap, or by vacuuming, to maintain good airflow. Ensure they are completely dry before reinstallation.
- Унутрашње чишћење: Periodically open the case and use compressed air to remove dust buildup from fans, heatsinks, and other components.
- Спољно чишћење: Обришите спољашње површине меком, дamp тканина. Избегавајте јаке хемикалије.
КСНУМКС. Решавање проблема
Ако наиђете на проблеме, размотрите следећа уобичајена решења:
- Нема напајања:
- Уверите се да је прекидач напајања у положају „УКЉУЧЕНО“.
- Проверите све прикључке за напајање на матичној плочи и компонентама.
- Verify the power cable is securely plugged into the wall outlet and PSU.
- Вентилатори се не окрећу:
- Check fan connections to the motherboard or fan controller.
- Ensure fans are not obstructed by cables or dust.
- У/И на предњој плочи не ради:
- Verify that the front panel connectors (USB, audio, power/reset switches) are correctly connected to the motherboard headers. Refer to your motherboard manual for header locations.
8. Спецификације
| Феатуре | Детаљ |
|---|---|
| Бранд | darkFlash |
| Број модела | Aquarius Mesh |
| Тип случаја | Мид-Товер |
| Материјал | легирани челик |
| Боја | Црно |
| Метод хлађења | Ваздух |
| Препоручена употреба | Рачунар |
| Форм фактор чврстог диска | 3.5 инча |
9. Гаранција и подршка
For warranty information or technical support, please refer to the official darkFlash webсајт или контактирајте њихову корисничку службу. Сачувајте доказ о куповини за потребе гаранције.
За додатну помоћ, можете посетити darkFlash official webсајту.