1. Увод
This manual provides detailed instructions for the operation and maintenance of your Jectse Smart RFID NFC Copier. This device is designed for reading, writing, and duplicating various RFID and NFC cards and keyfobs across multiple frequencies. Please read this manual thoroughly before use to ensure proper functionality and to prevent damage.
2. Производ је готовview
The Jectse Smart RFID NFC Copier is a handheld device featuring a color display and a numeric keypad for easy operation. It supports a wide range of card types and frequencies.
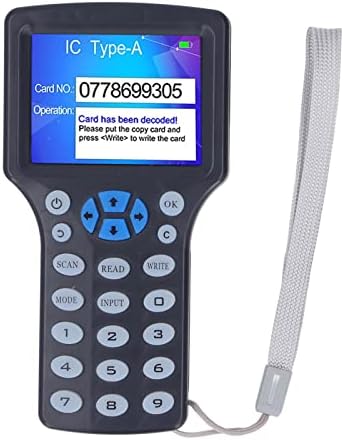
Слика 2.1: Jectse Smart RFID NFC Copier. This image shows the front view of the handheld copier with its color screen and keypad.
2.1 Компоненте и контроле
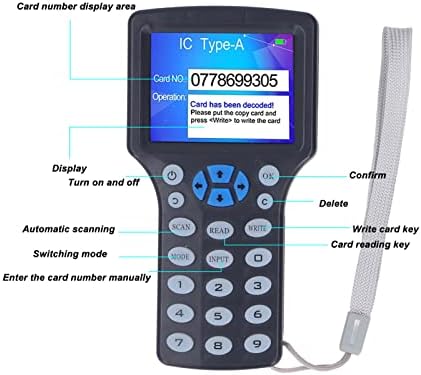
Слика 2.2: Labeled diagram of the copier's display and controls. Key elements include the display area, power button, OK button, delete button, scan button, read button, write button, mode switch, and input keys.
- Област приказа: Shows card number, operation status, and messages.
- Дугме за напајање: Укључује и искључује уређај.
- Дугме ОК: Потврђује изборе или радње.
- Ц дугме: Deletes input or cancels operations.
- Дугме СЦАН: Initiates automatic scanning for card types.
- Дугме ПРОЧИТАЈ: Reads data from a card.
- WRITE Button: Writes data to a card.
- Дугме МОДЕ: Пребацује се између различитих режима рада.
- Дугме ИНПУТ: Allows manual entry of card numbers.
- Нумеричка тастатура (0-9): For entering data.
- Тастери за смер: For navigation on the display.
2.2 Садржај пакета

Слика 2.3: Included accessories: USB data cable and two blue keyfobs. The package typically includes the copier unit, a USB data cable, and several writable keychains/cards.
- Jectse Smart RFID NFC Copier Unit
- УСБ кабл за пренос података
- Writable Keychains (Quantity may vary)
- Writable Cards (Quantity may vary)
3. Подешавање
3.1 Напајање
Уређај се може напајати на два начина:
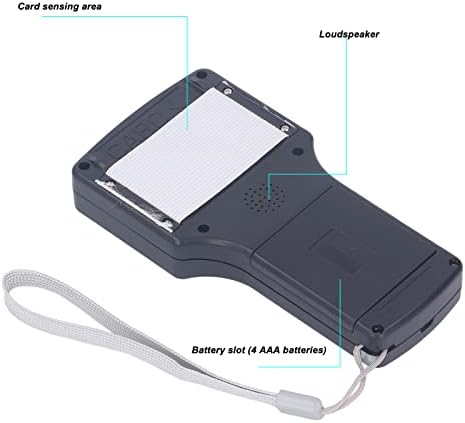
Слика 3.1: Позади view of the copier, highlighting the battery slot and card sensing area. The battery compartment is located on the back of the device.
- ААА батерије: Open the battery compartment on the back of the device and insert 4 AAA batteries (not included), ensuring correct polarity.
- УСБ напајање: Connect the device to a computer or a USB power adapter using the provided USB data cable.
Press the power button to turn on the device. The display will light up.
3.2 Connecting to a Computer (for Decryption)
For decrypting certain 13.56MHz encrypted cards, the device must be connected to a computer.
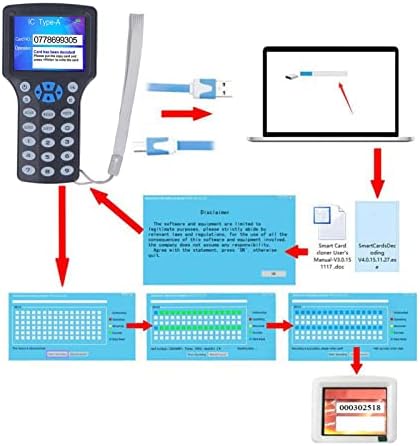
Слика 3.2: Connection diagram illustrating the copier connected to a computer via USB, with a representation of the software interface. The USB cable connects the copier to a computer for advanced functions like decryption and software interaction.
- Connect the USB data cable from the copier to an available USB port on your computer.
- The device may require specific software for decryption. Refer to the manufacturer's website or included documentation for software installation instructions.
4. Упутство за употребу
4.1 Reading a Card
- Укључите уређај.
- Place the card or keyfob you wish to read on the card sensing area (located on the back of the device, refer to Figure 3.1).
- Притисните тастер ПРОЧИТАЈТЕ дугме.
- The display will show the card number and type if successful.
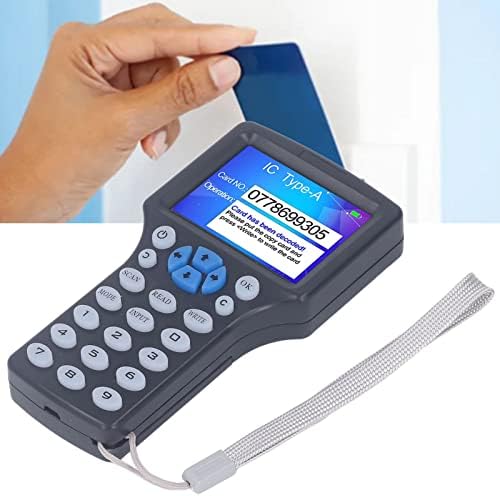
Слика 4.1: Demonstrating how to place a card on the copier for reading. The card is held flat against the back of the device.
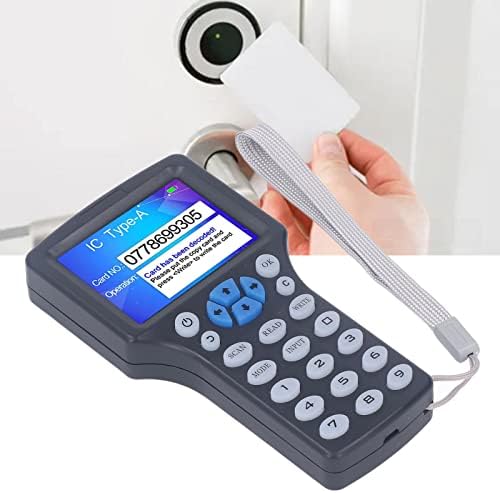
Слика 4.2: An alternative perspective of placing a card for reading. Ensure the card is positioned correctly over the sensing area.
4.2 Writing/Duplicating a Card
To duplicate a card, you must first read the source card, then write the data to a compatible writable card or keyfob.
- Follow the steps in Section 4.1 to read the source card. Ensure the card data is displayed on the screen.
- Remove the source card.
- Place a compatible writable card or keyfob (e.g., UID keychain, T5577 card) on the card sensing area.
- Притисните тастер ВРИТЕ дугме.
- The display will indicate if the writing process was successful.
Напомена: For successful writing, ensure the target card is a writable type (e.g., UID cards for 13.56MHz, T5577 for 125KHz). Standard read-only cards cannot be written to.
4.3 Decrypting Encrypted 13.56MHz Cards
The device can decrypt most 13.56MHz encrypted cards when connected to a computer.
- Connect the copier to your computer via the USB cable (refer to Section 3.2).
- Launch the dedicated decryption software on your computer.
- Follow the software's instructions to initiate the decryption process. This typically involves placing the encrypted card on the copier's sensing area and allowing the software to analyze and decrypt the data.
- Once decrypted, the software will guide you through writing the decrypted data to a new writable card.
Важно: Decryption capabilities may vary depending on the encryption complexity and the specific software version. Not all encrypted cards can be decrypted.
4.4 Frequency Support
The copier supports reading and writing across a broad range of frequencies:
- 125КХз
- 250КХз
- 375КХз
- 500КХз
- 625КХз
- 750КХз
- 875КХз
- 1000КХз
- 13.56МХз
It is compatible with various card types including ISO 14443 A cards, EM cards, T5577 cards, Ntag 213/215/216, and others.
5. Одржавање
- Чишћење: Користите меку, суву крпу за чишћење уређаја. Избегавајте употребу течних средстава за чишћење или абразивних материјала.
- Складиштење: Уређај чувајте на хладном и сувом месту, даље од директне сунчеве светлости и екстремних температура.
- Замена батерије: If using AAA batteries, replace all four batteries simultaneously when the low battery indicator appears on the display.
- Ажурирања софтвера: Периодично проверавајте произвођачеве website for any available software or firmware updates for enhanced functionality or compatibility.
КСНУМКС. Решавање проблема
| Проблем | Могући узрок | Решење |
|---|---|---|
| Уређај се не укључује. | Low or depleted batteries; USB cable not connected properly. | Replace AAA batteries or ensure USB cable is securely connected to a power source. |
| Cannot read a card. | Card not placed correctly; card type not supported; card damaged. | Ensure the card is flat against the sensing area. Try another card. Verify card type compatibility. |
| Cannot write to a card. | Target card is not writable; data not read correctly from source card; target card damaged. | Ensure the target card is a compatible writable type (e.g., UID, T5577). Re-read the source card. Try a different writable card. |
| Decryption fails for 13.56MHz card. | Card encryption too complex; software not installed or updated; device not connected to PC. | Ensure the device is connected to a PC with the correct software. Update software. Note that some advanced encryption may not be supported. |
| Екран је празан или не реагује. | Power issue; device malfunction. | Check power supply. Try restarting the device. If the problem persists, contact customer support. |
7. Спецификације
| Феатуре | Детаљ |
|---|---|
| Назив модела | Jectsegr19nkhvsb |
| Подржане фреквенције | 125KHz, 250KHz, 375KHz, 500KHz, 625KHz, 750KHz, 875KHz, 1000KHz, 13.56MHz |
| Дисплаи | HD 2.8 inch full color screen |
| Повер Суппли | 4 x AAA batteries or USB power supply |
| Повезивање | УСБ тип А |
| Компатибилност оперативног система | WinCE 5, Windows 98, Windows Vista (for PC connection/software) |
| Тежина артикла | 11.6 унци |
| Димензије пакета | 7.56 к 6.26 к 2.32 инча |
| Посебна карактеристика | Компактан дизајн |
8. Гаранција и подршка
For warranty information and technical support, please refer to the official Jectse webсајт или контактирајте продавца. Сачувајте рачун као доказ о куповини.
Manufacturer: Jectse