1. Увод
Thank you for choosing the Crivit Auriol Radio-Controlled Projection Alarm Clock. This device combines a precise radio-controlled clock with a clear LCD display, dual alarms, and a convenient projection feature. This manual will guide you through the setup, operation, and maintenance of your new alarm clock.

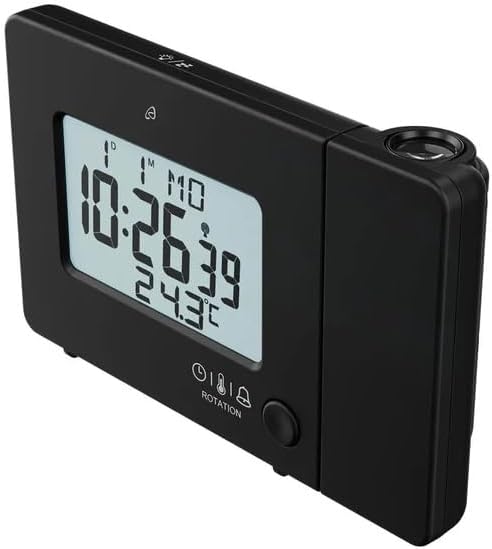
Фронт view of the alarm clock displaying time, date, and temperature.
2. Безбедносна упутства
- Пажљиво прочитајте сва упутства пре употребе и сачувајте их за будућу употребу.
- Не излажите уређај екстремним температурама, директној сунчевој светлости или високој влажности.
- Избегавајте испуштање или излагање уређаја јаким ударима.
- Не покушавајте сами да растављате или поправљате уређај. Обратите се квалификованом сервисеру.
- Keep batteries out of reach of children. Dispose of used batteries according to local regulations.
- Use only the provided AC adapter or one with identical specifications.
3. Садржај пакета
Молимо вас да проверите пакет за следеће ставке:
- Crivit Auriol Radio-Controlled Projection Alarm Clock (Model 373928)
- АЦ адаптер
- Батерије (унапред инсталиране или одвојене)
- Кориснички приручник (овај документ)

Included AC power adapter.
4. Карактеристике производа
- Радио-контролисано време: Automatic time synchronization for precise timekeeping.
- Функција пројекције: Projects time, alarm times, or ambient temperature onto a wall or ceiling.
- Pivoting Projection Arm: Adjustable projection angle with easy focus adjustment.
- ЛЦД екран: Clear screen showing time, day, month, week number/day of the week, and indoor temperature.
- Двоструки аларми: Two independent alarm settings with snooze function.
- Сензор на додир: Activates short-term projection and screen backlight.
- Опције напајања: Operates via AC adapter or batteries.
- УСБ-А прикључак за пуњење: Convenient 5V, 800mA output for charging external devices.
- Подесива осветљеност: Customizable display brightness.
5. Идентификација компоненте
Фронт View:
Фронт view with LCD display.
- ЛЦД екран: Shows time, date, temperature, alarm status, and radio control signal.
- Touch Sensor Area: Located above the display, for temporary backlight and projection.
- Projection Indicator: Icon indicating projection is active.
- Индикатори аларма: Иконе за аларм 1 и аларм 2.
- Дугме за ротацију: Adjusts projection orientation.
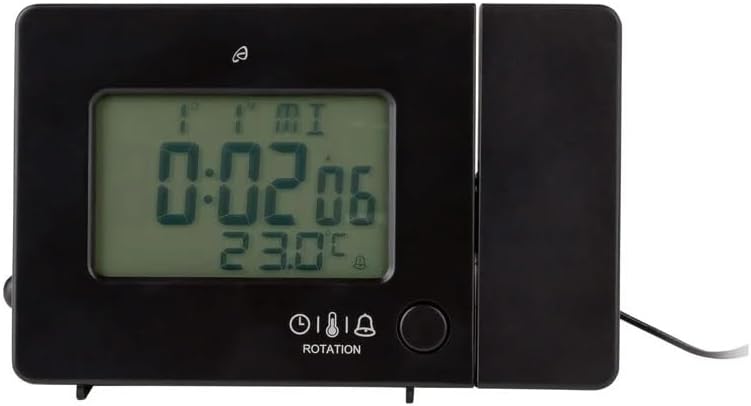
Сиде View (Projection Arm):
Сиде view with projection arm extended.
- Пројекциона рука: Pivots to direct the projection.
- Точак фокуса: Подешава јасноћу пројектоване слике.
- Пројекционо сочиво: Emits the time/temperature display.
Позади View:

Позади view with control buttons and ports.
- -/WEEK Button: Decreases values, sets week display.
- +/ZONE Button: Increases values, sets time zone.
- Дугме °Ц/°Ф: Toggles temperature unit.
- LANG Button: Selects display language for day of the week.
- Дугме 12/24: Toggles 12/24 hour format.
- Дугме МОДЕ: Cycles through settings modes (Time, Alarm 1, Alarm 2).
- СЕТ дугме: Enters setting mode for current display.
- Ресет: Resets the device to factory defaults (use a pointed object).
- Одељак за батерије: For backup batteries.
- ДЦ ИН порт: За повезивање АЦ адаптера за напајање.
- УСБ-А излазни порт: За пуњење екстерних уређаја.
6. Подешавање
6.1. Укључивање
The alarm clock can be powered by either the included AC adapter or batteries for backup.
- Инсталација батерије: Open the battery compartment on the rear of the unit. Insert the included batteries, observing the correct polarity (+/-). Batteries primarily serve as backup in case of power outage.
- Повезивање АЦ адаптера: Connect the small plug of the AC adapter into the DC IN port on the back of the alarm clock. Plug the AC adapter into a standard wall outlet. The display will light up.
Alarm clock connected to power.
6.2. Initial Setup and Radio Control Synchronization
Upon first power-up or after a reset, the clock will automatically attempt to synchronize with the radio-controlled time signal (DCF77). This process can take several minutes to an hour, depending on your location and signal strength. During synchronization, a radio tower icon will flash on the display.
- Place the clock near a window for better signal reception.
- Avoid placing it near electronic devices that may cause interference.
- Once synchronized, the radio tower icon will appear solid on the display.
If the radio signal is not received, you may need to set the time manually (see Section 7.1).
6.3. Basic Settings (if not automatically set or for adjustment)
Притисните тастер СЕТ button to enter setting mode. Use the -/WEEK и +/ZONE buttons to adjust values, and СЕТ да потврдите и пређете на следеће подешавање.
- временска зона: Adjust if you are not in the standard time zone for the radio signal.
- Формат 12/24 сата: Притисните тастер 12/24 button to toggle between 12-hour (with AM/PM) and 24-hour formats.
- Јединица температуре: Притисните тастер ° Ц/° Ф dugme za prebacivanje između Celzijusa i Farenhajta.
- Језик приказа: Притисните тастер ЛАНГ button to select the language for the day of the week display (5 languages available).
7. Упутство за употребу
7.1. Ручно подешавање времена
If the radio-controlled time signal is weak or unavailable, you can set the time manually:
- Притисните и држите СЕТ дугме док цифре сати не почну да трепћу.
- Користите -/WEEK и +/ZONE дугмад за подешавање сата.
- Притисните СЕТ to confirm and move to minutes, then year, month, and day.
- Притисните СЕТ again to exit manual time setting.
7.2. Подешавање аларма (Аларм 1 и Аларм 2)
Сат има два независна аларма.
- Притисните тастер МОДЕ button once to display Alarm 1 time, or twice for Alarm 2 time. The corresponding alarm icon (e.g., A1) will flash.
- While the alarm time is displayed, press and hold the СЕТ дугме док цифре сати не почну да трепћу.
- Користите -/WEEK и +/ZONE дугмад за подешавање сата.
- Притисните СЕТ to confirm and move to minutes. Adjust minutes using -/WEEK и +/ZONE.
- Притисните СЕТ again to confirm and exit alarm setting.
- Да бисте активирали/деактивирали аларм, притисните дугме МОДЕ button to display the desired alarm, then press the +/ZONE button. The alarm icon (bell) will appear/disappear on the display.
7.3. Функција одлагања
When an alarm sounds, touch the Додирните област сензора или притисните тастер СНООЗЕ / СВЕТЛО button (if available, otherwise use the touch sensor) to activate the snooze function. The alarm will pause for approximately 5 minutes and then sound again. To stop the alarm completely, press any other button.
7.4. Projection Function
The alarm clock can project the time, alarm times, or ambient temperature onto a wall or ceiling.
- Активирај пројекцију: The projection is continuously active when powered by the AC adapter. If running on batteries, touch the Додирните област сензора for short-term projection.
- Подесите угао пројекције: Pivot the projection arm to direct the image to your desired location.
- Подесите фокус: Користите Фоцус Вхеел on the projection arm to sharpen the projected image.
- Change Projected Content: Притисните тастер МОДЕ button repeatedly to cycle through projecting Time, Alarm 1, Alarm 2, or Temperature.
- Ротациона пројекција: Притисните тастер РОТАЦИЈА button to rotate the projected image by 90-degree increments (4 orientations available).

Time projected onto a surface.
7.5. Позадинско осветљење екрана
When powered by the AC adapter, the display backlight is continuously on. When running on batteries, touch the Додирните област сензора to activate the backlight for a few seconds.
7.6. USB Charging Output
The USB-A port on the back of the unit provides a 5V, 800mA output for charging small electronic devices like smartphones or tablets. Connect your device's USB charging cable to this port.
8. Одржавање
- Чишћење: Обришите уређај меком, сувом крпом. Не користите абразивна средства за чишћење или раствараче.
- Замена батерије: If using batteries for backup, replace them annually or when the display becomes dim during power outages. Ensure correct polarity.
- Складиштење: Ако уређај складиштите дуже време, извадите батерије да бисте спречили цурење.
КСНУМКС. Решавање проблема
| Проблем | Могући узрок | Решење |
|---|---|---|
| Екран је празан или замагљен. | No power, dead batteries, or AC adapter not connected. | Ensure AC adapter is securely connected. Replace batteries if using for backup. |
| Radio-controlled time not synchronizing. | Weak signal, interference, or incorrect time zone. | Move the clock to a window or open area. Avoid electronic devices. Manually set time if necessary. Check time zone setting. |
| Пројекција је мутна. | Фокус није подешен. | Подесите Фоцус Вхеел on the projection arm. |
| Аларм се не оглашава. | Аларм није активиран или је погрешно подешен. | Ensure the alarm icon is visible on the display. Recheck alarm time settings. |
| УСБ пуњење не ради. | Device not properly connected, or device requires more power than 800mA. | Ensure the USB cable is securely connected. Check if your device's charging requirements exceed 5V/800mA. |
10. Спецификације

Димензије производа.
- Број модела: 373928
- Димензије (Д к Ш к В): 15 x 3.81 x 9.5 cm (approx. 15l x 9.5H centimeters)
- Материјал: Пластика
- Тип приказа: Дигитални ЛЦД
- Извор напајања: AC Adapter (included) or Batteries (included)
- УСБ излаз: 5В, 800мА
- Посебне карактеристике: Adjustable brightness, Snooze, Projection, Radio-controlled time
- Тип покрета: кварц
- Тип монтаже: Таблетоп
- Унутрашња/спољашња употреба: Индоор
11. Гаранција и подршка
This Crivit Auriol Projection Alarm Clock comes with a standard manufacturer's warranty. Please refer to the warranty card included in your package or contact your retailer for specific warranty terms and conditions.
For technical support or inquiries, please contact the customer service department of your retailer or the Crivit support line as indicated on the product packaging or official webсајту.