Увод
The XTUGA CT160 is a versatile 16-channel audio mixer designed for a wide range of applications including DJ performances, podcasts, studio recording, karaoke, and live sound. This mixer features multi-device compatibility, low-noise operation, a slim and durable design, high-definition audio processing, built-in Bluetooth playback, and USB connectivity for recording and media playback. This manual provides detailed instructions to help you set up, operate, and maintain your CT160 audio mixer.
Почетно подешавање
Распакивање и садржај
Carefully unpack your XTUGA CT160 audio mixer and verify that all components are present. The package should include:
- XTUGA CT160 Audio Mixer Unit
- АЦ адаптер
- Упутство за употребу (овај документ)

Повер Цоннецтион
Connect the provided AC power adapter to the mixer's power input located on the rear panel. Ensure the power switch is in the OFF position before connecting to a power outlet. Once connected, you can switch the power ON.

Mixer Controls Overview
This section details the various controls and their functions on your XTUGA CT160 audio mixer.
Input Channels (1-16)
Each of the 16 input channels features dedicated controls for optimal sound shaping.

- Input Jacks (XLR/Line): Each channel is equipped with a combination jack that accepts both XLR (for microphones) and 6.35mm (1/4 inch) line-level inputs (for instruments or other audio devices).
- Фантомско напајање од 48V: A dedicated switch for each channel activates +48V phantom power, essential for condenser microphones. Ensure phantom power is only used when required by your microphone.
- Гаин Цонтрол: Adjusts the input sensitivity for each channel. Set this to achieve a strong signal without clipping (distortion).
- 3-Band EQ Adjustment (High, Mid, Low): These blue knobs allow you to fine-tune the high, mid, and low frequencies of each channel's audio signal for desired tonal characteristics.
- AUX Control (Orange Knobs): Controls the level of the signal sent to the auxiliary output, useful for monitor mixes or external effects.
- FX Send Control (Green Knobs): Adjusts the amount of signal sent from the channel to the internal digital effects processor.
- Pan Balance: Positions the channel's signal within the stereo field (left to right).
- Дугме за утишавање: Silences the individual channel's output.
- Цханнел Фадерс: Controls the overall volume level of each individual channel.


Мастер Сецтион
The master section provides overall control and connectivity options.

- USB/MP3 Player: A USB port allows for direct playback of MP3/WAV/WMA files from a USB flash drive. It also enables connection to a computer for recording and playback.
- Блуетоотх повезивање: Wirelessly stream audio from your smartphone, tablet, or other Bluetooth-enabled devices.
- MP3 EQ: Equalizer controls specifically for adjusting the tone of audio played through the MP3 player.
- 7-Band Stereo Graphic Equalizer: Provides precise frequency adjustment for the main stereo output, allowing you to tailor the overall sound to your environment.
- Main Outputs (XLR & 6.35mm): Balanced XLR and unbalanced 6.35mm (1/4 inch) jacks for connecting to main speakers or power ampлифиерс.
- АУКС излаз: Additional auxiliary output for sending a mixed signal to external devices.
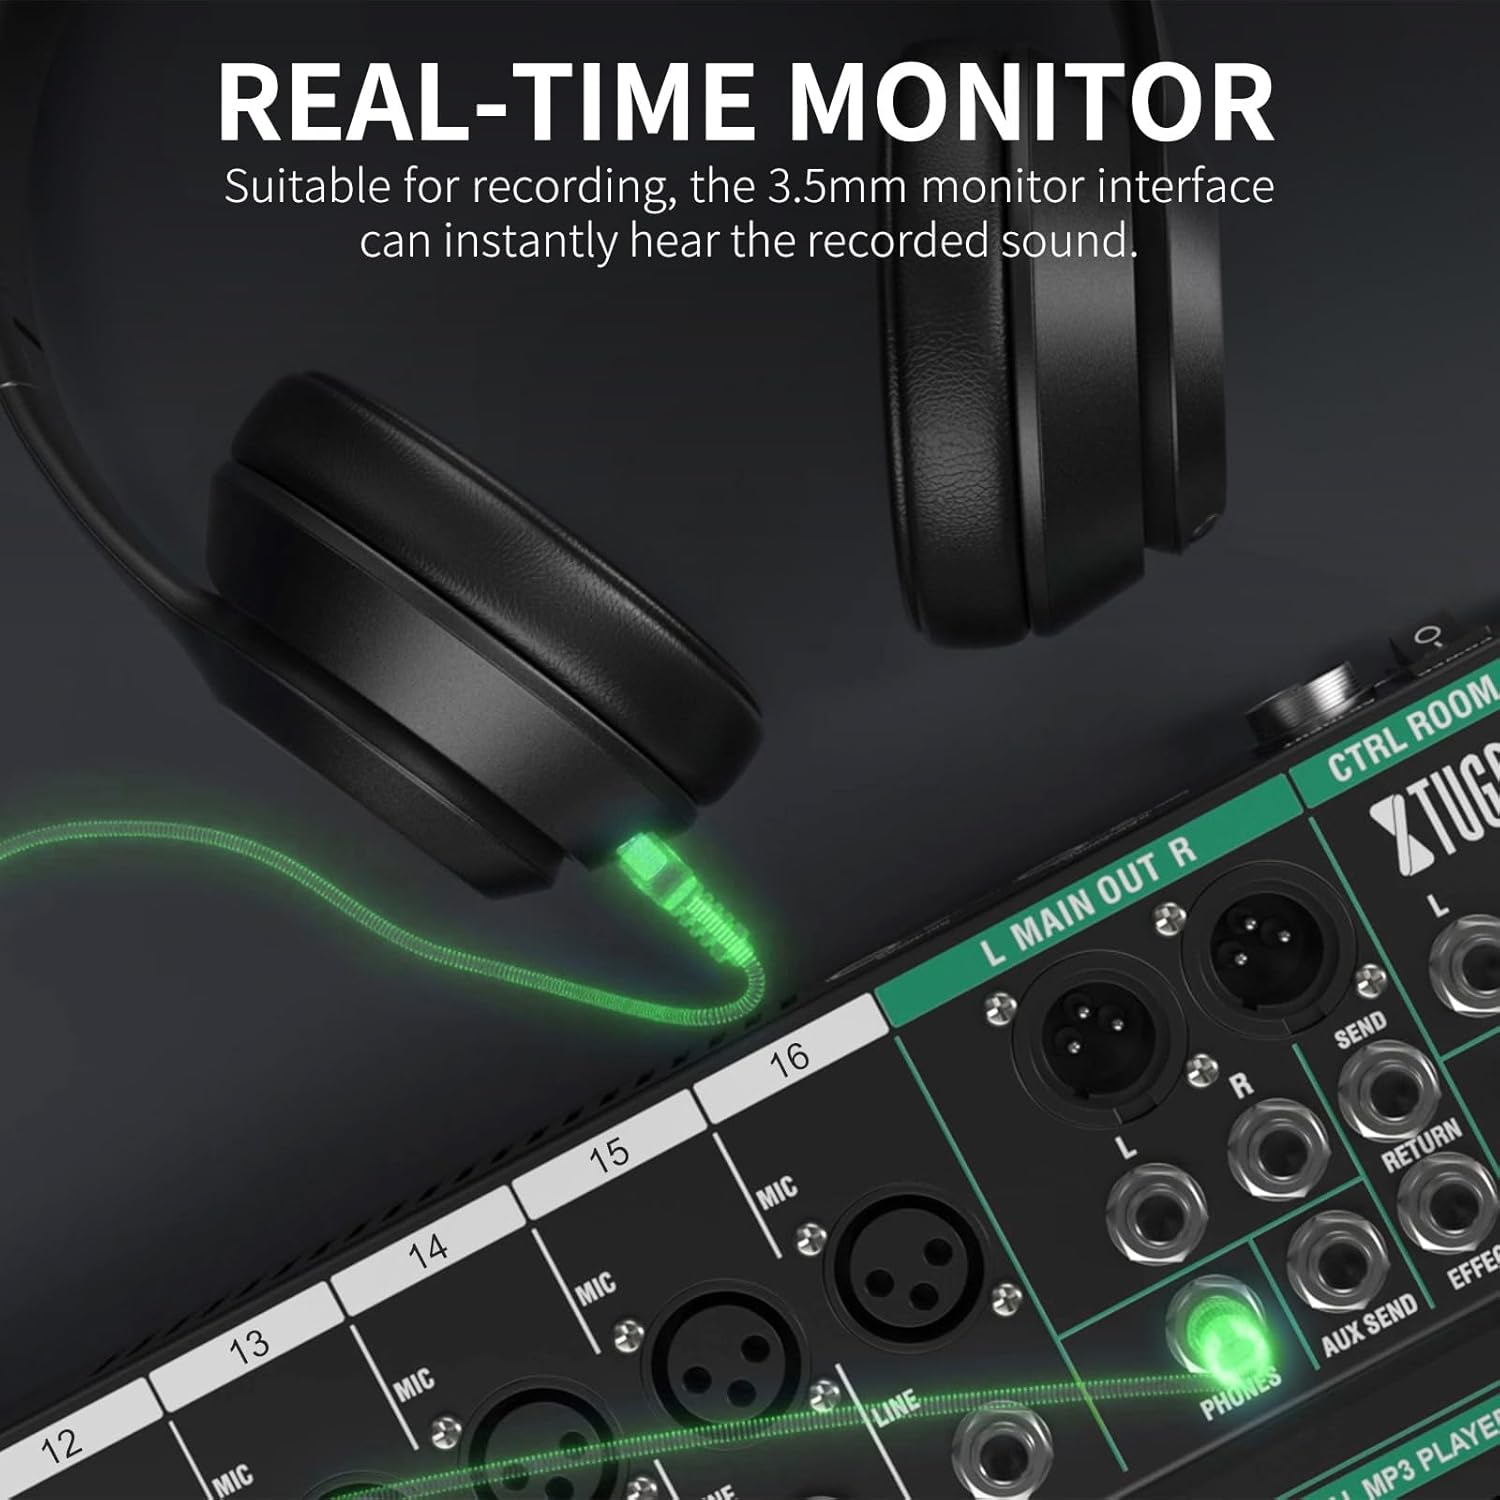
- Телефонски излаз: A 6.35mm (1/4 inch) headphone jack with dedicated volume control for monitoring the mix.
- Program/DSP Effects: A rotary encoder and button to select and apply one of the 99 built-in digital effects (e.g., reverb, delay, chorus).
- Main Faders (Red/Blue): Controls the overall volume of the main stereo output. The red faders control the left and right main outputs, while the blue fader controls the FX return level.
- Мерачи нивоа: LED indicators display the output level of the main mix, helping to prevent clipping and ensure optimal signal strength.


Оперативни режими
Повезивање спољних уређаја
The CT160 mixer supports a wide array of external devices for various audio setups.

УСБ репродукција и снимање
To play audio from a USB drive, insert the drive into the USB port. Use the MP3 player controls to navigate and play tracks. For computer recording, connect the mixer to your computer via a USB cable. The mixer will function as an audio interface, allowing you to record the stereo mix into your Digital Audio Workstation (DAW).

Блуетоотх стриминг
Activate Bluetooth on your external device (e.g., smartphone, tablet). Press the 'MODE' button on the mixer's MP3 player section until 'BLUE' appears on the display. Тражи 'BT-Speaker' on your device and pair. Audio from your device will now stream wirelessly through the mixer.
Digital Effects (DSP)
The CT160 features 99 built-in Digital Signal Processing (DSP) effects to enhance your audio. Use the 'PROGRAM' knob to select an effect and the 'FX SEND' knobs on individual channels to apply the effect to specific inputs. The blue fader in the master section controls the overall return level of the effects.
Техничке спецификације
| Феатуре | Спецификација |
|---|---|
| Модел | ЦТ160 |
| Број канала | 16 |
| Тежина артикла | 6.69 килограма (14.72 фунте) |
| Димензије пакета | 27.2 к 17.8 к 4.5 инча |
| Извор напајања | Цордед Елецтриц |
| Технологија повезивања | Блуетоотх, УСБ |
| Пхантом Повер | +48V (per channel) |
| Дигитал Еффецтс | 99 DSP ефекти |
Решавање проблема
If you encounter any issues with your XTUGA CT160 mixer, refer to the following common problems and solutions:
- Нема излаза звука:
- Check all power connections and ensure the mixer is turned on.
- Verify that input sources are properly connected and active.
- Ensure channel faders, main faders, and master volume are raised.
- Check if any channels are muted.
- Confirm output cables are correctly connected to speakers/amplifiers and they are powered on.
- Искривљени звук:
- Reduce the Gain control for the affected channel.
- Lower the main faders or master volume.
- Check the input signal level to ensure it's not too hot before reaching the mixer.
- Зујање или шум:
- Уверите се да су сви каблови безбедно повезани.
- Use balanced XLR cables for microphones and main outputs where possible.
- Check for ground loops by trying different power outlets or using a ground lift adapter (if safe and necessary).
- Држите аудио каблове даље од каблова за напајање.
- Проблеми са Блуетоотх везом:
- Ensure the mixer is in Bluetooth mode ('BLUE' displayed).
- Распарите и поново упарите уређај.
- Ensure the Bluetooth device is within range.
Нега и одржавање
To ensure the longevity and optimal performance of your XTUGA CT160 audio mixer, follow these maintenance guidelines:
- Чишћење: Use a soft, dry cloth to clean the exterior of the mixer. Avoid using liquid cleaners, solvents, or abrasive materials, as these can damage the finish and internal components.
- Складиштење: Store the mixer in a cool, dry place away from direct sunlight, extreme temperatures, and high humidity. If transporting, use appropriate padding or a case to protect it from physical damage.
- Заштита од прашине: When not in use, cover the mixer with a dust cover to prevent dust and debris from accumulating on the controls and inside the unit.
- Пажљиво рукујте: Avoid dropping or subjecting the mixer to strong impacts. Be gentle when operating knobs, faders, and connecting cables.
Гаранција и подршка
For warranty information, technical support, or service inquiries regarding your XTUGA CT160 audio mixer, please refer to the contact details provided on the XTUGA official website or the product packaging. Keep your purchase receipt as proof of purchase for warranty claims.