1. Увод
This manual provides essential information for the safe and efficient operation of your LiTime 60 Amp MPPT Solar Charge Controller. Please read this manual thoroughly before installation and use. This controller is designed to optimize power harvesting from solar panels to charge various battery types, including LiFePO4 and Lead-acid batteries, across 12V, 24V, and 48V systems.
Кључне карактеристике укључују:
- Advanced Maximum Power Point Tracking (MPPT) technology with 99% tracking efficiency and up to 96% peak conversion efficiency.
- Compatibility with multiple system voltages (12V/24V/48V for LiFePO4 and 12V/24V/36V/48V/Auto for Lead-acid batteries).
- Integrated LCD screen and LED indicators for system monitoring.
- Robust sheet metal shell with dual forced cooling for effective heat dissipation.
- Comprehensive safety protections against overpower, over-voltage, short-circuit, and over-temperature.
2. Шта је у кутији
Upon unpacking, please verify that all items listed below are present and undamaged. If any components are missing or damaged, contact customer support immediately.

Image: The contents of the product box, including the controller, manual, and accessories.
- LiTime 60 Amp МППТ соларни контролер пуњења
- Упутство за производ
- Magic Sticker (1)
- Remote Temperature Sensor (1)
- шрафови (4)
- Пластична сидра (4)
- Copper Wire Connectors (6)
- Heat Shrink Tubes (3 pairs)
3. Производ је готовview
3.1 Идентификација компоненте

Слика: Детаљна view of the controller's connection ports and mounting points.
- Терминал за уземљење: For connecting the system ground.
- Remote Temperature Sensor Port: Connects the external temperature sensor for accurate battery temperature compensation.
- Solar Panel Terminals (PV+ / PV-): Connects to the solar panel array.
- Battery Terminals (BAT+ / BAT-): Повезује се на банку батерија.
- DC Load Terminals (LOAD+ / LOAD-): Connects to DC loads.
- Communication Port (RS485): For external communication devices.
- Монтажне рупе: Used to secure the controller to a surface.
3.2 Display and Operation Keys
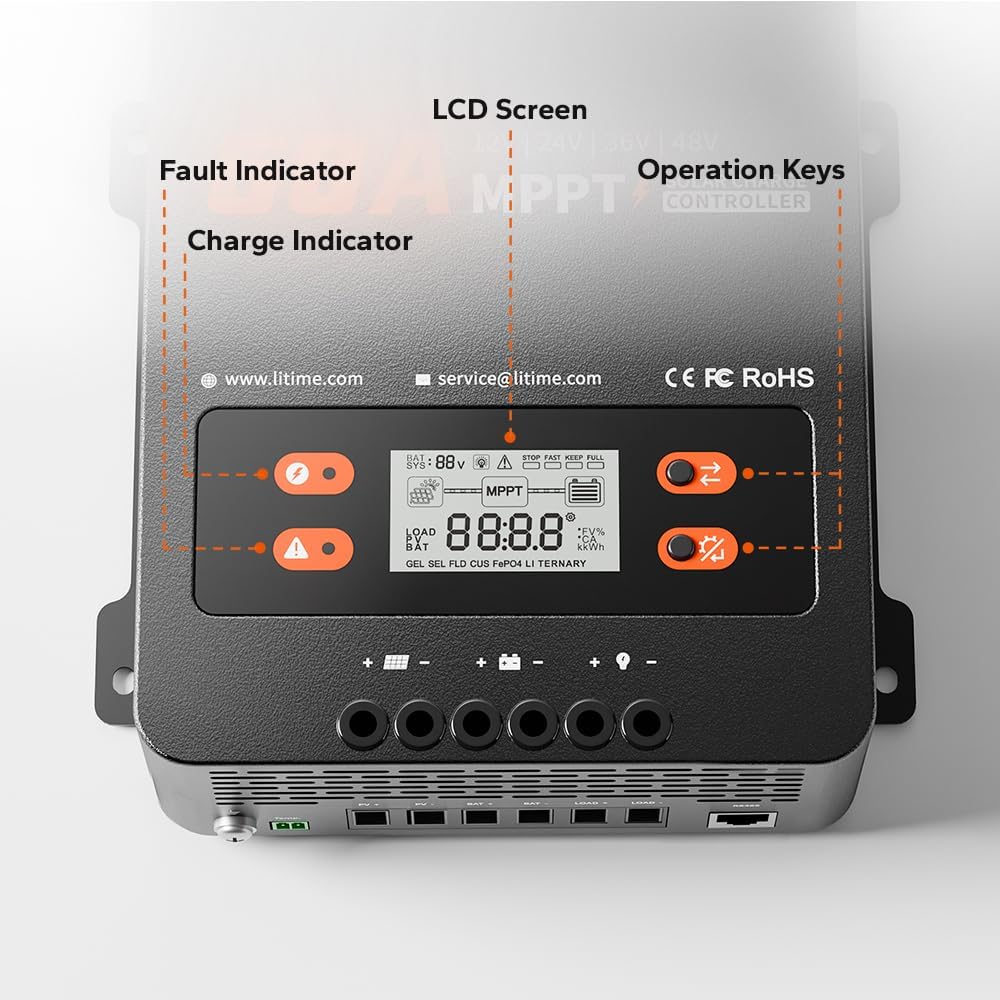
Image: A close-up of the controller's LCD screen, charge indicator, fault indicator, and operation keys.
- ЛЦД екран: Displays real-time system operation information.
- Индикатор пуњења: Illuminates to show charging status.
- Индикатор грешке: Illuminates to indicate system errors or faults.
- Оперативни кључеви: Two buttons (S Key and OK Key) for navigating menus and setting parameters.
4. Подешавање и инсталација
4.1 Избор места за монтажу
Select a dry, well-ventilated area away from direct sunlight, high temperatures, and moisture. Ensure adequate clearance around the controller for proper heat dissipation.

Image: A diagram showing the required ventilation clearances for mounting the controller, with at least 12 inches (30cm) above and below, and 2 inches (5cm) on both sides.
- Maintain at least 12 inches (30cm) of clearance above and below the controller.
- Maintain at least 2 inches (5cm) of clearance on both sides.
4.2 Монтажа контролера
The controller can be mounted on a wood wall or drywall using the provided screws and plastic anchors.
- On Wood Wall: Align the controller and fix it directly with screws.
- On Drywall: Drill holes, insert plastic anchors, then align and fix the controller with screws.
4.3 Ожичење
WARNING: Ensure all power sources are disconnected before making any connections. Incorrect wiring can damage the controller, batteries, or solar panels.
Follow the connection sequence below to prevent damage:
- Повежите батерија банка to the Battery Terminals (BAT+ / BAT-).
- Повежите ДЦ оптерећења to the DC Load Terminals (LOAD+ / LOAD-).
- Повежите solar panel array to the Solar Panel Terminals (PV+ / PV-).
- Повежите Даљински сензор температуре to its dedicated port.
- Повежите Терминал за уземљење to the system ground.

Image: An illustration of a complete solar power system setup, showing the connections between solar panels, the charge controller, battery, and an inverter/load.
4.4 Recommended Cable Size and Fuse
Proper cable sizing and fusing are critical for safety and performance.

Image: A table detailing recommended wire gauge and fuse sizes for solar panel/battery and load connections.
| Веза | Wire Gauge Recommendation | Fuse Recommendation (1.2 to 1.5 times max continuous current) |
|---|---|---|
| Solar Panel/Battery | 6 АВГ | 72А до 90А |
| Учитај | 10 АВГ | 36А до 45А |
5. Упутство за употребу
5.1 LCD екран и индикатори
The LCD screen provides real-time data, while LED indicators offer quick status updates.
- ЛЦД екран: Приказује запремину батеријеtage, charging current, load current, system status, and error codes.
- Индикатор пуњења: Solid green when charging, flashing green during float charge, off when not charging.
- Индикатор грешке: Solid red indicates a fault; refer to the troubleshooting section for details.
5.2 Operation Keys (S Key & OK Key)
The two buttons allow you to view system data and configure settings.

Image: A table detailing the functions of the 'S Key' and 'OK Key' for navigating and setting parameters on the controller's display.
| Кључ | Операција | Функција |
|---|---|---|
| С Кеи | Схорт Пресс | View Подаци у реалном времену |
| С Кеи | Притисните и држите | Није применљиво |
| ОК тастер | Схорт Пресс | View Подесите параметре |
| ОК тастер | Притисните и држите | Уђите у режим подешавања |
| Кључ | Операција | Функција |
|---|---|---|
| С Кеи | Схорт Пресс | View Претходна страница |
| С Кеи | Притисните и држите | Изађите из режима подешавања без чувања |
| ОК тастер | Схорт Пресс | View Следећа страница |
| ОК тастер | Притисните и држите | Сачувај податке и изађи из режима подешавања |
5.3 Battery Type and System Voltagе Конфигурација
The controller supports LiFePO4 and Lead-acid batteries. Parameters can be adjusted via the LCD screen in Set Mode.
- LiFePO4 Battery Charging Mode: Supports 12V, 24V, and 48V systems.
- Lead-acid Battery Charging Mode: Supports 12V, 24V, 36V, 48V, and Auto-detection systems.

Image: A table outlining the compatibility of the controller with LiFePO4 and Lead Acid batteries across different system voltages, along with maximum solar input power, PV input voltage, rated charging current, and rated load current.
6. Одржавање
Regular maintenance ensures optimal performance and longevity of your solar charge controller.
- чистоћа: Одржавајте контролер чистим и без прашине и прљавштине. Користите суву крпу за чишћење.
- Везе: Periodically check all wiring connections to ensure they are tight and free from corrosion.
- вентилација: Ensure the ventilation openings are not blocked to allow for proper airflow. The dual forced cooling system relies on clear airflow for effective heat dissipation.
- Сензор температуре: Ensure the remote temperature sensor is securely attached to the battery for accurate temperature readings.
КСНУМКС. Решавање проблема
The controller is equipped with multiple protection features to ensure safe operation. If the Fault Indicator illuminates, refer to the list below for potential issues.

Image: An illustration highlighting the nine safety protection features integrated into the solar charge controller.
7.1 Безбедносне мере заштите
The LiTime MPPT controller includes the following safety protections:
- ПВ Овер-волtagе Заштита
- ПВ заштита од обрнутог поларитета
- PV Short-circuit Protection
- Баттери Овер-волtagе Заштита
- Баттери Ундер-волtagе Заштита
- Заштита од обрнутог повезивања батерије
- Заштита од прекомерне струје
- Controller Over-temp Protection
- Low-temp Charging Protection (LTCP) for lithium batteries (stops charging below 0°C/32°F, resumes at ≥5°C/41°F).

Image: A visual explanation of the Low-Temperature Charging Protection (LTCP) feature, showing the temperature thresholds for stopping and resuming charging.
7.2 Уобичајена питања и решења
- Без напајања/приказа: Check battery connections and ensure the battery voltagе је унутар радног опсега контролера.
- Без пуњења: Verify solar panel connections, ensure sufficient sunlight, and check for PV over-voltage or short-circuit faults.
- Учитавање не ради: Check load connections, ensure the load current does not exceed the rated capacity, and verify battery voltagе је изнад ниске волtage disconnect setting.
- Over-temperature Fault: Ensure adequate ventilation around the controller. Reduce load or solar input if operating in extreme ambient temperatures.
For persistent issues, please contact LiTime customer support.
8. Спецификације
Detailed technical specifications for the LiTime 60 Amp MPPT Solar Charge Controller.
| Параметар | Валуе |
|---|---|
| Бранд | Litime |
| Број модела | L48V-60A-MPPT-BT-US-2 |
| Називна струја пуњења | 60А |
| Називна струја оптерећења | 30А |
| Систем Волtage | 12V/24V/48V (LiFePO4), 12V/24V/36V/48V/Auto (Lead Acid) |
| Макс. ПВ Инпут Волtage | 150В |
| Max. Solar Panel System Input Power (12V) | 870В |
| Max. Solar Panel System Input Power (24V) | 1740В |
| Max. Solar Panel System Input Power (36V) | 2610В |
| Max. Solar Panel System Input Power (48V) | 3480В |
| Ефикасност праћења | ≥99% |
| Максимална ефикасност конверзије | до 96% |
| Дисплаи Типе | ЛЦД |
| Радна температура | До 50°Ц |
| Димензије производа (Д к Ш к В) | 6.57 к 2.76 к 8.66 инча (167 к 70 к 220 мм) |
| Тежина артикла | 3.75 фунте (1.7 кг) |
| Материјал | Челик |
| Боја | Црно |
9. Гаранција и подршка
LiTime provides professional technical support and customer service. If you have any questions or require assistance, please do not hesitate to contact us.
- техничка подршка: Available via phone or online services.
- Време одговора: Quick feedback within 24 hours.
- Контакт е-маил: сервице@литиме.цом
For warranty details, please refer to the warranty card included with your product or visit the official LiTime webсајту.