1. Увод
Хвала вам на куповиниasing the Singer SN777αIII Computerized Sewing Machine. This machine is designed for ease of use and versatility, offering 100 stitch patterns, including alphanumeric characters, to support a wide range of sewing projects. Please read this manual thoroughly before operating your machine to ensure safe and efficient use.

Image: The Singer SN777αIII sewing machine is available in white, pink, and a white and pink combination, allowing users to choose a color that suits their preference or room decor.
2. Подешавање
2.1 Распакивање и постављање
- Пажљиво извадите машину и сву додатну опрему из паковања.
- Поставите машину на стабилну, равну површину. Уверите се да има довољно простора око машине за удобан рад.
2.2 Прикључак за напајање
- Уверите се да је прекидач за напајање у положају „ИСКЉУЧЕНО“.
- Прикључите кабл за напајање на машину, а затим на одговарајућу електричну утичницу.
2.3 Намотавање шпулице
- Ставите калем конца на иглу калема.
- Follow the winding path indicated on the machine.
- Поставите празну шпулицу на вретено намотача шпулице и померите је удесно.
- Start winding by pressing the foot controller or start/stop button. Stop when the bobbin is full.
2.4 Увлачење горњег конца
- Подигните ручицу притискача.
- Follow the numbered threading path on the machine, ensuring the thread is correctly seated in all guides and the tension discs.
- Use the automatic needle threader for easy threading of the needle eye.
2.5 Setting the Lower Thread (Bobbin)
- Отворите поклопац бобина.
- Insert the wound bobbin into the bobbin case, ensuring the thread unwinds in the correct direction.
- Guide the bobbin thread through the tension spring and out the bobbin case opening.
- Close the bobbin cover. The easy bobbin setting feature allows you to start sewing without pulling up the bobbin thread manually.
2.6 Причвршћивање додатне опреме
- широки сто: Attach the wide table to the machine to expand your work area, especially useful for larger projects.
- Ножни контролер: Connect the foot controller to the designated port on the machine for hands-free speed control.
3. Упутство за употребу
3.1 Контролна табла прекоview
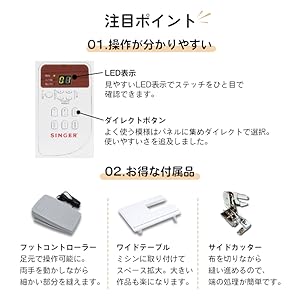
Image: The control panel features a clear LED display to show the selected stitch and direct buttons for frequently used patterns, simplifying operation.
- ЛЕД дисплеј: Shows the selected stitch pattern number and other relevant settings.
- Direct Buttons: Allows quick selection of commonly used stitch patterns.
- Дугмад за избор бода: Use these to navigate and select from the 100 available stitch patterns.
3.2 Selecting Stitch Patterns

Image: The machine offers 100 stitch patterns, including utility stitches, decorative stitches, buttonholes, satin stitches, cross stitches, patchwork quilt stitches, and alphanumeric characters (numbers and alphabets).
- Refer to the stitch chart on the machine or in the manual.
- Use the stitch selection buttons to choose the desired pattern. The selected pattern number will appear on the LED display.
- For alphanumeric stitches, select the corresponding pattern and then use the adjustment buttons to choose specific letters or numbers.
3.3 Основне операције шивења

Image: This illustration highlights key operational features such as hand-focused controls for start/stop, automatic buttonhole creation, the free arm for cylindrical sewing, stepless speed adjustment, drop feed for free-motion quilting, and the presser foot lifter button for smooth sewing over varying fabric thicknesses.
- Дугме Старт/Стоп: Press to start and stop sewing.
- Подешавање брзине: Use the slide control for stepless speed adjustment from low to high.
- Дугме за обрнути шав: Press and hold to sew in reverse for securing stitches.
- Дугме за подизање/спуштање игле: Positions the needle up or down.
- Presser Foot Lifter Button: Automatically keeps the presser foot horizontal, making it easy to start sewing thick fabrics.
3.4 посебних карактеристика
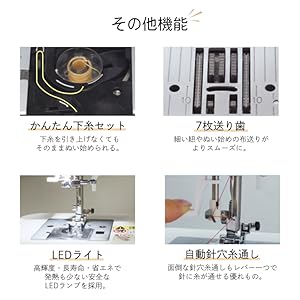
Image: This illustration details the easy bobbin setting for quick starts, the 7-point feed dog for smooth fabric feeding, the bright LED light for clear visibility, and the automatic needle threader for effortless threading.
- Аутоматски увлакач конца за иглу: A lever-operated system that threads the needle automatically.
- 7-Point Feed Dog: Ensures smooth and consistent fabric feeding, especially for delicate or thick materials.
- ЛЕД светло: Provides bright, long-lasting, and energy-efficient illumination of the sewing area.
- Слободна рука: Remove the accessory box to reveal the free arm, ideal for sewing cuffs, sleeves, and other cylindrical items.
- Fully Automatic Buttonhole: Simply set the button, and the machine automatically creates a perfectly sized buttonhole.
- Испуштање фида: Lower the feed dogs for free-motion quilting or darning.
4. Одржавање
4.1 Чишћење
- Увек искључите машину и искључите је из струје пре чишћења.
- Regularly clean lint and dust from the bobbin case area and under the needle plate using the brush provided.
- Обришите спољашњост машине меком, сувом крпом. Не користите јаке хемикалије.
4.2 Замена игле
- Искључите машину и искључите је.
- Отпустите иглу цлamp заврните и уклоните стару иглу.
- Insert a new needle with the flat side facing the back, pushing it up as far as it will go.
- Затегните иглу цлamp сигурно заврнути.
КСНУМКС. Решавање проблема
This section addresses common issues you might encounter. For problems not listed here, please consult the full instruction DVD or contact customer support.
| Проблем | Могући узрок | Решење |
|---|---|---|
| Машина се не покреће | Power cord not connected; Power switch off; Foot controller not connected. | Check power connections; Turn on power switch; Ensure foot controller is plugged in. |
| Прескочени шавови | Incorrect needle; Bent needle; Incorrect threading. | Use correct needle type for fabric; Replace bent needle; Re-thread machine carefully. |
| Нит се прекида | Incorrect tension; Poor quality thread; Improper threading; Needle bent or dull. | Adjust tension; Use good quality thread; Re-thread machine; Replace needle. |
| Тканина се не увлачи | Feed dogs lowered; Presser foot pressure too low. | Raise feed dogs; Adjust presser foot pressure. |
6. Спецификације

Image: The Singer SN777αIII machine's dimensions are 404mm width x 188mm depth x 298mm height, with a weight of 5.8 kg.
- Модел: SN777αIII
- Произвођач: Сингер
- Димензије (производ): 40.4 цм (ширина) x 18.8 цм (дубина) x 29.8 цм (висина)
- Тежина (производ): 5.8 кг
- Материјал: акрилонитрил бутадиен стирен (АБС)
- Узорци шавова: 100 types (including numbers and alphabets)
6.1 Укључена додатна опрема

Image: A comprehensive diagram illustrating all standard accessories, including various presser feet, bobbins, screwdrivers, a seam ripper, needle set, seam guide, spool caps, auxiliary spool pin, spool pin felt, soft cover, power cord, instruction manual, and instruction DVD.
- Зигзаг Фоот
- Зиппер Фоот
- Буттонхоле Фоот
- Нога за шивање дугмета
- Облачно стопало
- Стопало за слепи шав
- Сатен Ститцх Фоот
- Боббинс
- Triangular Screwdriver
- Мали одвијач
- Seam Ripper with Brush
- Неедле Сет
- Водич за шавове
- Поклопац шпулице (велики)
- Поклопац шпулице (мали)
- Помоћни клин за калем
- Филц за калем
- Софт Цовер
- Повер Цорд
- Упутство за употребу
- ДВД са упутствима
- Фоот Цонтроллер
- Виде Табле
- Бочни секач
7. Гаранција и подршка
For warranty information, please refer to the warranty card included with your product or contact your retailer. For technical support or service inquiries, please refer to the contact information provided in your purchase documentation or visit the official Singer webсајту.