
1. Производ је готовview
The Cuifati H310 LGA 1151 DDR4 Motherboard is designed to support 8th and 9th generation Intel Core processors. It features a Micro ATX form factor, dual-channel DDR4 memory support, and a range of expansion options including M.2 NVMe, PCIe slots, and multiple I/O ports for versatile connectivity.
Кључне карактеристике укључују:
- Wide CPU Compatibility: Supports 8th and 9th generation Intel Core processors (LGA 1151 socket).
- Dual Channel DDR4 Memory: Supports up to 32GB DDR4 RAM across two DIMM slots, with frequencies up to 2666MHz.
- Стабилно напајање: Features a three-phase power supply with solid capacitors and 24+8 pin power sockets for reliable operation.
- High-Speed H310 Chipset: Provides stable and efficient performance for various computing tasks.
- Интегрисана графика: Equipped with an integrated graphics processor and multiple display outputs (DVI, HDMI, VGA) for multi-monitor setups.
- Rich Expansion Ports: Includes SATA 6Gb/s, NVME M.2, PCIe X16, PCIe X1, USB 3.0, USB 2.0, PS/2, RJ45, and audio ports.

Слика 1: Одозго надоле view of the Cuifati H310 LGA 1151 DDR4 Motherboard, showing CPU socket, RAM slots, and various connectors.
2. Подешавање и инсталација
This section provides instructions for installing the Cuifati H310 motherboard and its components into a computer case.
2.1 Мере предострожности
- Увек искључите напајање из зидне утичнице пре инсталирања или уклањања било којих компоненти.
- Носите антистатичку наруквицу или често додирујте уземљени метални предмет како бисте спречили електростатичко пражњење (ESD).
- Држите матичну плочу за ивице како бисте избегли додиривање осетљивих компоненти.
2.2 Инсталација ЦПУ-а
- Пронађите LGA 1151 CPU сокет на матичној плочи.
- Пажљиво притисните ручицу за оптерећење надоле и повуците је у страну да бисте отворили поклопац процесорског сокета.
- Поравнајте троугласту ознаку на процесору са одговарајућом ознаком на подножју. Пажљиво поставите процесор у подножје без насиља.
- Close the socket cover and push the load lever back into place until it clicks.
- Нанесите термалну пасту на процесор и инсталирајте хладњак процесора према упутствима произвођача.
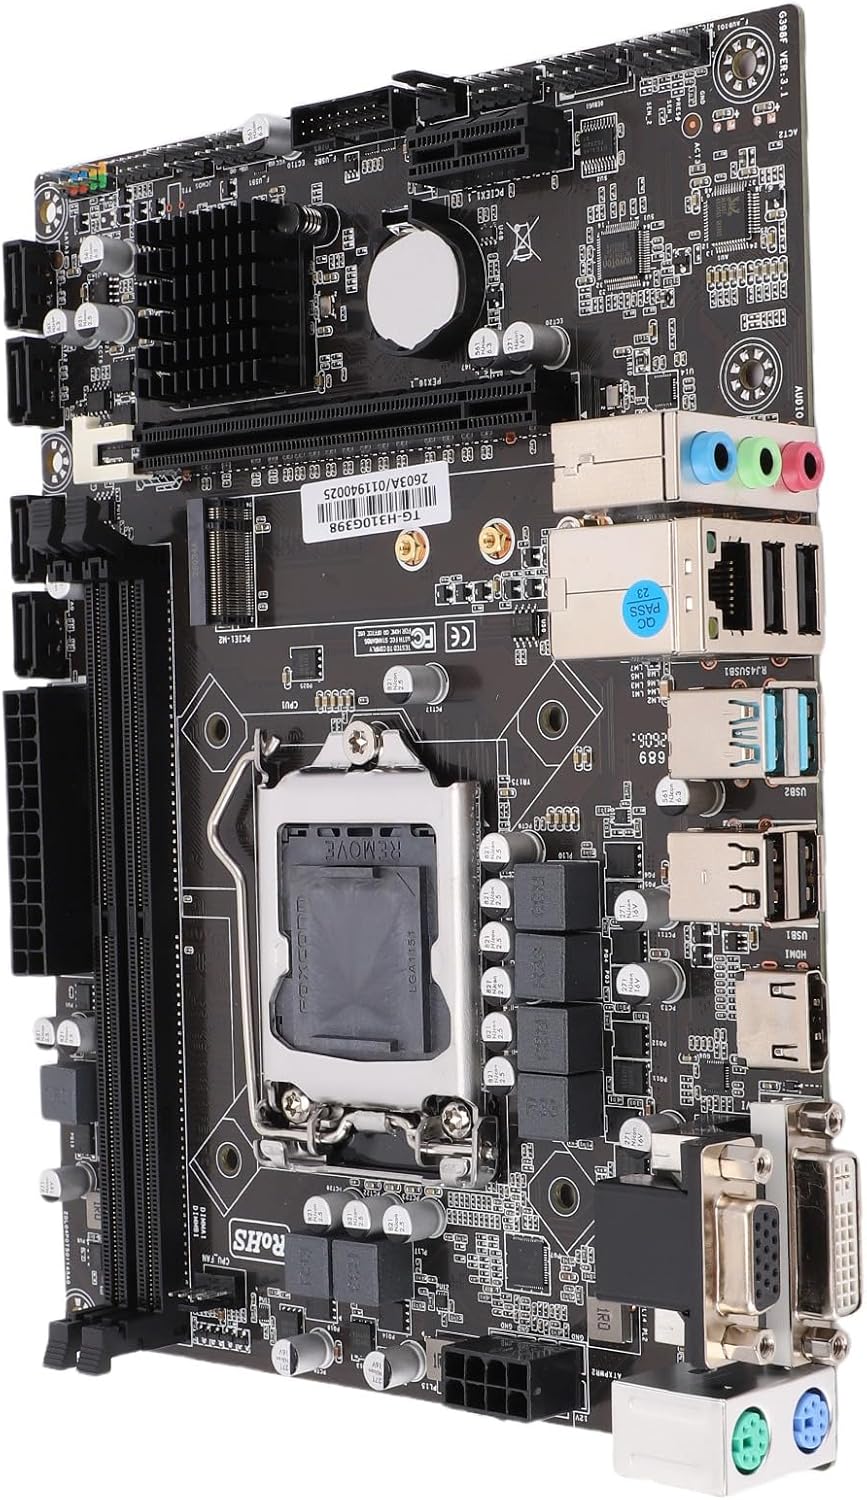
Слика 2: Под углом view of the motherboard, highlighting the LGA 1151 CPU socket and surrounding components.
2.3 Инсталација РАМ-а
- Отворите копче на оба краја DDR4 DIMM слотова.
- Поравнајте зарез на DDR4 меморијском модулу са кључем у DIMM слоту.
- Чврсто уметните меморијски модул у слот док се копче не залепе на своје место. Уверите се да су обе копче затворене.
- For dual-channel operation, install memory modules in matching slots as indicated in the motherboard manual (typically alternating slots).
2.4 Storage Device Installation (M.2 NVMe / SATA)
2.4.1 M.2 NVMe SSD
- Пронађите М.2 слот на матичној плочи.
- Уклоните завртањ за одстојање M.2 конектора.
- Insert the M.2 NVMe SSD into the slot at a 30-degree angle.
- Пажљиво притисните SSD и причврстите га завртњем за одстојање.
2.4.2 SATA Drives
- Повежите један крај SATA кабла за пренос података са SATA 6Gb/s портом на матичној плочи.
- Повежите други крај SATA кабла за пренос података са вашим SATA чврстим диском или SSD-ом.
- Повежите SATA кабл за напајање са јединице за напајање (PSU) на SATA диск.
2.5 Прикључци за напајање
- Connect the 24-pin ATX main power connector from your PSU to the corresponding socket on the motherboard.
- Connect the 8-pin ATX 12V CPU power connector from your PSU to the socket near the CPU.
2.6 Front Panel and I/O Connections
- Connect the front panel headers (Power LED, HDD LED, Power Switch, Reset Switch) to the designated pins on the motherboard. Refer to the motherboard's silkscreen labels for correct orientation.
- Connect USB 2.0 and USB 3.0 front panel headers.
- Повежите аудио прикључак на предњој плочи.
- Install the I/O shield into the computer case opening before installing the motherboard.

Figure 3: Rear I/O panel of the motherboard, showing ports for USB, DVI, VGA, HDMI, RJ45, and audio.
2.7 Инсталација картице за проширење (PCIe)
- Locate the PCIe X16 slot for a graphics card or other PCIe X1 slots for expansion cards.
- Уклоните одговарајући поклопац слота са кућишта рачунара.
- Align the expansion card with the slot and press it firmly until it is seated correctly.
- Причврстите картицу за кућиште завртњем.
3. Упутство за употребу
After successful installation, follow these steps for initial system operation.
3.1 Почетно укључивање
- Ensure all components are securely connected and the power supply is plugged into a wall outlet.
- Притисните дугме за напајање на кућишту рачунара.
- The system should power on, and you should see a display on your monitor.
3.2 Подешавање BIOS-а/UEFI-ја
- Током покретања, више пута притисните ДЕЛ or F2 key (common keys, may vary) to enter the BIOS/UEFI setup utility.
- In the BIOS/UEFI, you can configure boot order, system time, CPU settings, memory settings, and other hardware parameters.
- Save changes and exit to continue booting into your operating system installer or existing OS.
3.3 Инсталација драјвера
- After installing your operating system, install the necessary drivers for the motherboard chipset, integrated graphics, audio, and LAN.
- Drivers are typically provided on a support CD/DVD or can be downloaded from the manufacturer's webсајту.
4. Одржавање
Proper maintenance ensures the longevity and optimal performance of your motherboard and system.
4.1 Чишћење
- Редовно чистите прашину из унутрашњости кућишта рачунара, посебно око вентилатора и хладњака, користећи компримовани ваздух.
- Уверите се да је систем искључен и искључен из струје пре чишћења.
- Избегавајте употребу течних средстава за чишћење директно на компонентама.
4.2 Ажурирања BIOS-а/UEFI-ја
- Проверите произвођача website periodically for BIOS/UEFI updates.
- Updates can improve compatibility, stability, and performance.
- Follow the update instructions carefully to avoid system damage.
КСНУМКС. Решавање проблема
Овај одељак се бави уобичајеним проблемима на које можете наићи и нуди могућа решења.
5.1 No Power / System Does Not Turn On
- Проверите прикључке за напајање: Уверите се да су 24-пински ATX и 8-пински CPU конектори за напајање безбедно причвршћени.
- Напајање: Verify the PSU switch is in the 'ON' position and the power cable is firmly connected to both the PSU and the wall outlet.
- Заглавља на предњем панелу: Confirm the power switch header is correctly connected to the motherboard.
5.2 No Display on Monitor (No POST)
- Веза монитора: Ensure the monitor is connected to the correct display output (DVI, HDMI, or VGA) on the motherboard or graphics card and is powered on.
- РАМ: Reseat the RAM modules. Try booting with only one RAM module installed.
- ЦПУ: Verify the CPU is correctly installed and the CPU cooler is properly seated.
- графичка картица: If using a dedicated graphics card, ensure it is properly seated in the PCIe slot and has adequate power. Try removing it and using the integrated graphics.
5.3 Периферни уређај није детектован
- Проверите везе: Ensure the peripheral (e.g., USB device, SATA drive) is correctly connected.
- Возачи: Install or update the necessary drivers for the peripheral.
- Подешавања BIOS-а/UEFI-ја: Check if the port or device is enabled in the BIOS/UEFI settings.
6. Спецификације
Detailed technical specifications for the Cuifati H310 LGA 1151 DDR4 Motherboard.
| Феатуре | Детаљ |
|---|---|
| Назив модела | H310 LGA 1151 DDR4 |
| Произвођач | Цуифати |
| ЦПУ Соцкет | ЛГА 1151 |
| Компатибилни процесори | 8th and 9th Generation Intel Core Processors (e.g., Intel Core i7-8700K, Intel Core i9-9900K) |
| Чипсет | Интел Х310 |
| Технологија меморије | DDR4 двоканална |
| меморијска слота | 2 к ДИММ слотова |
| Максимални капацитет РАМ-а | 32 ГБ (2 к 16 ГБ) |
| Брзина меморије | 2133 МХз, 2400 МХз, 2666 МХз |
| Графички интерфејс | Integrated, PCI-Express x16 |
| Дисплаи Оутпутс | 1 x VGA, 1 x DVI, 1 x HDMI |
| Слотови за проширење | 1 x PCI Express X16, 1 x PCI Express X1 |
| Портови за складиштење | 4 x SATA 6Gb/s, 1 x NVME M.2 connector |
| УСБ портови | 2 x USB 3.0 (rear), 4 x USB 2.0 (rear), 1 x USB 3.0 header (supports 2 ports), 1 x USB 2.0 header (supports 2 ports) |
| ЛАН | Realtek 100/1000 Mbps Ethernet |
| Аудио | Реалтек АЛЦ662 6-канални ХД аудио |
| Конектор за напајање | 24+8 Pin ATX Power |
| Форм Фацтор | Micro ATX (Approx. 21.5 x 17 cm / 8.5 x 6.7 inches) |
| Батерија | CR2032 (integrated) |
7. Информације о гаранцији
The Cuifati H310 LGA 1151 DDR4 Motherboard comes with a Једногодишња гаранција против производних недостатакаОва гаранција покрива недостатке у материјалу и изради при нормалној употреби током гарантног периода.
Гаранција не покрива:
- Штета узрокована несрећом, злоупотребом, злоупотребом, поплавом, пожаром, земљотресом или другим спољним узроцима.
- Damage caused by operating the product outside the permitted or intended uses described by Cuifati.
- Damage caused by service (including upgrades and expansions) performed by anyone who is not a representative of Cuifati or an authorized Cuifati Service Provider.
- Products or parts that have been modified to alter functionality or capability without the written permission of Cuifati.
For warranty claims, please contact Cuifati customer support with your proof of purchase.
8. Корисничка подршка
If you encounter any issues not covered in this manual or require further assistance, please contact Cuifati customer support.
- Подршка на мрежи: Visit the official Cuifati webсајт за често постављана питања, преузимање драјвера и ресурсе за подршку.
- Контакт информације: Refer to your product packaging or the Cuifati webсајт за најновије контакт информације.
When contacting support, please have your product model (H310 LGA 1151 DDR4) and purchase information ready.