
Увод
The RunCam Spotter V2 Micro FPV AIO Camera is a compact, all-in-one camera and video transmitter designed for various RC applications, including RC cars, boats, drones, and planes. It features a 700TVL camera with a 170-degree field of view, an integrated microphone, and an On-Screen Display (OSD) for real-time data. The 5.8G video transmitter offers adjustable power output from 20mW to 200mW across 40 channels, ensuring compatibility with standard FPV goggles and monitors.
Садржај пакета
- 1x Spotter V2 Micro FPV AIO Camera (with Cloverleaf antenna)
- 1x XT-60 Power Cable
- 1x Double Sided Tape (one side Velcro)
- 1x Spare Whip Antenna
- 1x Упутство за употребу (овај документ)
Производ је завршенview
The Spotter V2 is designed for minimal impact on device performance due to its lightweight and compact form factor. It provides an expansive field of view for an immersive FPV experience.
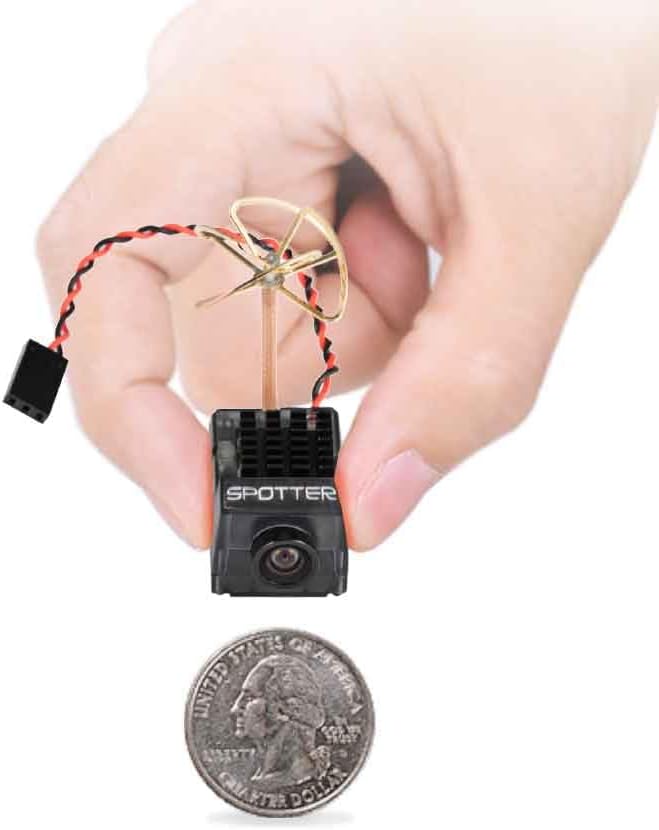
Image: The RunCam Spotter V2 FPV Camera, demonstrating its compact size and lightweight design, weighing only 9g.

Image: Illustration of the 170-degree wide-angle lens, providing an expansive field of view for enhanced detail in FPV applications.

Image: Detailed dimensions of the Spotter V2 camera, measuring 35x20.5x17.8mm (excluding antenna).
Сетуп
- Прикључак за напајање: Connect the provided XT-60 power cable to the camera and your power source (2S-4S LiPo battery, 7.4V-14.8V). Ensure correct polarity.
- Инсталација антене: The camera comes with a pre-installed Cloverleaf antenna. A spare Whip Antenna is included for replacement if needed. Ensure the antenna is securely attached.
- Монтажа: Use the double-sided tape (one side Velcro) to securely mount the camera on your RC vehicle. Position the camera to achieve the desired field of view.
- Хлађење: Due to potential heat generation, especially in enclosed spaces, ensure adequate airflow around the camera's heatsink. Consider adding a small cooling fan if mounting inside an RC vehicle without natural ventilation.
- FPV Receiver Connection: The Spotter V2 is compatible with all analog 5.8G FPV goggles and monitors. Refer to your FPV receiver's manual for pairing instructions.

Image: The Spotter V2 camera is broadly compatible with analog FPV goggles and monitors.
Упутство за употребу
- Укључено: Connect the camera to a compatible power source. The camera will power on automatically.
- Избор канала и опсега: The camera features 5 bands and 40 channels. Use the button on the camera to cycle through channels and bands. Refer to the detailed frequency table (usually provided in a separate quick start guide or on the product page) to match your FPV receiver.
- Приказ на екрану (ОСД): The integrated OSD provides real-time flight data, such as battery voltage and channel information. This data is overlaid on the video feed.
- Интегрисани микрофон: The built-in microphone captures audio, enhancing the immersive FPV experience.
- Видео пренос: Once powered on and a channel is selected, the camera will transmit video. Ensure your FPV goggles or monitor are tuned to the same frequency.

Image: The camera's button for frequency adjustment and its heatsink for thermal management.
Одржавање
- Чишћење: Keep the camera lens clean using a soft, dry cloth. Avoid abrasive materials or harsh chemicals.
- Управљање топлотом: Regularly inspect the heatsink for dust or debris. Ensure consistent airflow to prevent overheating, which can degrade video quality and shorten component lifespan.
- Брига о антени: Handle the antenna carefully. If the Cloverleaf antenna is damaged, it can be replaced with the spare Whip Antenna by soldering.
- Складиштење: Store the camera in a dry, cool environment away from direct sunlight and extreme temperatures.
Решавање проблема
| Проблем | Могући узрок | Решење |
|---|---|---|
| Distorted or No Video Signal |
|
|
| Camera Gets Excessively Hot |
|
|
| Нема звука |
|
|
Спецификације
| Феатуре | Детаљ |
|---|---|
| Камера | 700 TVL, 170-degree wide-angle lens |
| Резолуција | 1280*960 |
| Резолуција видео излаза | 720 пиксела |
| Default Video Input | ПАЛ |
| Видео пренос | 5.8G, 40CH, 20mW~200mW adjustable |
| Максимална даљина преноса | 500 meters / 547 yards |
| Инпут Повер | 2S-4S (7.4V~14.8V) |
| Антена | Cloverleaf and Whip antenna (interchangeable) |
| Подешавање фреквенције | Притисните дугме |
| Карактеристике | Built-in OSD, Integrated Microphone |
| Минимално осветљење | 0.5 ЛУКС |
| Оператинг Цуррент | 80мА |
| Димензије (Д*Ш*В) | 35*20.5*17.8mm (Antenna not included) |
| Укупна тежина | 9g |
| Материјал | Пластика |
| Ниво вештине | Бегиннер |
Гаранција
The RunCam Spotter V2 FPV Camera and Transmitter Kit typically comes with a 1-year limited warranty. For specific warranty terms, conditions, and claim procedures, please refer to the official RunCam webсајт или директно контактирајте њихову корисничку подршку. Сачувајте доказ о куповини ради потврде гаранције.
Подршка
For further assistance, technical support, or inquiries regarding the RunCam Spotter V2, please visit the official RunCam website or contact their customer service department. Online resources, FAQs, and firmware updates may also be available on their webсајту.
Official RunCam Store: Visit the RunCam Store on Amazon