
OMTech SH-G570
OMTech 100W CO2 Laser Engraver (Model SH-G570) Instruction Manual
Свеобухватни водич за подешавање, рад и одржавање.
1. Увод
This manual provides essential information for the safe and efficient operation of your OMTech 100W CO2 Laser Engraver, Model SH-G570. Please read this manual thoroughly before operating the machine to ensure proper usage and to prevent damage or injury.
The OMTech 100W CO2 Laser Engraver is designed for precision cutting and engraving of various non-metallic materials such as acrylic, wood, and glass. It features a 20x28 inch work area, 4-way pass-through, integrated air assist, and a water pump for cooling.
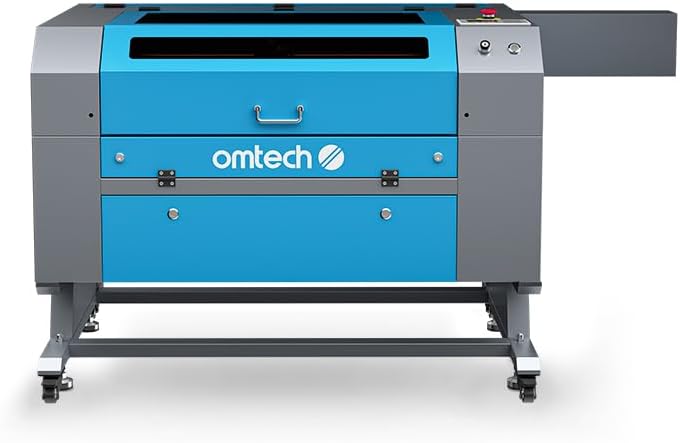
Слика 1.1: Предња страна view of the OMTech 100W CO2 Laser Engraver.
2. Безбедносне информације
Operating a laser engraver involves inherent risks. Adhere to all safety precautions to prevent accidents and ensure safe operation.
- Ласерско зрачење: This is a Class 2 laser product with 0.827 mW output power. Never look directly into the laser beam or its reflection. Always use appropriate laser safety eyewear.
- вентилација: Ensure adequate ventilation to remove smoke and fumes generated during laser processing. The integrated air assist system helps, but additional room ventilation may be required.
- Опасност од пожара: Certain materials can ignite during laser processing. Never leave the machine unattended during operation. Keep a fire extinguisher nearby.
- електрична безбедност: Уверите се да је машина правилно уземљена. Немојте руковати мокрим рукама или уamp услови. Искључите напајање пре него што извршите било какво одржавање.
- Систем за хлађење: The water pump maintains the laser tube's temperature. Ensure the water level is adequate and the pump is functioning correctly before operation.
- Viewинг Виндов: The flame-retardant viewing window allows for safe observation of the engraving process.
- Хитно заустављање: Упознајте се са положајем и радом дугмета за хитно заустављање.
- Заштита лозинком: Utilize the machine's password protection feature to prevent unauthorized use.

Image 2.1: The flame-retardant viewing window allows for safe observation of the engraving process.
3. Подешавање
3.1 Распакивање и постављање
- Carefully remove the laser engraver from its packaging.
- Place the machine on a stable, level surface capable of supporting its weight (251 lb). Ensure sufficient space around the machine for ventilation and access.
- Install the included wheels for mobility, if desired.
3.2 Повезивање компоненти
- Прикључак за напајање: Connect the power cable to a grounded electrical outlet.
- пумпа за воду: Connect the water pump to the laser cooling system as per the diagram provided in the quick start guide. Ensure the water reservoir is filled with distilled water.
- Ваздушна помоћ: Connect the air assist hose. This system helps clear debris and smoke from the engraving area.
- Издувни систем: Connect the exhaust fan and ducts to properly vent fumes outside.
- Везу за пренос података: Connect the machine to your computer using a USB cable or Ethernet cable. Alternatively, use a USB flash drive for offline operation.

Слика 3.1: Готовоview of included components for setup, such as the exhaust system and cables.
4. Упутство за употребу
4.1 Powering On and Initial Checks
- Ensure all connections are secure and the water pump is running.
- Укључите главни прекидач за напајање.
- The control panel will illuminate. Enter your password if prompted.
4.2 Постављање и фокусирање материјала
- Place your material on the honeycomb workbed.
- For this manual focus model, adjust the workbed height or laser head manually to achieve the optimal focal distance. Refer to the quick start guide for specific instructions on manual focusing.
- Utilize the 4-way pass-through doors for oversized materials. The front-rear pass-through supports materials up to 31.5" x 3.94", and left-right supports up to 19.69" x 0.79".

Image 4.1: Laser head positioned over material on the honeycomb workbed.
4.3 Software and Job Preparation
The OMTech 100W CO2 Laser Engraver is compatible with various software, including LightBurn, CorelDRAW, and AutoCAD. Prepare your design file in your preferred software.
- Import your design into the laser control software.
- Set appropriate power and speed settings for your material. The machine supports engraving speeds up to 600 mm/s.
- Use the "Frame" function on the control panel to preview the job area and ensure correct material placement.

Image 4.2: The machine's control panel for operation and settings.
4.4 Starting the Engraving/Cutting Process
- Once settings are confirmed, send the job to the laser engraver.
- Press the "Start/Pause" button on the control panel to begin the process.
- Monitor the process through the flame-retardant viewинг виндов.
- In case of an emergency, press the emergency stop button immediately.

Image 4.3: The laser engraver actively processing a design on wood.
5. Одржавање
Regular maintenance ensures optimal performance and extends the lifespan of your laser engraver.
- Чишћење оптике: Regularly clean the laser lenses and mirrors to maintain engraving quality. Refer to the detailed cleaning instructions in the full manual.
- Систем за хлађење водом: Check and maintain the water level in the cooling system. Replace the water periodically (e.g., every 1-2 months) with distilled water to prevent algae growth and mineral buildup.
- Workbed Cleaning: Clean the honeycomb workbed regularly to remove debris and residue. The anti-scorch plate can be removed for easier cleaning.
- Air Assist Nozzle: Ensure the air assist nozzle is clear of obstructions to maintain effective smoke and debris removal.
- подмазивање: Periodically lubricate the guide rails and moving parts as recommended in the full manual.

Image 5.1: Detail of the laser head and air assist nozzle, which requires regular cleaning.
КСНУМКС. Решавање проблема
Овај одељак се бави уобичајеним проблемима на које можете наићи током рада.
| Проблем | Могући узрок | Решење |
|---|---|---|
| Нема ласерског излаза | Power not connected, emergency stop engaged, water flow error, laser tube failure. | Check power, release emergency stop, verify water pump operation and flow, contact support if laser tube is suspected. |
| Лош квалитет гравирања | Incorrect focus, dirty optics, wrong power/speed settings, material issues. | Adjust focus, clean lenses/mirrors, optimize power/speed settings for material, ensure material is flat. |
| Машина се не повезује са рачунаром | Loose USB/Ethernet cable, driver issues, software configuration. | Check cable connections, reinstall drivers, verify software communication settings. |
| Упозорење о прегревању | Insufficient water flow, high ambient temperature, faulty water pump. | Check water level, ensure water pump is running, clean cooling system, operate in a cooler environment. |
For more detailed troubleshooting, refer to the complete user manual or contact OMTech customer support.
7. Спецификације
- Модел: СХ-Г570
- Снага ласера: 100В ЦО2
- Радна област: 20" x 28" (508 mm x 711 mm)
- Максимална брзина гравирања: 600 мм/с
- Max. Cutting Thickness (Acrylic): Up to 0.98" (25mm)
- Max. Cutting Thickness (Wood): Up to 0.59" (15mm)
- Pass-Through (Front-Rear): 31.5 cm x 3.94 cm
- Pass-Through (Left-Right): 19.69 cm x 0.79 cm
- Димензије машине: 64.96" x 34.25" x 36.61" (165 цм x 87 цм x 93 цм)
- Тежина артикла: 251 фунти (113.8 кг)
- Класа ласера: 2
- Излазна снага: 0.827 мВ
- Пренос података: USB Cable, Ethernet Cable, USB Flash Drive (Offline)
- Хлађење: Водена пумпа
- Ваздушна помоћ: Интегрисано

Image 7.1: Visual representation of the machine's key specifications.
8. Гаранција и подршка
OMTech provides comprehensive customer service and support for your laser engraver.
- гаранција: The product comes with 2 years of comprehensive support.
- Служба за кориснике: A 24-hour support team is available across the U.S., the Philippines, and China.
- техничка подршка: Professional pre-sales and after-sales service, along with technical support, are provided.
- Demo Room Program: Over 60 demo room hosts are available in the U.S. for on-site experiences by appointment.
For assistance, please refer to the contact information provided with your product or visit the official OMTech webсајту.

Image 8.1: Map illustrating the widespread availability of OMTech demo rooms for customer support.
Ask a question about this manual
Ask about setup, troubleshooting, compatibility, parts, safety, or missing instructions. Manuals+ will review the question and use this page’s manual context to help answer it.